MIG welding is one of the most popular ways to join metal. This technique is fast, clean, and easy to learn. But if you want strong, neat welds, you need more than basic skills. Many beginners struggle with their welds cracking, looking messy, or failing stress tests. The truth is, the best MIG welding technique combines careful setup, steady hand control, and knowing how to adjust your machine for different metals. Whether you’re starting out or want to improve your results, understanding these details can make a big difference.
What Is Mig Welding?
MIG stands for Metal Inert Gas welding, also known as Gas Metal Arc Welding (GMAW). In MIG welding, a wire electrode feeds through a gun, and an electric arc melts the wire and the metal surface. The melted wire joins the metal pieces together. The process uses a shielding gas, usually argon or a mix of argon and CO₂, to protect the weld from contamination.
MIG welding is used in car repair, construction, and manufacturing. It works well for steel, stainless steel, and aluminum. Compared to other methods, it is quicker and produces less splatter.
Choosing The Right Mig Welding Equipment
Before you start welding, picking the right equipment is essential. The machine, wire, and gas you choose affect your weld quality.
Mig Welding Machine
There are two main types of MIG machines:
| Type | Best For | Power Range | Portability |
|---|---|---|---|
| Transformer | Heavy-duty work | Up to 600A | Low |
| Inverter | Home & small shops | Up to 250A | High |
Inverter machines are lighter and use less power, making them popular for beginners.
Wire Selection
The wire must match your metal. For mild steel, use ER70S-6 wire. For aluminum, choose ER4043 or ER5356. Wire thickness is important:
- 0.023″ – light sheets, auto body
- 0.030″ – general repair, home projects
- 0.035″ – thicker metal, structural work
Shielding Gas
Shielding gas protects your weld from oxygen and moisture. The most common mixes are:
- 100% CO₂ – cheap, deep penetration, more splatter
- 75% Argon / 25% CO₂ – cleaner welds, less splatter
- 100% Argon – needed for aluminum
Choosing the right gas improves the weld’s look and strength.

Credit: www.perfectwelders.com
Preparing For Mig Welding
Preparation sets the stage for good results. Skipping these steps can cause weak welds or defects.
Clean The Metal
Dirt, rust, paint, and oil block the arc and contaminate the weld. Always clean the surface with a wire brush or grinder.
Fit-up And Clamping
Metal pieces must fit tightly together. Gaps make welding harder and can cause holes. Use clamps to hold parts steady.
Machine Settings
Set your machine’s voltage, wire speed, and gas flow. Here’s a quick reference:
| Material Thickness | Voltage (V) | Wire Speed (IPM) | Gas Flow (CFH) |
|---|---|---|---|
| 1/8 inch | 18-20 | 200-300 | 20-25 |
| 1/4 inch | 22-24 | 250-350 | 25-30 |
| Aluminum (1/8 inch) | 20-22 | 250-350 | 30-35 |
Always check your machine manual for the best settings. Doing a test weld on scrap metal helps you fine-tune.
The Best Mig Welding Technique
Knowing the equipment is just the start. The real secret lies in your hands and eyes.
Gun Angle And Position
Hold the welding gun at a 10-15° angle from vertical, pointing in the direction you want to weld. This is called the push technique. For thicker metal, the pull technique can give deeper penetration.
- Push technique: Produces flatter, cleaner welds.
- Pull technique: Makes deeper, stronger welds for thick metal.
Keep the gun’s tip ¼ inch from the metal. Too far, and the arc becomes unstable.
Travel Speed
Moving the gun too fast leaves weak, thin welds. Too slow causes too much build-up and may burn through the metal. Aim for a steady speed so the weld bead is about ⅜ inch wide for most jobs.
Wire Feed And Arc Length
Listen for a steady “hissing” sound. If you hear popping, your wire speed is too high. If the arc cuts out, it’s too low. Keep the wire tip just off the surface, not touching.
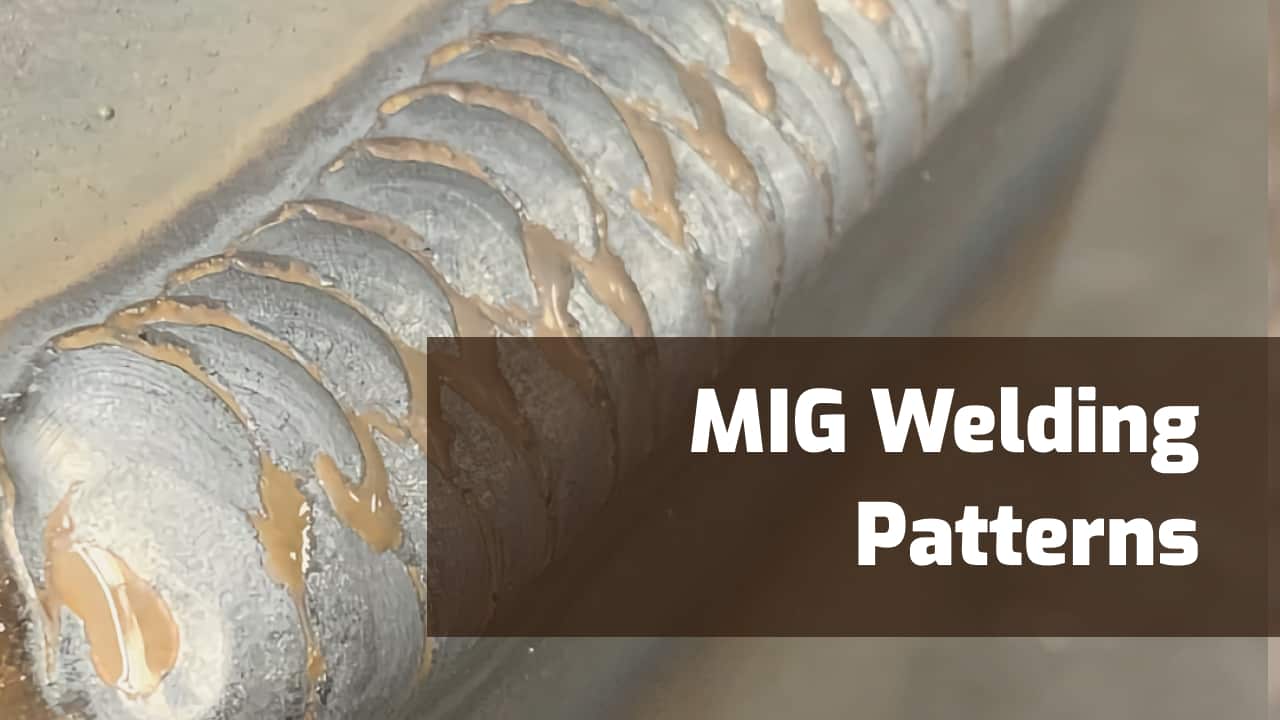
Welding Pattern
For thin metal, a straight line is enough. For thicker pieces, use small circles or zigzag motions. This spreads heat and fills gaps.
Watching The Weld Pool
Focus on the weld pool—the melted area behind the arc. It should be bright, round, and move evenly. Beginners often look at the arc, but watching the pool helps you control the bead.
Common Mistakes And How To Fix Them
Even experienced welders make mistakes. Here are some problems and solutions:
- Porosity: Small holes in the weld. Usually from dirty metal or poor gas coverage. Clean surfaces and check gas flow.
- Undercut: A groove at the weld edge. Caused by too much heat or moving too fast. Slow down and lower voltage.
- Excessive Spatter: Metal drops around the weld. Often from wrong gas or wire speed. Adjust settings and use the right gas mix.
- Weak Penetration: Weld doesn’t go deep enough. Increase voltage or wire speed.
- Burn-through: Hole in the metal. Too much heat or staying in one spot too long. Move faster or lower the settings.
Many beginners forget to check for these defects. Regularly inspect your welds and practice fixing issues on scrap metal.
Practical Tips For Better Mig Welding
You can improve your MIG welding with these practical tips:
- Warm up the wire with a short burst before the main weld.
- Keep your welding gun clean; replace tips regularly.
- Practice on scrap metal before working on your project.
- Use both hands for better control; rest your hand on the workpiece.
- Keep your helmet lens clean for a clear view.
- For aluminum, use a spool gun to prevent tangling.
A non-obvious insight: Many beginners ignore the importance of wire tension. If the wire feed is too loose or tight, the arc becomes unstable. Adjust tension until the wire feeds smoothly, especially when switching wire sizes.
Another overlooked point: Ambient airflow can blow away shielding gas. Even a small fan or breeze can cause porosity. Weld in a sheltered area, or use wind screens if you work outside.

Credit: www.youtube.com
Comparing Mig Welding With Other Techniques
It helps to see how MIG welding stacks up against other common methods.
| Method | Ease of Use | Speed | Metal Types | Finish Quality |
|---|---|---|---|---|
| MIG | Easy | Fast | Steel, aluminum, stainless | Clean |
| TIG | Difficult | Slow | All metals | Very clean |
| Stick | Moderate | Medium | Steel, cast iron | Rough |
MIG welding is the best choice for beginners and fast work. TIG welding gives the cleanest finish but needs more skill.
Safety Considerations
MIG welding creates bright light, heat, and fumes. Always wear:
- Auto-darkening helmet (shade 10–13)
- Flame-resistant gloves
- Long-sleeve shirt
- Closed-toe shoes
- Respirator for indoor work
Never weld near flammable materials or in wet conditions.
Real-world Example: Repairing A Car Panel
Let’s see the MIG welding technique in action. Imagine you need to fix a rusted car panel.
- Clean the rust and paint with a grinder.
- Clamp the new metal piece in place.
- Set machine to 18V, 200 IPM, 75/25 gas.
- Hold gun at 10° angle, push technique.
- Tack weld corners to hold.
- Weld in short bursts to avoid heat warping.
- Grind welds flat for a smooth finish.
This method produces a strong, neat repair. Many car shops use MIG welding for this reason.
Frequently Asked Questions
What Is The Best Mig Wire For Beginners?
ER70S-6 is the best wire for most beginners. It works for mild steel, is easy to feed, and produces clean welds.
Can I Mig Weld Aluminum?
Yes, you can. Use 100% argon gas and a spool gun for best results. Aluminum melts faster, so practice on scrap pieces first.
How Do I Fix Weld Porosity?
Clean the metal, check your gas flow (20–30 CFH), and weld in a sheltered area. Porosity is often caused by dirt or air mixing with the weld.
Should I Push Or Pull The Mig Gun?
For thin metal and clean welds, use the push technique. For thick metal and deeper penetration, use the pull technique.
Where Can I Find Official Mig Welding Guides?
A good source is the Lincoln Electric Education Center. They offer tutorials and tips for all skill levels.
MIG welding is a skill anyone can learn with the right technique. Focus on your setup, watch your weld pool, and practice regularly. By following these tips, you’ll create strong, neat welds and avoid common mistakes. Remember: preparation, steady hands, and smart adjustments are the keys to success.
Credit: weldguru.com