Green corrosion on metal usually indicates oxidation caused by moisture, chemical exposure, or galvanic reactions between dissimilar metals.
Understanding How to Remove Green Corrosion from Metal is important because corrosion buildup can weaken surfaces, contaminate weld zones, interfere with electrical conductivity, and prevent proper coating or finishing.
If corrosion is left untreated, it can spread beneath the surface, leading to pitting, reduced structural strength, and adhesion failure when paint, plating, or sealants are applied. In fabrication and repair work, welding or bonding over contaminated metal often results in porosity, poor arc stability, and weak joints.
Effective corrosion removal requires more than simple cleaning. The process involves breaking down the oxidation layer, restoring the metal surface, and preventing the corrosion from returning.
I’ll explain practical removal methods, surface preparation techniques, and preventive steps that help restore metal condition and maintain long-term durability.
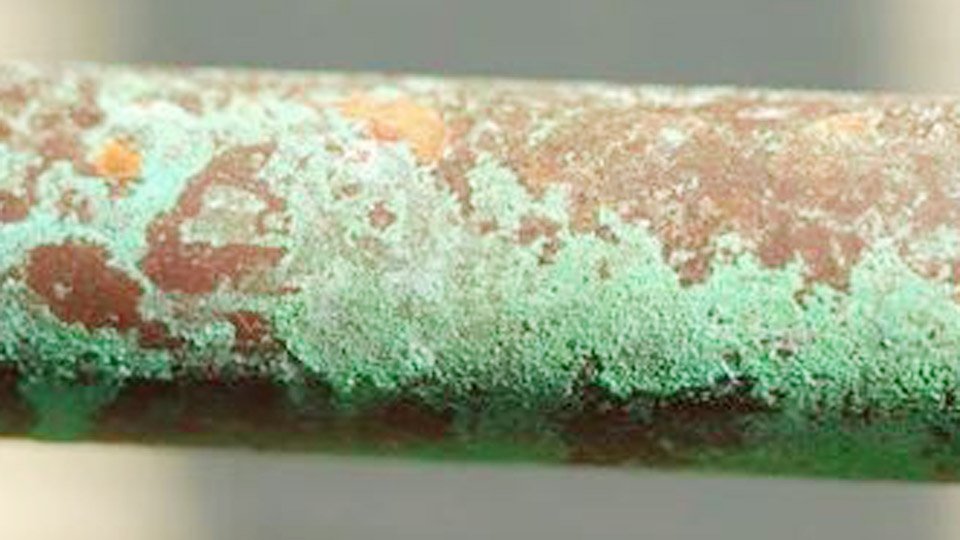
Photo aviator-sunglasses
Understanding Green Corrosion Formation
Green corrosion primarily affects copper-based alloys due to their reactivity. The process begins with the oxidation of copper to cuprous oxide (Cu2O), a reddish layer, which further reacts with carbon dioxide and water to form basic copper carbonate (Cu2(OH)2CO3), the green patina.
This reaction accelerates in humid environments or with exposure to chlorides, such as in coastal areas or industrial settings.
Quantitatively, the corrosion rate for unprotected copper can reach 0.5–1.5 micrometers per year in urban atmospheres, per ASTM standards, leading to surface buildup that interferes with welding.
In welding contexts, this corrosion disrupts electrical conductivity during processes like TIG or MIG on copper alloys. It also absorbs heat unevenly, causing inconsistent arc behavior and potential spatter. For instance, on brass fittings, the zinc content can exacerbate dezincification, where zinc leaches out, leaving a porous copper-rich surface prone to further green buildup.
Identifying the alloy type—such as C110 copper (99.9% Cu) versus C360 brass (61% Cu, 3% Pb)—is essential, as removal methods vary to avoid damaging the base metal.
Technically, the patina’s thickness influences removal difficulty. Thin layers (under 10 microns) respond well to mild abrasives, while thicker deposits (over 50 microns) may require chemical intervention. pH levels play a role; the carbonate is stable in neutral to slightly alkaline conditions but dissolves in acids below pH 5.
Impacts of Green Corrosion on Welding Performance
Untreated green corrosion directly compromises weld quality. During arc welding, the patina acts as an insulator, increasing resistance and requiring higher amperage—typically 10–20% more—to initiate the arc. This can lead to overheating, distortion, or burn-through on thin sections (under 1/8 inch).
In MIG welding with copper alloys, corrosion particles can contaminate the filler wire, causing inclusions that reduce tensile strength by up to 15%, based on AWS testing protocols.
Porosity is another critical issue. The carbonate decomposes under heat, releasing CO2 gas that gets trapped in the weld pool, forming voids.
For example, in a lap joint on corroded brass, porosity rates can exceed 5% without preparation, versus under 1% on clean surfaces. Penetration depth suffers too; corrosion barriers limit fusion, resulting in shallow welds with poor root reinforcement.
For shop technicians, this translates to rework costs. In a typical U.S. fabrication shop, addressing corrosion-related defects can add 20–30 minutes per joint, impacting efficiency. On stainless steel hybrids with copper overlays, green corrosion can promote galvanic coupling, accelerating further degradation if not removed promptly.
Diagnostic Steps to Identify Green Corrosion
Accurate diagnosis ensures the right removal approach. Visually, green corrosion presents as a powdery or flaky turquoise layer, distinct from rust (Fe2O3, reddish-brown) or aluminum oxide (white). Test by scraping: verdigris powders easily, unlike adherent scales on nickel alloys.
Use a multimeter to check conductivity; corroded copper surfaces show resistance spikes over 0.5 ohms compared to clean metal’s near-zero. For precise assessment, employ a profilometer to measure surface roughness—corroded areas often exceed Ra 3.2 microns, versus the ideal Ra 0.8 for welding prep.
Chemical testing involves applying a dilute acid (5% acetic) drop; effervescence indicates carbonate presence. In lab settings, X-ray diffraction confirms Cu2(OH)2CO3 peaks. For welders, these diagnostics prevent misapplication of methods, such as using alkaline cleaners on acid-sensitive alloys.
Mechanical Removal Methods
Mechanical techniques offer control and minimal chemical residue, ideal for welding prep. Start with wire brushing using stainless steel bristles (0.006–0.010 inch diameter) at 3,000–5,000 RPM on an angle grinder. This removes loose patina without gouging, achieving a surface finish suitable for welding—aim for 80–120 grit equivalent.
For thicker layers, abrasive blasting with aluminum oxide media (60–80 mesh) at 60–80 PSI effectively strips corrosion. Blast angle should be 45–60 degrees to avoid embedding particles, which could cause inclusions. Post-blasting, inspect for pitting; depths over 0.005 inches may require filler.
Sanding with silicon carbide paper (progress from 80 to 220 grit) is suitable for flat surfaces. Use wet sanding to reduce dust and heat, preventing work-hardening on soft copper. Travel speed: 10–15 inches per minute to avoid overheating.
Pros: No chemical disposal issues. Cons: Dust generation requires N95 masks and ventilation per OSHA 1910.134. For 1/4-inch copper plate, mechanical removal takes 5–10 minutes per square foot.
Chemical Removal Methods
Chemical approaches dissolve the carbonate efficiently for intricate parts. Acetic acid solutions (5–10% vinegar) neutralize the patina: Cu2(OH)2CO3 + 2CH3COOH → 2Cu(CH3COO) + H2O + CO2 + H2O. Soak for 10–30 minutes, then rinse thoroughly to prevent residue that could flux during welding.
Commercial removers like phosphoric acid-based gels (10–15% concentration) provide targeted application. Apply with a brush, agitate for 5 minutes, and neutralize with baking soda solution (pH 8–9). These are effective on brass, removing zinc oxides alongside copper patina.
For heavy corrosion, use chelating agents like EDTA (0.1 M solution) at pH 4–5, which binds copper ions without aggressive etching. Exposure time: 15–45 minutes, followed by deionized water rinse to avoid water spots.
Safety: Use nitrile gloves and eye protection; acids can evolve gases. In welding shops, ensure no cross-contamination with alkaline fluxes. Chemical methods suit vertical positions where mechanical access is limited.
Electrolytic Removal Techniques
Electrolytic cleaning leverages electrochemical reactions for precise removal. Set up a DC power supply (5–10 volts, 1–2 amps per square inch) with the workpiece as cathode and a stainless steel anode in a sodium carbonate electrolyte (5–10% solution).
Current flow reduces the patina: at the cathode, hydrogen evolution lifts the layer. Process time: 5–15 minutes for 10-micron thickness. Monitor amperage drop as corrosion clears.
This method preserves base metal integrity, with etch rates under 0.1 microns per minute. It’s particularly useful for heat-sensitive alloys, avoiding thermal distortion.
Equipment: Use a rectifier with polarity reversal to prevent anode buildup. Post-treatment: Passivate with chromate-free inhibitors for corrosion resistance.
Step-by-Step Removal Process for Welding Preparation
- Assess the surface: Measure corrosion depth with a micrometer; if over 100 microns, combine methods.
- Select method based on alloy: Mechanical for pure copper, chemical for brass to avoid dezincification.
- Prepare workspace: Ensure ventilation (at least 500 CFM) and PPE.
- Remove corrosion: Apply chosen technique, monitoring progress visually.
- Clean and inspect: Ultrasonic cleaning in neutral detergent (pH 7) removes residues. Use dye penetrant testing to check for cracks.
- Dry and protect: Air dry or use compressed air; apply temporary rust inhibitor if storage exceeds 24 hours.
This process ensures a clean, oxide-free surface for optimal weld adhesion.
Prevention Strategies in Fabrication Shops
Preventing green corrosion focuses on environmental control and protective measures. Store copper alloys in low-humidity areas (under 60% RH) using desiccants or VCI (volatile corrosion inhibitor) papers, which release amines to neutralize acids.
Apply clear lacquers (acrylic-based, 1–2 mil thickness) post-fabrication for exposed surfaces, maintaining conductivity for electrical welds. In humid U.S. regions like the Southeast, use dehumidifiers to keep shop RH below 50%.
Joint preparation: Bevel edges at 30–45 degrees and clean immediately before welding to minimize exposure time. For ongoing projects, cover with plastic sheeting.
Regular maintenance: Inspect inventory quarterly, removing early patina with mild buffing. This reduces downtime by 20–30% in high-volume shops.
One practical insight from shop experience: In multi-metal fabrications, isolate copper from dissimilar metals using insulating gaskets to prevent galvanic acceleration of green corrosion.
Conclusion
Effectively managing green corrosion ensures reliable welds and extends material lifespan in demanding fabrication environments. By prioritizing root cause identification—such as environmental exposure—and deploying structured removal steps, welders can achieve contamination-free surfaces that support consistent arc performance and joint strength.
Prevention remains key: implementing humidity controls and protective coatings minimizes recurrence, allowing focus on core tasks like penetration optimization.
This approach not only resolves immediate issues but enhances overall shop efficiency, reducing defects that could compromise structural projects.
For advanced welders, consider integrating laser cleaning systems for precision removal; these operate at 100–500 mJ/pulse, stripping patina without abrasives while preserving micron-level tolerances on critical alloys.
FAQs
Can green corrosion affect weld strength on non-copper metals?
While primarily on copper alloys, similar greenish oxides can form on nickel or zinc coatings. These reduce weld strength by 10–20% through poor fusion; remove via pickling with inhibited hydrochloric acid (5%) for 2–5 minutes, ensuring thorough neutralization to avoid hydrogen embrittlement.
What tools are essential for removing green corrosion in a home shop?
Basic kit includes a 4.5-inch angle grinder with wire cup brush (3-inch diameter, 0.014-inch wires), safety glasses, and nitrile gloves. For chemicals, stock 5% acetic acid and pH strips. Budget: under $50 for starters, scaling to electrolytic setups for frequent use.
How long does removed corrosion take to reappear?
Reappearance depends on environment; in dry indoor storage, 6–12 months. In humid conditions, as little as 1–3 weeks. Apply benzotriazole inhibitors (0.5–1% solution) post-removal for up to 2 years of protection without affecting weldability.
Is ultrasonic cleaning effective for green corrosion?
Yes, especially for complex geometries. Use a 40 kHz unit with 2–5% alkaline detergent at 50–60°C for 10–20 minutes. It dislodges patina without scratching, ideal pre-weld for fittings.
What are the environmental considerations for chemical removal?
Dispose of acidic waste per EPA guidelines: neutralize to pH 6–9 before discharge. Use biodegradable chelators like citric acid (10%) to minimize impact, avoiding heavy metals in removers for compliance in U.S. shops.

Hi, I’m Zachary Ford. I’m passionate about welding and dedicated to helping both beginners and experienced welders make informed decisions. I research, test, and write about welding helmets, welding machines, safety equipment, and essential workshop tools. My goal is to provide honest reviews, practical buying guides, and easy-to-follow tutorials that help you weld more safely, work more efficiently, and choose the right gear with confidence.