Setting up a home welding workspace requires more than just buying a welder. A proper Home Welding Setup must address electrical capacity, ventilation, fire safety, and equipment compatibility to ensure stable arc performance and safe operation.
Without the right setup, welders often face issues such as insufficient input power, inconsistent arc starts, overheating machines, and increased fire risk from sparks and hot slag.
In real welding conditions, poor workspace preparation can limit the type of welding processes you can run and affect weld quality on common materials like mild steel, stainless steel, or automotive sheet metal.
Adequate circuit capacity, correct grounding, and proper workbench design also play a major role in arc stability and workpiece control.
I’ll explain the essential components of a functional home welding workspace, including power requirements, core tools, safety equipment, and layout considerations that allow you to weld efficiently while maintaining safe shop conditions.
Why Set Up A Home Welding Workshop?
A home welding setup gives you freedom and flexibility. You can repair metal items on your schedule, customize projects, and even start side gigs. Many DIY enthusiasts find welding rewarding because it combines creativity with practical skills.
Besides personal satisfaction, there are real-world benefits:
- Save money by repairing instead of replacing.
- Build custom projects such as metal fences, shelves, or art.
- Increase home value with professional-looking repairs.
- Learn a valuable trade that’s useful in many industries.
However, welding at home also comes with responsibilities. Safety, proper gear, and knowing your limits are key. With the right setup, you can weld safely and confidently.
Choosing The Right Welding Process
Not all welding methods are the same. The main types for home use are MIG, TIG, and Stick welding. Each has pros and cons. Let’s compare them so you can choose what fits your needs.
| Process | Best For | Difficulty | Materials | Setup Cost |
|---|---|---|---|---|
| MIG (GMAW) | Beginners, repairs, light fabrication | Easy | Steel, stainless, aluminum | Medium |
| TIG (GTAW) | Precision work, thin metals | Hard | All metals (especially thin) | High |
| Stick (SMAW) | Outdoor, thick or rusty metal | Moderate | Steel, stainless | Low |
Mig Welding
Most home welders start with MIG welding. It’s fast, easy to learn, and works well for many projects. You feed a wire electrode through a gun and use shielding gas to protect the weld. The result is neat and strong. If you want to weld car panels, make garden gates, or fix bikes, MIG is a solid choice.
Tig Welding
TIG welding is more advanced. It uses a tungsten electrode and a separate filler rod. TIG gives you the best control and the cleanest welds, especially on thin or delicate metals. It’s the top choice for motorcycle frames or decorative metalwork, but it takes more skill and patience.
Stick Welding
Stick welding uses a flux-coated rod and works well outside or on dirty metal. It’s common for farm equipment, gates, and heavy repairs. The equipment is simpler and cheaper, but the welds are rougher, and there’s more cleanup.
Key Insight
Many beginners overlook flux-cored wire welding (a type of MIG). It doesn’t require a gas cylinder and works outside, making it a smart pick for basic home projects.

Credit: www.youtube.com
Essential Welding Equipment For Home Use
Setting up your home welding workshop means investing in the right tools. Here’s what you’ll need:
1. Welding Machine
Choose a machine that matches your chosen process (MIG, TIG, or Stick). For most beginners, a 120V or dual-voltage (120/240V) MIG welder is perfect. Look for one with adjustable settings and clear controls.
2. Welding Helmet
Never weld without a welding helmet. Auto-darkening helmets are best because they adjust instantly and keep your hands free. Make sure it meets ANSI safety standards.
3. Protective Clothing
Wear a welding jacket (leather or flame-resistant), gloves, jeans, and boots. Never wear synthetic fabrics; they can melt and cause burns.
4. Gloves
Use heavy-duty welding gloves. For TIG, use thinner gloves for control; for MIG/Stick, thick gloves protect from heat and sparks.
5. Safety Glasses
Even with a helmet, wear safety glasses underneath. Flying metal or sparks can still reach your eyes.
6. Welding Cart Or Workbench
A stable surface is essential. A metal workbench or dedicated welding cart keeps your gear organized and safe.
7. Angle Grinder
An angle grinder is vital for cleaning metal before and after welding. It’s also useful for cutting and shaping.
8. Clamps And Magnets
Use strong clamps and magnetic holders to hold pieces together while you weld. This improves accuracy and safety.
9. Measuring Tools
A metal tape measure, square, and marking tools help you cut and fit pieces correctly.
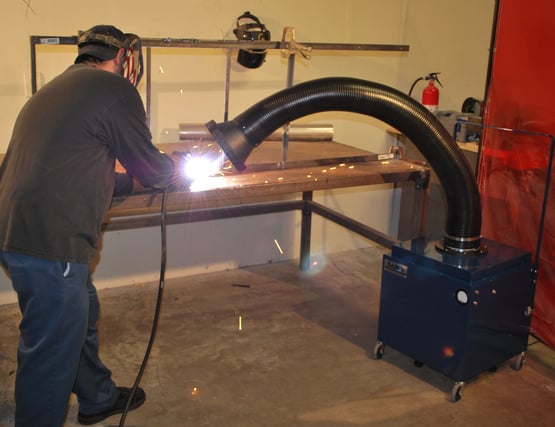
10. Ventilation Fan Or Fume Extractor
Welding produces dangerous fumes. Use a ventilation fan or a dedicated fume extractor to keep the air safe.
11. Fire Extinguisher
Always have a fire extinguisher nearby. A Class ABC extinguisher covers most fire types found in home workshops.
12. Chipping Hammer And Wire Brush
These are needed to clean up welds, especially after Stick welding.
13. Consumables
Stock up on wire, rods, tips, and nozzles for your machine. Keep spares handy to avoid work delays.
Non-obvious Equipment
Many beginners forget a dedicated grounding clamp and extension cords rated for welding. Using the wrong cord can overheat and cause fires.
Setting Up Your Workshop Space
Your welding area is as important as your gear. Here’s how to create a safe, productive workspace at home.
Space Requirements
- Choose a well-ventilated area (garage or shed is ideal).
- Leave at least 3-4 feet around your work area for movement.
- Keep flammable items (paint, gas, oil) far away.
Electrical Setup
Most home welders run on 120V, but some need 240V. Use an outlet with a proper breaker. Avoid standard extension cords unless they’re rated for heavy loads. Check your welder’s manual for the minimum wire gauge.
Ventilation
Welding fumes are dangerous. Open windows and use a fan to blow fumes away from your face. Better yet, install a fume extractor over your workbench.
Lighting
Good lighting is key. Overhead LED lights and a portable work light help you see details. Avoid working in dim areas.
Fire Safety
- Keep a fire extinguisher within reach.
- Place a metal bucket nearby for hot scraps.
- Sweep the floor before welding to remove flammable dust.
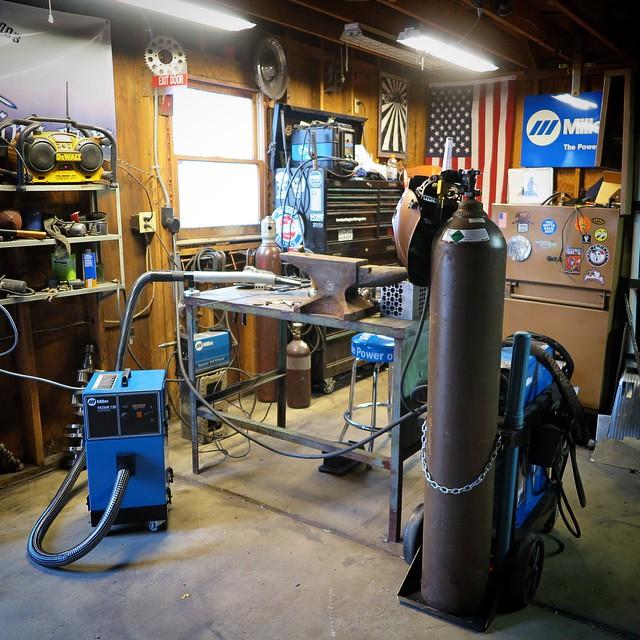
Storage
Store your welder, gas cylinders, and tools on a welding cart or shelf. Keep cables coiled and out of walkways to prevent trips.
Noise Control
Welding and grinding are loud. If you work late or have neighbors nearby, consider soundproofing your workspace or wearing hearing protection.
Credit: blog.cetrain.isu.edu
Safety Gear And Best Practices
Welding is safe if you follow rules, but mistakes can be serious. Protect yourself and your home with these tips.
Personal Protective Equipment (ppe)
- Helmet: Always wear it, even for quick welds.
- Gloves: Use the right gloves for your process.
- Jacket: Flame-resistant or leather.
- Boots: High-top, non-slip, no synthetic materials.
- Glasses: Under your helmet, always.
Preventing Accidents
- Check all cables and connections before starting.
- Keep your work area clear.
- Never weld in wet conditions.
- Let metal cool before touching—use pliers if unsure.
Fume And Gas Safety
- Never weld in a closed room without ventilation.
- Avoid breathing fumes, especially from galvanized or coated metals. These can cause metal fume fever.
- Don’t weld near chemicals or gas cans.
Fire Prevention
- Remove flammable items from the area.
- Let someone know you’re welding if possible.
- Check for smoldering fires after you finish.
First Aid
Keep a basic first aid kit nearby. Treat minor burns quickly. Learn where the nearest emergency room is, just in case.
Choosing The Right Welder For Home Use
With many welders on the market, picking the right one can feel overwhelming. Here’s how to decide:
Power Supply
- 120V welders work in any home outlet. Good for thin metal and small projects.
- 240V welders handle thicker metal and longer welds but need a special outlet.
Amperage Range
A wider amp range gives you more flexibility. For most home projects, 30–140 amps is enough.
Duty Cycle
This tells you how long you can weld before the machine needs to cool. For example, a 30% duty cycle at 90 amps means you can weld for 3 minutes, then rest for 7 minutes.
Portability
If you plan to move your welder around, choose a lighter model with a carrying handle.
Wire Feed Or Electrode Size
Make sure your welder can use commonly available wire or rods. Check what local stores stock.
Brand And Support
Reliable brands like Lincoln Electric, Miller, and Hobart offer better support, more spare parts, and higher resale value.
Warranty
Look for at least a 1-year warranty. Some brands offer up to 3 years.
Comparing Popular Home Welders
Here’s a quick comparison of three common models:
| Model | Type | Voltage | Amps | Weight | Price (USD) |
|---|---|---|---|---|---|
| Lincoln Electric 140 | MIG/Flux-Core | 120V | 30–140 | 50 lbs | ~$600 |
| Hobart Handler 210 | MIG/Flux-Core | 120/240V | 25–210 | 79 lbs | ~$900 |
| Forney Easy Weld 100 ST | Stick | 120V | 10–90 | 9 lbs | ~$200 |
Insider Tip
Many new welders buy the cheapest model and regret it. Spend a little more for a reliable machine—you’ll get better welds and fewer headaches.
Buying Gas And Consumables
Some welding types need shielding gas. Here’s what you should know:
Common Gases
- MIG Welding: Use 75% Argon / 25% CO2 mix for most steel. 100% CO2 is cheaper but produces more spatter.
- TIG Welding: Pure Argon is standard.
- Stick Welding: No gas needed—rods have built-in flux.
Gas Cylinder Size
For home use, a 40–80 cubic foot cylinder lasts several hours of welding. Larger tanks cost less per fill but are heavier.
Storing And Handling Gas
- Keep cylinders upright and chained to a wall or cart.
- Never leave valves open when not in use.
- Store in a cool, dry place away from heat sources.
Buying Wire, Rods, And Tips
- Match your wire or rod to the metal type and thickness.
- Buy extra contact tips and nozzles—these wear out with use.
- Always read your welder’s manual for recommended sizes.
Basic Welding Techniques For Beginners
Once your setup is ready, practice these skills:
Preparing Metal
- Clean off rust, paint, and oil with a grinder or brush.
- Cut pieces to fit using a saw or grinder.
Setting Up
- Attach the ground clamp to clean metal.
- Adjust your machine’s settings (amperage, wire speed, voltage).
- Practice on scrap metal first.
Making The Weld
- Hold the gun or rod at a 10–15 degree angle.
- Move smoothly and steadily—don’t rush.
- Listen for a steady “sizzle” (MIG) or “crackling” (Stick).
Checking Your Weld
- Good welds look like stacked coins (MIG/TIG) or a smooth bead (Stick).
- Bad welds have holes, are too thin, or don’t stick.
Fixing Mistakes
- Grind off bad welds and try again.
- Don’t weld over paint, rust, or greasy metal.
Common Beginner Mistakes
- Moving the torch too fast or too slow.
- Not cleaning the metal first.
- Using the wrong settings for the material.
- Forgetting to check the ground connection.
Non-obvious Insight
Many beginners ignore practice. Welding is a skill—your first tries may look ugly, but practice on scrap metal will improve your results quickly.
Maintenance And Troubleshooting
A well-maintained setup lasts longer and is safer. Here’s how to keep your gear in top shape:
Daily Checklist
- Wipe down your welder and cables.
- Check for loose connections.
- Inspect hoses and wires for damage.
Weekly Tasks
- Clean your helmet lens and replace if scratched.
- Empty the metal scrap bucket.
- Lubricate moving parts on your workbench or cart.
Replacing Consumables
- Change contact tips if wire jams or welds are uneven.
- Swap out worn nozzles and liners.
Troubleshooting Common Problems
- Wire jams: Check the liner and tips; replace if worn.
- Porous welds: Increase gas flow or check for leaks.
- No power: Inspect plugs, fuses, and breakers.
Professional Help
If your welder smokes, sparks internally, or smells burnt, stop and get professional repair. Never open the machine unless you know what you’re doing.
Project Ideas For Home Welders
Once you’re set up, the real fun begins. Here are simple projects to try:
- Garden gate repairs: Strengthen or fix broken hinges.
- Metal shelving: Build custom shelves for your garage.
- Fire pit: Weld a simple steel ring for outdoor fires.
- Bike racks: Create sturdy stands for your family bikes.
- BBQ grill frame: Build a unique frame for your outdoor cooker.
- Tool hangers: Make hooks and racks for your workshop.
- Art pieces: Weld scrap metal into creative sculptures.
As you gain skill, try more complex projects like furniture or automotive repairs.
Practical Tips For Efficient Home Welding
- Mark your metal with soapstone—it won’t burn off easily.
- Use a magnetic square to hold angles steady.
- Practice on scrap pieces before every new project.
- Keep your workspace organized—mess leads to accidents.
- Review safety rules often; complacency causes most accidents.
Common Mistakes To Avoid
- Skipping safety gear: Even for “just a quick weld.”
- Poor ventilation: Never underestimate fumes.
- Ignoring maintenance: Small problems become big fast.
- Overloading circuits: Know your power limits.
- Not practicing: Confidence comes with repetition.
Credit: www.thefabricator.com
Where To Learn More
Joining a local welding class or online community can speed up your progress. Look for forums, YouTube tutorials, and classes at community colleges. The Welding Wikipedia page offers a solid overview of welding processes and history.
Final Thoughts
With the right setup and attention to safety, a home welding workshop is a powerful tool for any DIY enthusiast. Start with basic projects, keep learning, and enjoy the satisfaction of creating and repairing with your own hands.
Frequently Asked Questions
What’s The Best Welding Process For Beginners?
MIG welding is usually best for beginners. It’s easy to set up, works on most home projects, and produces clean, strong welds with little cleanup.
How Much Space Do I Need For A Home Welding Setup?
Aim for at least a 6×8 foot area with good ventilation and room to move. More space makes it easier to handle large projects and improves safety.
Can I Weld Indoors Safely?
Yes, but you need excellent ventilation, no flammable items nearby, and a safe electrical setup. Never weld in a closed room without airflow, and always have a fire extinguisher on hand.
How Do I Know If My Weld Is Strong Enough?
A good weld has full penetration, looks even, and holds up to gentle hammer taps without breaking. For critical repairs, test your welds on scrap first or consult a professional.
Is Home Welding Expensive To Start?
A basic setup (welder, helmet, gloves, gas) can cost $400–$1,000. The price depends on the type of welder and if you buy new or used. Consumables like wire and gas add ongoing costs.