Welding is a craft that connects not just metal, but ideas, industries, and people. Among the many tools and materials welders rely on, the 7018 welding rod stands out as a favorite for its strength, reliability, and ease of use.
Whether you are building a skyscraper or fixing a farm gate, choosing the right amperage for your 7018 electrode is key to getting a solid, safe weld. But finding the right settings can be confusing, especially if you are new to welding or work with different rod sizes.
Understanding the amperage chart for the 7018 welding rod is more than memorizing numbers. It’s about knowing how current, rod size, metal thickness, and even welding position all work together.
This guide will help you break down the 7018 welding rod amperage chart, explain why each setting matters, and show you how to get the best results in real-world welding.
We’ll also look at practical tips, common mistakes, and essential safety notes, so you can weld with confidence.
What Is The 7018 Welding Rod?
The 7018 electrode is a low-hydrogen, iron powder welding rod used mainly for shielded metal arc welding (SMAW) or stick welding. The “7018” name has a meaning:
- 70: Welds can handle 70,000 psi of tensile strength.
- 1: Can be used in any welding position.
- 8: Indicates the rod’s coating type and that it uses an AC or DC power supply.
Welders like 7018 rods because they create strong, smooth welds with minimal spatter. They are used in construction, repair, heavy equipment, pipelines, and anywhere strong joints are required.
Why Amperage Matters For 7018 Welding Rods
Amperage is the amount of electrical current flowing through your welding rod. Too low, and the rod sticks or fails to melt properly. Too high, and you risk burning through the metal, making a weak weld, or creating excess spatter.
The correct amperage depends on the rod’s diameter, the metal’s thickness, and your welding position. Using the right amperage:
- Gives deeper penetration
- Prevents excessive spatter
- Reduces porosity and defects
- Ensures strong, attractive welds
7018 Welding Rod Amperage Chart: All Common Rod Sizes
Choosing the correct amperage starts with your rod size. Here is a detailed breakdown of the most common 7018 rod sizes and their recommended amperage ranges. This is your starting point, adjust based on your own setup, technique, and project.
| Rod Diameter (inches) | Rod Diameter (mm) | Recommended Amperage Range | Typical Metal Thickness (inches) |
|---|---|---|---|
| 3/32″ | 2.4 mm | 70 – 110 A | 1/8″ – 1/4″ |
| 1/8″ | 3.2 mm | 110 – 165 A | 1/4″ – 3/8″ |
| 5/32″ | 4.0 mm | 150 – 220 A | 3/8″ – 1/2″ |
| 3/16″ | 4.8 mm | 200 – 275 A | 1/2″ and above |
| 1/4″ | 6.4 mm | 330 – 415 A | Very thick plate |
Now let’s explore each 7018 rod size and amperage in detail.
⚡ Recommended Tools for 7018 Welding Rod Setup
Using the correct amperage is only part of the equation. Proper electrode storage, quality welding rods, and accurate electrical measurements can help improve weld quality and consistency.
Zonon Welding Rod Storage Tube (4-Pack)
Protect welding electrodes from moisture and contamination with airtight storage tubes designed to help maintain rod performance and weld quality.
Keep Rods Dry & Protected →YESWELDER E6011 3/32″ Welding Rods
A versatile stick electrode for practicing amperage settings, improving technique, and handling a wide range of steel welding projects.
View Welding Rods →Klein Tools CL120 Digital Clamp Meter
Verify electrical output and monitor amperage readings to help fine-tune welding machine settings with greater confidence.
Check Latest Price →7018 Welding Rod Amperage By Size
3/32″ (2.4 Mm) 7018 Rod
Amperage Range: 70 – 110 A
This is the smallest common size for 7018 rods. It’s perfect for light fabrication, thin sheet metal, and repairs on farm equipment or automotive frames. If you use less than 70 amps, the rod may stick or run cold, creating a weak weld. More than 110 amps can cause excessive burn-through or undercut on thin materials.
Best For:
- Metal thickness: 1/8″ to 1/4″
- T-joints, butt joints, and fillet welds
- Overhead or vertical welding (easier to control)
Tips:
- Use the lower end of the range for thin metal and vertical welds.
- On thicker metal, bump the amperage up for deeper penetration.
- Keep your arc short to avoid spatter.
1/8″ (3.2 Mm) 7018 Rod
Amperage Range: 110 – 165 A
The 1/8” rod is one of the most popular choices for general fabrication and construction. It works well on steel up to 3/8” thick. Starting at 110 amps is good for vertical or overhead work, as it gives you more control. Going up to 165 amps is best for flat welds or thick plate.
Best For:
- Metal thickness: 1/4″ to 3/8″
- Fillet and groove welds on structural steel
- Bridges, frames, heavy machinery
Tips:
- Use mid-range amps (130–145) for most flat welds.
- For out-of-position welds, stay near the lower end.
- Preheat thick steel for stronger welds.
5/32″ (4.0 Mm) 7018 Rod
Amperage Range: 150 – 220 A
When you need to weld thicker steel or make long, heavy welds, the 5/32” rod is a good choice. It’s common in industrial, bridge, or heavy equipment work. The low end of 150 amps is for vertical or overhead welding, while 220 amps is ideal for flat, horizontal passes on thick plate.
Best For:
- Metal thickness: 3/8″ to 1/2″
- Large structural welds and repairs
- Beveled joints and multiple pass welds
Tips:
- High amperage helps avoid lack of fusion in thick joints.
- Use shorter rods for better control on vertical welds.
3/16″ (4.8 Mm) 7018 Rod
Amperage Range: 200 – 275 A
The 3/16” rod is used for very thick plate and big, heavy-duty welds. It’s rarely used for anything under 1/2” thickness. These rods require a powerful welder. Lower amperages may not melt the rod properly, while too high can cause excessive heat-affected zones.
Best For:
- Metal thickness: 1/2″ and above
- Heavy machinery, shipbuilding, and large structures
- Multi-pass welds
Tips:
- Use high amperage only on flat or horizontal welds.
- Preheat large plates to prevent cracking.
1/4″ (6.4 Mm) 7018 Rod
Amperage Range: 330 – 415 A
This is the largest standard 7018 rod size. It’s used in very heavy fabrication, such as ship hulls, pressure vessels, or thick bridge sections. These rods are rarely used outside of major industrial projects, and only with large, high-output welders.
Best For:
- Metal thickness: Over 1″ thick
- Shipyards, power plants, or infrastructure projects
Tips:
- Only use on thick, flat plate.
- Control heat to avoid warping.
How To Choose The Right Amperage
Picking the right amperage is about more than matching numbers. Here are practical steps and two key insights that many beginners miss:
Check Your Rod’s Packaging: Most rod boxes list the recommended amperage range. Start in the middle of this range.
Consider Your Welding Position: For vertical or overhead welding, use the lower end of the amperage range for better control.
Adjust for Joint Type: Fillet welds may need slightly more amperage than groove welds because the heat spreads out more.
Account for Metal Condition: Rusty, painted, or dirty metal may need extra heat to achieve proper fusion. But this can increase spatter and defects.
Listen to the Arc: A smooth, steady “crackling” sound means you are in the right zone. If the rod sticks, increase amperage; if it’s too hot and splatters, decrease.
Non-obvious insight: Many beginners don’t realize that ambient temperature and wind can affect amperage needs. Cold weather and drafts can cool the weld pool too fast. You may need to increase amperage slightly to compensate.
Another insight: Not all welders deliver the amperage shown on their dials, especially older or low-budget models. Always test on scrap metal first, don’t rely only on the numbers.
Amperage And Welding Position: Why It Matters
Welding position (flat, horizontal, vertical, or overhead) directly affects the amperage you need. Here’s why:
- Flat position: You can use the highest amperage, as gravity helps the molten metal stay in place.
- Horizontal position: Slightly less amperage, as the weld pool can sag.
- Vertical/Overhead position: Use lower amperage to prevent the weld pool from dripping or running out of the joint.
| Rod Size | Flat Position Amps | Vertical/Overhead Amps |
|---|---|---|
| 3/32″ | 90 – 110 | 70 – 90 |
| 1/8″ | 130 – 165 | 110 – 130 |
| 5/32″ | 180 – 220 | 150 – 180 |
Always start low and increase as needed for the best control.
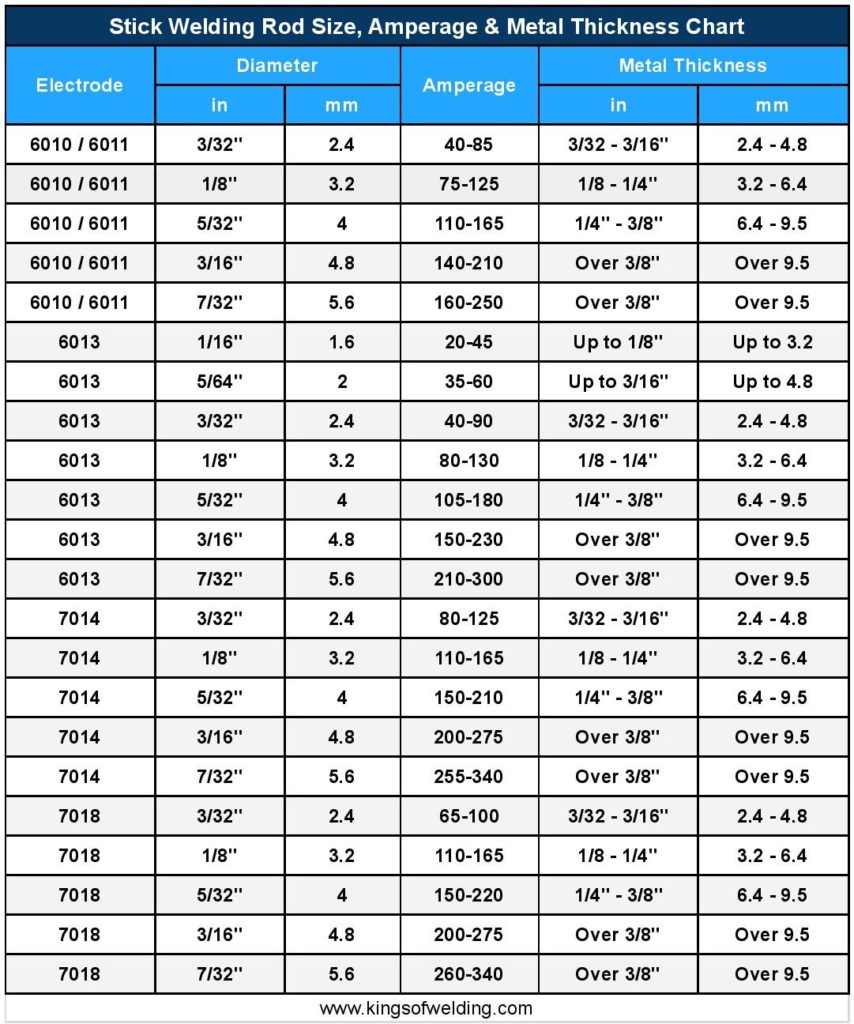
Credit: www.kingsofwelding.com
7018 Welding Rod Amperage: Practical Examples
To make this clearer, here are a few real-world scenarios:
Example 1: Welding Thin Sheet Metal
You’re repairing a thin trailer frame with 1/8” steel. You choose a 3/32” 7018 rod and set your welder to 85 amps. The arc is smooth, the bead is clean, and there’s no burn-through.
Example 2: Building A Heavy Steel Bracket
You’re making a bracket from 3/8” plate. A 1/8” 7018 rod at 145 amps provides deep penetration and a strong, solid weld.
Example 3: Repairing Farm Equipment
A cracked tractor arm (1/2” thick) needs repair. A 5/32” 7018 rod at 200 amps gets the job done quickly and safely, with a strong weld.
Factors That Affect 7018 Amperage Settings
Your amperage setting can also be influenced by:
- Type of power source: AC or DC. DC usually allows smoother starts and more stable arcs.
- Electrode brand: Some rods may run hotter or cooler, so always check the manufacturer’s chart.
- Lead length: Longer welding cables cause voltage drop, which may require a small increase in amperage.
- Metal cleanliness: Clean metal welds better at lower amps; dirty metal may need a bit more.
Common Mistakes When Setting 7018 Amperage
Even experienced welders make these mistakes:
- Using too much amperage: This can cause undercutting, excessive spatter, and a weak joint.
- Not adjusting for position: Using the same amperage for vertical as for flat welds leads to poor results.
- Ignoring rod storage: 7018 rods absorb moisture fast. Wet rods may need more amperage and create porous, weak welds.
- Not testing on scrap: Always test your settings before welding the actual piece.
Tips For Getting The Best Welds With 7018 Rods
- Store rods in a rod oven if possible, to avoid moisture. Wet rods can cause weld defects.
- Keep your arc short and steady. A long arc can cause porosity and weak beads.
- Use the correct polarity. Most 7018 rods work best with DC+ (electrode positive), but will run on AC if needed.
- Preheat thick steel (over 3/8”) to reduce cracking and ensure full penetration.

Credit: www.arccaptain.com
7018 Amperage Chart For Different Applications
Here’s a quick reference for typical projects:
| Application | Rod Size | Amperage Range |
|---|---|---|
| Sheet Metal Repair | 3/32″ | 75 – 90 A |
| General Fabrication | 1/8″ | 110 – 145 A |
| Heavy Equipment | 5/32″ | 150 – 200 A |
| Shipbuilding | 3/16″ | 200 – 275 A |
| Industrial Plate | 1/4″ | 330 – 415 A |
Safety When Welding With 7018 Rods
Welding with the 7018 rod produces intense heat, UV light, and fumes. Always:
- Wear a welding helmet with the right shade lens.
- Use fire-resistant clothing and gloves.
- Work in a well-ventilated area to avoid inhaling fumes.
- Keep a fire extinguisher nearby.
How To Read And Use The 7018 Amperage Chart
Reading the amperage chart is simple, but using it well takes some experience:
- Start with the chart’s middle value for your rod size.
- Adjust up or down based on your welding position, metal thickness, and comfort.
- If you hear sputtering or sticking, increase the amperage a little.
- If you see excessive spatter or a burning smell, decrease the amperage.
Pro tip: Write down your favorite settings for each rod size and application. Over time, you’ll build your own reference guide.
Why 7018 Is A Favorite For Structural Welding
The 7018 rod is trusted for its low hydrogen content, strong welds, and versatility. It resists cracking, even in difficult conditions. Engineers often specify 7018 for structures like bridges and high-rise buildings because it meets strict safety codes.
Comparing 7018 With Other Common Welding Rods
The 7018 rod is not the only choice. Here’s how it compares to two other popular rods:
| Rod Type | Strength | Position | Best For | Amperage Range (1/8″) |
|---|---|---|---|---|
| 7018 | 70,000 psi | All | Structural, low-alloy steel | 110 – 165 A |
| 6013 | 60,000 psi | All | Light sheet, thin steel | 90 – 130 A |
| 6011 | 60,000 psi | All | Dirty/rusty steel, farm work | 75 – 125 A |
For more details on electrode types and uses, visit the Shielded Metal Arc Welding page on Wikipedia.
Credit: bakersgas.com
Final Thoughts
Mastering the 7018 welding rod amperage chart is about more than numbers—it’s about understanding your materials, your project, and your tools. The right settings help you make strong, attractive welds that last for years. Take the time to practice, test, and adjust.
Soon, you’ll find your own rhythm and results that make you proud. And remember: in welding, the smallest details can make the biggest difference.
Frequently Asked Questions
What Happens If I Use The Wrong Amperage With A 7018 Rod?
If the amperage is too low, the rod may stick, and the weld will not penetrate well. If it’s too high, the weld may be too flat, with lots of spatter and possible burn-through. Both can weaken the joint.
Can I Use 7018 Rods With Any Welder?
You need a welder that provides enough amps for your chosen rod size. Most home welders can handle 3/32” and 1/8” rods. Larger rods like 5/32” or above need industrial-grade machines.
Do I Need To Preheat The Metal Before Welding With 7018 Rods?
For thin metal, preheating is not needed. For thick metal (over 3/8”) or when welding in cold weather, preheating helps prevent cracking and improves weld quality.
Why Do My 7018 Rods Keep Sticking?
Sticking is usually caused by too low amperage, a long arc, or dirty base metal. Try increasing amperage, keeping a short arc, and cleaning your metal before welding.
What Is The Best Way To Store 7018 Rods?
7018 rods absorb moisture from the air. Store them in a rod oven at 250°F–300°F (120°C–150°C) or in a sealed container with desiccant. Moist rods can cause weld defects.