Stick welding, also known as Shielded Metal Arc Welding (SMAW), is one of the oldest and most widely used welding methods in the world. For beginners, stick welding can seem difficult at first. The process looks simple: strike an arc, move your hand, and metal fuses together.
But anyone who has ever tried it knows there’s a lot more to it than meets the eye. Small mistakes can lead to weak welds, ugly results, or even dangerous failures.
The good news is, with the right knowledge and a bit of practice, you can master the basics of stick welding and start creating strong, reliable welds. I’ll shares practical stick welding tips, tricks, and common mistakes to help beginners succeed faster and avoid frustration.
Image millerwelds
About Stick Welding
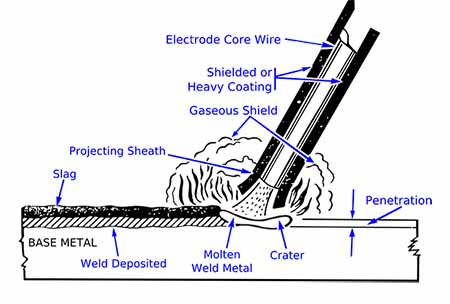
Stick welding uses an electric current to create an arc between a metal rod (the electrode) and the workpiece. The electrode melts and fuses with the base metal, forming a joint. The flux coating on the electrode creates a gas shield that protects the weld from air, making stick welding very versatile. You can use it outdoors, in windy conditions, and on dirty or rusty metal.
One reason stick welding is popular with beginners is that the equipment is simple and affordable. All you need is a stick welder, electrodes, safety gear, and some scrap metal to practice. Unlike MIG or TIG welding, you don’t need gas tanks or complicated settings.
Still, stick welding takes patience and skill to master.
Essential Equipment And Safety
Before you start, it’s important to understand what tools and gear you need, and how to stay safe.
Basic Stick Welding Equipment
Stick Welder: This machine supplies the electrical current for welding. For beginners, a small AC/DC inverter welder is usually enough.
Electrodes: These are metal rods with a flux coating. Common beginner electrodes are E6013 (easy to use, smooth weld) and E6011 (good for rusty/dirty metal).
Ground Clamp and Electrode Holder: The ground clamp attaches to the workpiece. The electrode holder grips the welding rod.
Protective Gear: Always wear a welding helmet (auto-darkening is best for beginners), welding gloves, a fire-resistant jacket, long pants, and closed shoes.
Safety Tips
- Stick welding produces intense light, UV radiation, and hot sparks. Never look at the arc with the naked eye—always use a proper welding helmet.
- Make sure your work area is clean and free of flammable materials.
- Ventilation is important—welding produces fumes that can be harmful if inhaled.
- Keep a fire extinguisher nearby. Sparks can easily start fires on wood, paper, or clothing.
Choosing The Right Electrode
Selecting the correct electrode is one of the first decisions you’ll make as a stick welder. The type and size of electrode affects how your weld looks, how strong it is, and how easy it is to make.
| Electrode Type | Main Use | Best For | Beginner Friendly? |
|---|---|---|---|
| E6013 | General purpose | Clean/new metal | Yes |
| E6011 | Penetration | Dirty/rusty metal | Yes |
| E7018 | Strong welds | Structural work | No (needs dry storage) |
E6013 is often recommended for beginners because it’s very forgiving, produces a smooth arc, and works well on thin metal. E6011 is great for outdoor jobs or metal that can’t be cleaned perfectly. As you advance, you may use E7018, which creates very strong welds but requires more skill and careful storage.
Setting Up Your Stick Welder
Getting your welder ready is a key step that many beginners rush through. Proper setup makes welding much easier.
Polarity: Most stick electrodes work best with DCEN (DC Electrode Negative) or DCEP (DC Electrode Positive). Check the electrode box for the recommended setting. E6013 usually works on both AC and DC.
Amperage: The right amps depend on electrode size and metal thickness. For 1/8” (3.2 mm) E6013, start at around 90-110 amps. Thin rods (3/32” or 2.5 mm) work well at 40-80 amps.
Prepare Your Metal: Clean the area you want to weld. Remove rust, paint, oil, and dirt. A wire brush or grinder works well. Clean metal leads to stronger, cleaner welds.
Ground Connection: Attach the ground clamp close to your welding area, directly on bare metal. A loose or dirty ground can cause problems with arc stability.
Striking The Arc
For beginners, striking the arc is often the hardest part. It’s similar to lighting a match. Touch the electrode to the metal, then quickly pull back about 1/8 inch (3 mm). If you pull back too far, the arc will go out.
If you don’t pull back enough, the electrode will stick.
Common arc starting methods:
- Scratch Start: Drag the tip of the electrode across the metal as if striking a match.
- Tapping: Tap the electrode quickly onto the metal and lift it slightly.
If your electrode sticks, don’t panic. Twist it gently to break it free, or turn off the welder and remove the rod. If it sticks often, check your amperage—it might be too low.
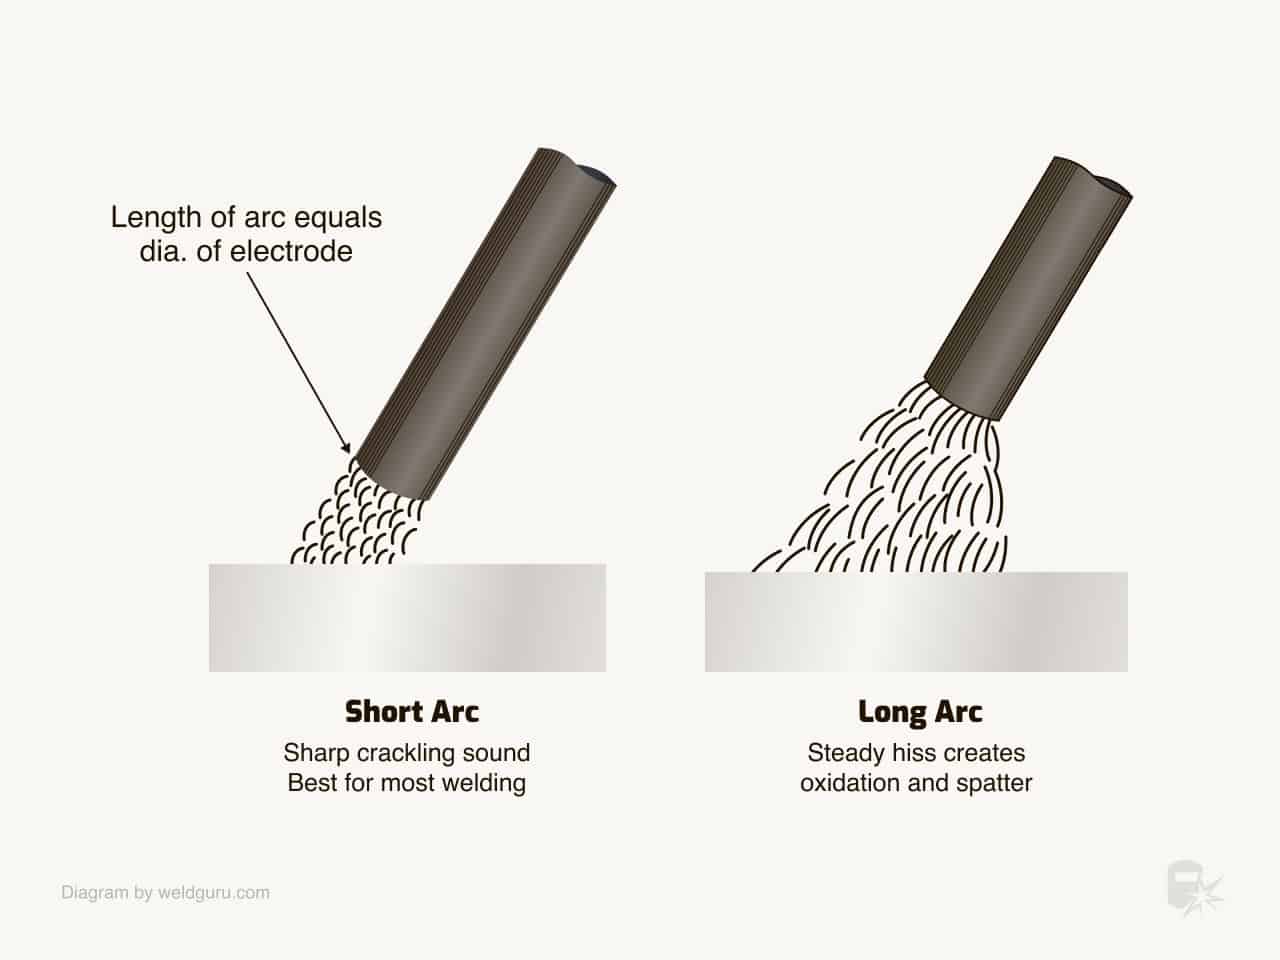
Mastering Arc Length
Arc length is the distance between the tip of the electrode and the workpiece during welding. This small space makes a big difference.
- Too short: The electrode will stick, and the weld will be uneven.
- Too long: The arc will be noisy, spatter a lot, and the weld will be weak.
Aim for an arc length about the same as the diameter of your electrode. For example, with a 1/8” rod, keep the arc about 1/8” away from the metal. This helps maintain a stable arc and good penetration.
Welding Technique: Travel Speed And Angle
Welding is not just about moving your hand. Travel speed and electrode angle are two factors that beginners often overlook.
Travel Speed: Move too fast and your weld will be thin, with poor penetration. Move too slow and the weld will be tall and lumpy, with too much heat input.
Electrode Angle: Hold the electrode at a 10-15 degree angle away from the direction of travel. This gives you the best view of the weld pool and helps control the bead.
A steady, even movement is key. Many beginners “weave” the electrode from side to side, but for most basic welds, a straight line is best. Only weave if you need a wider bead or are filling a large gap.
Reading And Controlling The Weld Pool
The weld pool is the small area of molten metal behind the electrode. Learning to watch and control the pool is an essential skill.
- Watch the leading edge of the pool, not the arc itself.
- The pool should be bright, smooth, and not too large.
- If you see the pool getting too big, you’re moving too slow or using too much heat.
- If the pool is very small or there’s no visible bead, you may be moving too fast or have low amperage.
Practice on scrap metal until you can keep the weld pool consistent. This skill will help you make stronger, better-looking welds.
Dealing With Common Stick Welding Problems
Even with good technique, problems can happen. Here’s how to fix the most frequent issues beginners face.
Sticking Electrodes: Usually caused by low amperage, dirty metal, or holding the rod too close. Increase amps, clean your metal, or try a different starting method.
Porosity (Holes in Weld): Often due to moisture on the electrode or workpiece, or welding in windy conditions. Store rods in a dry place, and keep your metal dry.
Undercut: This is a groove melted into the base metal along the weld. Causes include moving too fast or holding the rod at too steep an angle.
Excessive Spatter: Too long arc length or too high amperage. Shorten the arc and adjust amps down.
Incomplete Fusion: The weld doesn’t penetrate into the base metal. Use a higher amperage or move the rod slower.
Cleaning And Inspecting Your Welds
After welding, you need to clean off the slag—the crusty layer left by the flux. Use a chipping hammer and a wire brush. Don’t judge your weld until the slag is removed; sometimes a weld that looks rough will be smooth underneath.
Inspect your welds for:
- Cracks or holes (porosity)
- Undercuts or excessive bead height
- Consistent width and appearance
A good weld should be smooth, even, and fully fused to both pieces of metal.
Credit: www.cruxweld.com
Improving Your Welds: Practice Exercises
Practice is the best way to get better at stick welding. Here are some exercises for beginners:
Straight Beads: Lay down straight beads on a flat piece of scrap metal. Focus on keeping the arc length and travel speed steady.
Bead on Plate: Once you can make straight beads, try overlapping beads side by side to make a wider weld.
Joining Two Pieces: Practice butt joints (two pieces side by side), lap joints (one piece on top of another), and fillet welds (joining at a right angle).
Try using different electrode sizes and amperages to see how they affect the weld. Don’t rush—focus on control and consistency.
Stick Welding Positions
Welds aren’t always flat. Stick welding can be done in many positions:
| Position | Description | Difficulty for Beginners |
|---|---|---|
| Flat | Welding on top of a horizontal surface | Easy |
| Horizontal | Welding on a vertical surface, moving sideways | Medium |
| Vertical | Welding up or down a vertical seam | Hard |
| Overhead | Welding above your head | Very Hard |
Start with flat position welds. Once you’re comfortable, move to horizontal, then vertical, and finally overhead. Each position requires slightly different technique and more control of the weld pool.
Tips For Better Results As A Beginner
Getting good at stick welding takes time, but these practical tips will speed up your progress:
- Use shorter rods (electrodes) when learning. They’re easier to control.
- Weld on clean, dry metal whenever possible.
- Don’t try to weld over paint, rust, or oil unless you’re using a rod like E6011.
- Keep your welding cable as straight as possible to avoid voltage drop.
- If you’re not sure about your settings, start with a lower amperage and increase slowly.
- Change your electrode when it gets too short (about 2 inches left).
- Take breaks and inspect your work often. This helps you spot and correct mistakes early.
Mistakes Beginners Often Make (and How To Avoid Them)
Many beginners struggle because they repeat common errors. Here are some mistakes to watch out for, and advice on how to fix them.
- Trying to Weld Dirty Metal: Clean your work before welding. Even a little oil or rust can ruin a weld.
- Ignoring Safety: Never weld without proper gear. UV burns and eye injuries are real risks.
- Using the Wrong Electrode: Start with E6013 or E6011. Don’t jump to harder rods until you have more experience.
- Moving Too Fast or Too Slow: Watch the weld pool, not just your hand. Adjust your speed to keep the pool steady.
- Not Practicing Enough: Welding is a manual skill. You need to build muscle memory. Practice on scrap before working on real projects.

Credit: www.youtube.com
Advanced Stick Welding Tricks For Faster Learning
As you become more comfortable, you can try a few tricks that make learning easier and improve your results:
Preheat Thick Metal: If you’re welding thick steel, preheat it with a torch. This helps prevent cracking and improves weld quality.
Tack Weld First: Before making a long weld, make small “tacks” to hold your pieces in position. This prevents them from moving as you weld.
Use Both Hands: If possible, steady your welding hand by bracing with your other hand or resting on the table. This gives you more control, especially for long welds.
Listen to the Arc: A good stick weld makes a steady “crackling” sound, like frying bacon. If the arc hisses or pops, adjust your arc length or amperage.
Store Electrodes Properly: Keep rods in a dry place. Some (like E7018) need to be kept in a rod oven to prevent moisture, which can cause porosity.
Understanding Weld Quality: What Makes A Good Weld?
A strong weld isn’t just about appearance. Here’s what to look for:
- Full penetration: The weld fuses deeply into the base metal, not just sitting on top.
- No cracks or holes: These are signs of poor technique or dirty materials.
- Uniform bead: The weld bead should be even in width and height.
- Minimal spatter: Excess spatter means the settings or technique need adjustment.
Professional welders often test their welds by bending or hammering them to check strength. For beginners, visual inspection and practice are key.
Credit: weldguru.com
Essential Stick Welding Terms Every Beginner Should Know
Understanding the language of welding helps you learn faster. Here are some common terms:
- Electrode: The metal rod you use to weld.
- Arc: The electric spark that melts the metal.
- Slag: The hard coating left after welding, from the flux.
- Bead: The line of weld metal created as you move the rod.
- Penetration: How deeply the weld fuses into the base metal.
- Tack Weld: A small weld to hold pieces in place before the main weld.
How Stick Welding Compares To Other Welding Methods
Beginners often wonder how stick welding stacks up against other methods like MIG or TIG. Here’s a quick side-by-side look:
| Method | Ease of Use | Best For | Equipment Cost | Outdoor Use |
|---|---|---|---|---|
| Stick Welding | Medium | General repairs, thick steel | Low | Excellent |
| MIG Welding | Easy | Thin metal, bodywork | Medium | Poor |
| TIG Welding | Hard | Precise, clean welds | High | Poor |
Stick welding is harder to master than MIG, but much more forgiving outdoors or when the metal isn’t perfectly clean. It’s also cheaper to get started.
Non-obvious Insights For Beginners
Many beginners focus only on their hand movements and settings, but two other factors are just as important:
Ambient Temperature: Welding in cold conditions can cause cracks in steel, especially on thick pieces. Try to work in moderate temperatures, or preheat the metal if needed.
Electrode Storage: Most beginners don’t realize that electrodes can absorb moisture from the air, leading to weld defects. Store rods in sealed containers or use a simple homemade rod oven.
Where To Find More Resources
Stick welding is a skill for life. If you want to go deeper, local community colleges often offer basic welding classes. You can also find detailed guides and video tutorials on trusted sites such as Lincoln Electric.
Final Thoughts
Stick welding is both an art and a skill. With these tips and tricks, you’re well on your way to creating strong, reliable welds. Remember: every expert was once a beginner. Focus on safety, practice often, and keep learning. Your progress will show in every bead you lay down.
Frequently Asked Questions
What Is The Easiest Stick Welding Rod For Beginners?
The easiest rod for most beginners is E6013. It’s easy to strike an arc, produces a smooth weld, and works well on clean or slightly dirty steel. E6011 is also beginner-friendly, especially for outdoor work or rusty metal.
Why Does My Electrode Keep Sticking To The Metal?
Sticking electrodes are usually caused by low amperage, a dirty workpiece, or holding the rod too close to the metal. Try increasing your amperage, cleaning the area, or adjusting your arc length. Practice makes this easier over time.
Can I Stick Weld Aluminum Or Stainless Steel?
Stick welding is mostly used for mild steel. There are special electrodes for aluminum and stainless steel, but they require more skill and experience. Beginners should start with mild steel projects before trying other metals.
How Do I Know If My Weld Is Strong?
A strong weld should be smooth, even, and fully fused to both pieces of metal. There should be no cracks, holes, or undercut. Over time, you’ll learn to judge by appearance, but you can also test welds by bending or tapping them with a hammer.
Is Stick Welding Safe For Beginners?
Stick welding is safe if you use proper safety gear and follow basic rules. Always wear a welding helmet, gloves, and long sleeves. Work in a well-ventilated area, keep flammable materials away, and never look directly at the arc.

Hi, I’m Zachary Ford. I’m passionate about welding and dedicated to helping both beginners and experienced welders make informed decisions. I research, test, and write about welding helmets, welding machines, safety equipment, and essential workshop tools. My goal is to provide honest reviews, practical buying guides, and easy-to-follow tutorials that help you weld more safely, work more efficiently, and choose the right gear with confidence.