Molten slag bubbling on top of the weld, zero arc glare, and a bead forming so smooth it almost looks poured — that’s the moment many welders stop and wonder what’s really happening under that blanket of granules. It’s a question I asked myself early on: What Does the Flux Do in Submerged Arc Welding?
At first, I thought flux was just there to hide the arc. But after running long seams and seeing how different flux types changed penetration, bead shape, and cleanup time, I realized it’s the backbone of the whole process.
Flux doesn’t just cover the weld — it shields it from contamination, stabilizes the arc, controls cooling, and even affects the chemical makeup of the weld metal.
I learned this by testing settings, swapping flux grades, and fixing welds that didn’t meet spec because I underestimated its role. Understanding what flux actually does can mean the difference between a flawless, high-strength seam and one that fails inspection or cracks under stress.
Let me break down exactly how flux works in submerged arc welding and why it matters more than most welders realize.
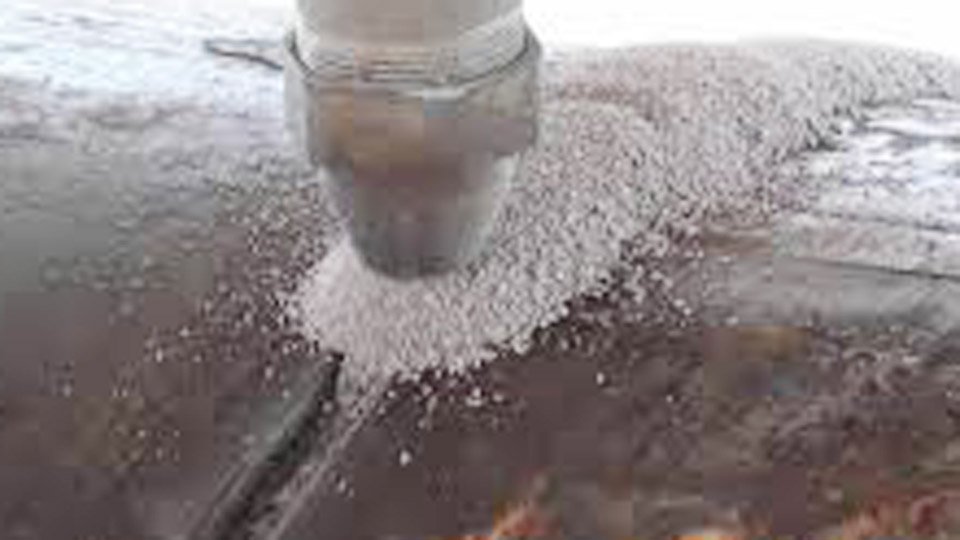
Photo dnhsecheron
The Basics: What Exactly Is Flux in Submerged Arc Welding?
Flux in SAW is that granular powder you dump from the hopper onto your joint before the wire hits. It’s not like the coating on a stick rod or the powder in flux-cored wire—it’s a separate beast, made from a mix of minerals like silica, lime, manganese oxide, calcium fluoride, and sometimes alloying elements. Think of it as a custom shield tailored for high-heat, high-speed welding.
In practice, you load it into a flux hopper on your SAW machine—Lincoln, Miller, or ESAB rigs all work the same way. As the electrode wire feeds in and the arc strikes, the flux melts partially, forming a molten slag layer that floats on the weld pool. The unmelted flux above it stays granular, keeping everything submerged and out of sight.
I’ve run setups where the flux depth is about 1 to 1.5 inches thick over the joint. Too thin, and the arc flashes through, ruining the shield. Too thick, and it piles up, messing with your bead shape. In my shop, we always aim for that sweet spot where the arc glow is just visible as a faint red haze through the flux—no sparks flying out.
How Flux Transforms the Welding Process: The Step-by-Step Breakdown
Here’s how it all plays out on the bench. You clamp your plates, set your travel speed on the carriage, dial in the wire feed, and hit the trigger. The arc ignites under the flux, melting the wire, the base metal edges, and a good chunk of the flux itself.
The heat from the arc—often 500 to 1000 amps on thicker stuff—vaporizes some flux components, creating a shielding gas cloud right at the weld zone. That gas pushes back the oxygen and nitrogen from the air, which would otherwise oxidize your molten metal and create weak, brittle welds.
Meanwhile, the flux reacts chemically. Deoxidizers in the mix (like silicon and manganese) pull impurities out of the pool, floating them up into the slag. As the weld cools, that slag hardens into a glassy crust you peel off later—easy on good flux, a nightmare on bad.
In a typical run on 1-inch plate, the flux lets you crank travel speeds to 20-40 inches per minute without losing control. No spatter, no fumes billowing everywhere, and a bead that’s wide, flat, and fused deep into the root.
I’ve used this on everything from ship hull repairs to pipeline sections, and the consistency is what keeps me coming back to SAW over stick or MIG for big jobs.
The Key Jobs Flux Does: Protection, Stability, and More
Flux isn’t a one-trick pony. It handles multiple roles that directly impact your weld quality, and understanding them helps you troubleshoot on the fly.
Shielding the Weld Pool from the Atmosphere
This is job one. Without flux, the arc would suck in air like a vacuum, leading to nitrogen pickup that makes your weld brittle and prone to cracking. The flux blanket creates an airtight seal, melting into a protective layer that excludes 99% of contaminants.
In humid Florida shops like the one I ran down south, this protection is gold. I’ve welded outdoors on bridge girders where rain was threatening, and the flux kept the pool clean while the rest of the crew scrambled for tarps. Result? Zero porosity, even with 80% humidity.
Stabilizing the Arc for Consistent Runs
Flux components like calcium fluoride and potassium compounds keep the arc from wandering. They lower the voltage needed to sustain it, making the arc steady at high amps.
On a Miller sub-arc tractor, this means you can run 600 amps at 28 volts without the arc blowing out on uneven joints. Beginners often crank voltage too high, thinking it helps penetration—big mistake. Flux does the heavy lifting here, so stick to manufacturer charts: 25-32 volts for most carbon steel runs.
Deoxidizing and Cleaning the Molten Pool
Impurities like sulfur, phosphorus, and oxides from the base metal? Flux scavenges them. Silicon and manganese in active fluxes bind with oxygen, forming slag that rises out.
I’ve fixed countless “dirty steel” welds this way. Last year, on a repair job for old tank cars with mill scale, a neutral flux left slag pockets. Switched to an active one with extra deoxidizers, and the beads came out mirror-smooth. Saved the customer thousands in rework.
Controlling Weld Chemistry and Adding Alloys
Some fluxes are “active” or “alloying,” meaning they add elements to the weld. Neutral fluxes keep things stable for multi-pass work. Active ones boost manganese and silicon for better strength in single-pass fillets.
For stainless jobs, alloying fluxes with chromium help match the base metal’s corrosion resistance. In my experience, mismatching here is a rookie error—your weld might look good but fail in a salt spray test.
Shaping the Bead and Boosting Penetration
Flux influences how the pool flows. Basic fluxes give deeper penetration but narrower beads. Acidic ones spread wider for better wetting on rusty edges.
On groove welds, I’ve adjusted flux type to control distortion: lower basicity for less heat input on thin sections, higher for thick plates needing full fusion.
Types of Flux: Picking the Right One for Your Machine and Material
Not all flux is created equal. Here’s the breakdown I use when stocking the shop.
By Manufacturing Method: Fused, Agglomerated, or Bonded
Fused Fluxes: Melted in a furnace, then crushed. They’re glassy, non-hygroscopic (don’t suck up moisture), and great for high-speed runs. But they’re acidic, so toughness suffers in cold weather. I use them sparingly now—mostly for light structural work.
Agglomerated Fluxes: Baked powders bound with silicates. These are the workhorses: flexible, can add alloys, and excel at low-temp toughness. In my shop, 80% of our flux is agglomerated—perfect for pressure vessels down to -40°F.
Bonded Fluxes: Similar to agglomerated but with more binders. They’re hygroscopic, so store them dry. Good for custom mixes but prone to moisture issues if you’re not careful.
By Chemistry: Neutral, Active, or Alloying
Neutral Fluxes: Minimal impact on weld chemistry. Ideal for thick, multi-pass welds where you need consistent properties layer after layer. Low sensitivity to voltage changes—great for automated setups.
Active Fluxes: Pump in extra silicon and manganese. They shine on rusty or scaled steel, high-dilution welds, and fast travel speeds. But limit to 1-3 passes, or you’ll over-alloy and embrittle the metal.
Alloying Fluxes: Add nickel, chrome, or molybdenum for exotic steels. Use with plain wire to save costs on cladding jobs.
By Basicity: Acidic, Neutral, or Basic
Basicity index (Bi) is your guide—under 1.0 acidic, 1.0-1.5 neutral, over 1.5 basic.
| Flux Basicity | Key Traits | Best Applications | Common Pitfalls |
|---|---|---|---|
| Acidic (Bi <1.0) | Wide beads, easy slag removal, handles contamination | Single-pass fillets on dirty plate, high-speed production | Poor low-temp toughness, higher oxygen in weld |
| Neutral (Bi 1.0-1.5) | Balanced chemistry, good penetration, versatile | Multi-pass on carbon steel, general fab | Average bead shape on thick stuff |
| Basic (Bi >1.5) | Superior toughness, low oxygen, crack-resistant | Critical welds like offshore, nuclear, cryogenic | Rougher beads, harder slag, needs parameter tweaks |
In practice, start with neutral for most USA shop work on A36 or A572 steel. For 7018-level toughness, go basic.
Matching Flux to Your Job: Practical Selection Tips
For a 3/4-inch butt joint on mild steel with EM12K wire? Grab a neutral agglomerated flux like those from Hobart or Lincoln—runs clean at 450-550 amps, 26-30 volts.
Stainless 304 for food tanks? Alloying flux with chrome compensators, paired with 308L wire. I’ve done this on brewery vessels—flux kept the chemistry spot-on, no carbide precipitation.
High-strength low-alloy (HSLA) for heavy equipment? Active flux for the root pass to handle scale, then neutral for fills. Travel speed jumps to 35 ipm, cutting cycle time by 20%.
Pro tip: Always check the flux-wire combo charts from your machine maker. In my shop, we laminate them to the welder’s station—no guessing.
Setting Up for Success: Amperage, Voltage, and Flux Flow
Flux performance ties directly to your settings. Here’s what I dial in for common jobs.
Amperage Ranges:
- 1/8-inch wire: 350-500A for light plate
- 5/32-inch: 450-650A—my go-to for 1-inch stuff
- 3/16-inch: 600-900A for heavy fabrication
Voltage: 24-28V for stringer beads, 28-32V for weaves. Too high, and flux burns away unevenly.
Travel speed: 15-25 ipm for deep roots, 25-40 ipm for caps. Flux depth: 1 inch minimum.
Joint prep: Clean to bright metal, 60-degree V-groove with 1/8-inch root face. Preheat thick stuff to 200°F to avoid hydrogen cracks.
I’ve ruined runs by skimping on prep—flux can’t fix mill scale forever.
Handling Flux Like a Pro: Storage, Recycling, and Safety
Flux hates moisture. In a humid shop, it absorbs water like a sponge, leading to hydrogen porosity.
Store in sealed drums or heated ovens at 250-300°F. I use flux recovery systems with magnets and screens—recycle 70% of the slag, mix 50/50 with fresh.
Safety: Wear a respirator for dust, gloves for hot slag. In my early days, I ignored this and paid with a nasty cough.
Common Mistakes and How to Fix Them
Mistake 1: Wrong Flux for the Material. Acidic flux on low-alloy steel? Expect cracks in winter. Fix: Switch to basic and retest Charpy values.
Mistake 2: Insufficient Flux Coverage. Arc flashes = porosity. Add more from the hopper mid-run if needed.
Mistake 3: Over-Recycling Without Screening. Metallic bits in flux cause inclusions. Sieve every batch.
Mistake 4: Ignoring Voltage Sensitivity. Active flux at high volts over-alloys. Drop to 26V max.
One time, a trainee ran basic flux at acidic settings—bead was a mess. We adjusted amps down 10%, and it fused perfectly.
Troubleshooting Flux Woes: From Porosity to Slag Sticking
Porosity: Damp flux or dirty plate. Dry at 300°F for 2 hours, grind surfaces.
Slag Inclusions: Low amps or fast travel. Slow down, increase current.
Cracking: High basicity without preheat. Add 150°F heat, use neutral flux.
Uneven Beads: Flux too deep or shallow. Level the hopper.
In a recent nuclear job, porosity hit from recycled flux. Fresh batch and magnetic separation fixed it overnight.
Real Shop Stories: Lessons from the Weld Booth
Back in 2015, welding 4-inch thick headers for a power plant. Neutral flux gave great toughness, but slag was stubborn. Switched to a low-basicity agglomerated—beads popped off clean, project finished two days early.
Another: Hobby welder client with a Miller 350—tried cheap flux on aluminum-killed steel. Burned through. Lesson? Flux isn’t universal; match it to your machine’s capabilities.
Wrapping It Up
Once you get flux dialed in, SAW becomes your secret weapon—fast, clean, and bulletproof for the big stuff. You’ll spot defects before they happen, tweak settings on instinct, and deliver welds that outlast the steel around them.
You’re now equipped to walk into any shop, grab the right hopper load, and turn out pro-level beads every time. Next run, start with a neutral flux on your test plate, note the settings, and build from there. And remember: the best welders aren’t the ones with the fanciest machines—they’re the ones who respect the flux.
Always keep a small sample of your flux in a jar by the machine. When a run goes south, compare it visually—clumped grains mean moisture, and that’s your fix before you waste another plate.
FAQ: Answering the Real Questions Welders Ask
Can I Reuse Flux in Submerged Arc Welding, and How Much?
Yes, but smartly. Recover the unfused flux with a vacuum system, screen out slag and metal bits, then mix 50% recycled with 50% fresh. I’ve pushed to 70% on clean jobs, but test for chemistry shifts. Damp or contaminated? Toss it—porosity isn’t worth the savings.
What’s the Best Amperage Range for Different Fluxes on 1-Inch Steel?
For neutral flux with 5/32-inch wire: 450-600 amps at 26-29 volts. Active flux? Bump to 500-650 for faster travel, but watch dilution. On my Lincoln setup, I start at 500A and creep up, checking bead cross-sections every 10 feet.
How Do I Prevent Moisture Problems with Flux in a Humid Shop?
Bake it fresh before use—250°F for 2-4 hours in a dedicated oven. Store in airtight hoppers with desiccants. In my Gulf Coast shop, we re-dry every morning. Skip this, and you’ll chase hydrogen cracks all day.
Active vs. Neutral Flux: When Should I Switch?
Neutral for multi-pass, thick sections needing consistent toughness—like pipeline girth welds. Active for quick fillets on scaled plate or high-speed production. Codes often limit active to two passes max, so check AWS D1.1. In practice, I use active 70% of the time for efficiency.
Why Is My SAW Bead Not Penetrating, Even with Good Flux?
Usually low amps, high travel speed, or wrong flux basicity. Increase current 50A, drop speed 5 ipm, or switch to a more basic flux. Joint prep matters too—ensure a tight root gap. I’ve fixed this on dozens of groove welds by simply cleaning the land and adding preheat.