If you use a Miller welding helmet, you already know how important it is for safety and clear vision during welding. But what happens when your lens gets dim or the auto-darkening feature stops working? Often, this means your helmet battery needs changing.
Many new users worry about damaging the helmet, voiding warranties, or not being able to get it working again. The good news is that changing the battery is a simple task you can do yourself—if you know the right steps and avoid common mistakes.
I’ll discuss everything you need to confidently change the battery in your Miller welding helmet. You’ll learn which batteries to buy, how to open the helmet without damage, and how to avoid errors that could affect your helmet’s performance.
Plus, you’ll get pro tips, troubleshooting advice, and answers to common questions people ask about Miller helmet batteries.
Image millerwelds
Why Your Miller Welding Helmet Needs A Battery
Most Miller welding helmets use an auto-darkening lens. This means the helmet stays light so you can see your work, but darkens instantly when you start welding. The lens changes shade using sensors and electronics. These electronics need power, which comes from a small battery inside the helmet.
Some Miller helmets have solar assist panels to help charge the battery, but almost all use a replaceable button cell battery for consistent performance. The solar panel works only when exposed to bright light, and its main role is to supplement the battery, not replace it.
If the battery is weak or dead, the lens may stay dark, not darken at all, or act unpredictably. This can be dangerous and make your work much harder, especially when working on detailed or critical welds.
Signs Your Battery Needs Changing
- The auto-darkening feature stops working or delays
- The lens flickers or changes shade randomly
- The lens stays dark after welding
- A low battery warning appears (if your model has this feature)
- The helmet makes a faint, high-pitched noise (some models do this when power is low)
- Sensitivity and delay controls stop responding or feel “off”
Don’t wait until the helmet fails completely. Change the battery as soon as you notice any of these signs. A helmet that fails mid-job can expose your eyes to harmful light, causing discomfort or even permanent damage.
Miller Welding Helmet Models And Battery Types
Different Miller helmet models use different battery types. Always check your helmet’s user manual or look for the battery code printed near the battery holder.
Here’s a quick look at some common Miller helmets and their batteries:
| Helmet Model | Battery Type | Number of Batteries | Solar Assist |
|---|---|---|---|
| Digital Elite | CR2450 | 2 | Yes |
| Classic Series | CR2032 | 2 | No |
| Performance Series | CR2450 | 2 | Yes |
| Titanium Series | CR2032 | 1 | Yes |
| Infinity Series | CR2450 | 2 | Yes |
Important: The most common batteries are CR2032 and CR2450. These are standard coin cell batteries you can find in hardware stores or online. Don’t try to use a battery that “almost fits.” The wrong size can cause poor contact or even damage the holder.
Some rare models may use other batteries, so double-check before purchasing. If you’re not sure, bring your old battery to the store for comparison, or take a clear photo of it for reference. Also, note that some helmets use two batteries side by side, so always check if you need to replace one or both.
Credit: proweldinghelmets.com
Tools And Materials Needed
Before you start, gather the right tools and supplies. This makes the process smooth and prevents last-minute problems.
- Replacement battery (check your model for CR2032 or CR2450)
- Small Phillips screwdriver (some models need it)
- Clean cloth (to keep lens and electronics dust-free)
- Gloves (optional, to avoid fingerprints)
- User manual (if you have it)
- Small tray or cup (to hold screws or small parts)
- Plastic pry tool (optional, for stubborn covers)
Don’t use sharp metal tools near the lens—they can scratch the surface or damage sensors. If you don’t have gloves, wash your hands before starting to avoid transferring oils to the lens or sensors.
Extra tip: If you don’t have a user manual, most Miller helmet guides can be found online as PDFs. Download one to your phone or computer for quick reference during the process.
Step-by-step: Changing The Battery In A Miller Welding Helmet
Changing the battery is easy if you follow these steps carefully. Take your time, work in a clean area, and keep track of any screws or small parts.
1. Turn Off The Helmet
If your helmet has an on/off switch, turn it off before you begin. This protects the electronics and prevents accidental activation. If your helmet doesn’t have a power switch, don’t worry—removing the battery will cut power automatically.
2. Remove The Helmet Shell
On many Miller helmets, you need to remove the outer shell or lens cover to access the battery compartment. Look for small clips, screws, or sliding panels. Gently release or unscrew these parts.
Tip: Take a photo of each step as you go, so you can reverse the process easily when reassembling. If your helmet has a headgear adjustment, loosen it to make the shell removal easier. Set parts aside in a tray or cup so nothing gets lost.
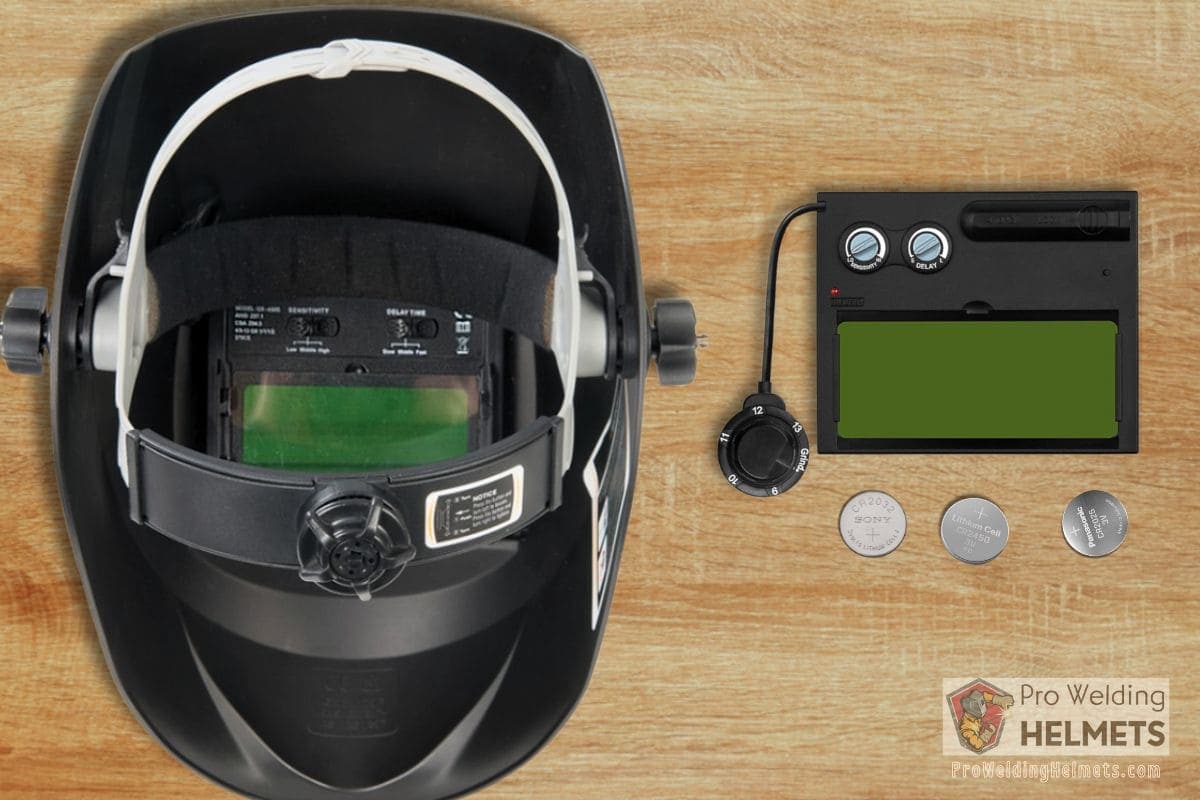
3. Locate The Battery Compartment
The battery compartment is usually behind the auto-darkening lens, on the inside of the helmet. On some models, it’s a small plastic cover you can pop open with your fingernail. Others may have a screw or latch.
If you have trouble finding the compartment, look for a small battery icon or label inside the helmet. Some models hide the battery under a sensor panel—gently lift or slide this part to reveal the battery.
4. Remove The Old Battery
Carefully lift out the old battery. Note the orientation—the “+” (positive) side usually faces up, but always double-check your helmet’s markings.
If the battery is stuck, gently tap the helmet or use a plastic tool (never metal) to pry it out. Avoid using force, as the battery holder is delicate. If you see dust or debris, blow it away with a burst of air or brush it aside with a soft cloth.
Extra detail: Some batteries have a small tab or ribbon under them to help with removal. If your helmet has this, pull gently on the tab to lift the battery out.
5. Clean The Battery Contacts
Before inserting the new battery, wipe the contacts with a clean, dry cloth. Dust or fingerprints can prevent good electrical contact. Even a tiny bit of oil can cause problems.
If you see any white or green residue (corrosion), gently clean it with a cotton swab dipped in isopropyl alcohol. Allow the contacts to dry fully before proceeding. This step is often skipped but can make a big difference in the helmet’s reliability.
6. Insert The New Battery
Place the new battery in the compartment, matching the orientation of the old one. Press it down until it clicks into place.
Pro Insight: Many users accidentally flip the battery upside down. This will stop the helmet from working but usually doesn’t cause permanent damage. Just reinstall the battery correctly.
If your helmet uses two batteries, insert them both before reassembling. Mixing old and new batteries can lead to uneven power and strange behavior.
7. Reassemble The Helmet
Replace any covers, clips, or screws you removed earlier. Make sure everything is secure but don’t overtighten screws—they can crack the plastic.
Check that the lens or any sensor panels are seated flat, with no gaps or loose spots. If you encounter resistance when reassembling, stop and double-check for misaligned parts.
8. Test The Helmet
Turn the helmet on and check the auto-darkening function. Point the helmet at a bright light or use the test button if your model has one. The lens should darken and return to normal quickly.
If your helmet has sensitivity and delay controls, adjust them to your usual settings and confirm they respond properly. Some helmets beep or flash a small LED when the battery is replaced—this is normal.
If Everything Works, You’re Done!
Model-specific Battery Change Tips
Some Miller helmets have unique features that change how you access or replace the battery. Here’s what you need to know for the most popular models:
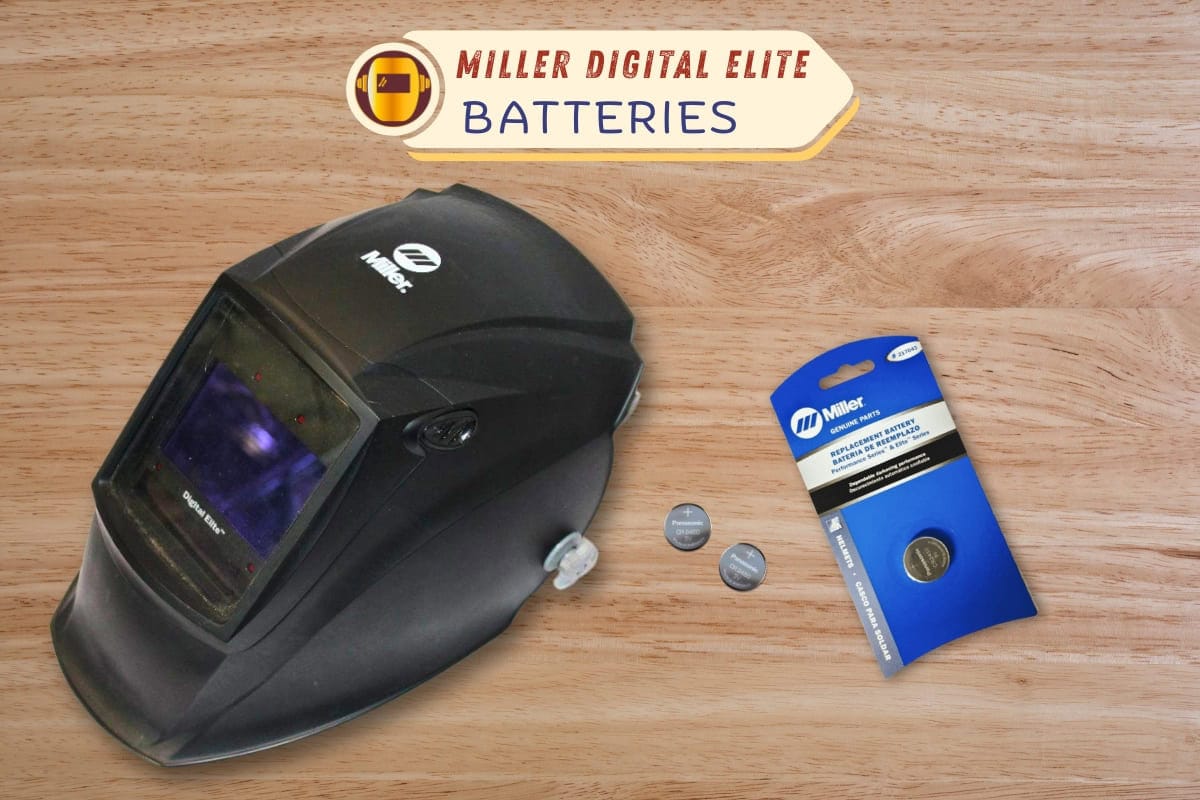
Miller Digital Elite
- Battery compartment is behind a small sliding door inside the helmet
- Uses two CR2450 batteries
- Slide the door open, replace both batteries, and close securely
- Don’t force the cover—it should slide smoothly if aligned properly
Miller Classic Series
- Battery holder is inside the lens area
- May require removing the lens itself (use care not to touch the sensor)
- Uses two CR2032 batteries
- Watch for a small spring or clip holding the battery; gently compress to release
Miller Performance Series
- Similar to Digital Elite in battery location
- Always replace both batteries at the same time
- Check for any small foam pieces that help hold batteries snugly—replace them if lost
Miller Infinity Series
- Battery access is easy—no screws needed
- Uses two CR2450 batteries
- Solar panel helps extend battery life, but you still must replace batteries when low
- If helmet acts odd after change, reset sensitivity and shade settings
Miller Titanium Series
- Single CR2032 battery
- Battery access is on the inside of the lens, under a plastic tab
- Gently lift the tab without bending it too far
Extra tip: For all models, consult your manual for diagrams if you’re unsure about any steps. Miller’s website has model-specific videos that show the process.
How Often Should You Change The Battery?
Most Miller helmet batteries last one to two years with regular use. If you weld daily or leave the helmet on for long periods, the battery drains faster. Solar-assisted models may go longer between changes, but you should still check them at least once a year.
Non-obvious insight: Even with solar assist, the coin cell battery is the main power source for the lens memory and quick response. Don’t ignore battery changes just because your helmet has a solar panel.
Practical example: Some welders only change the battery when the helmet fails. However, if you start a big job or work far from stores, it’s smart to replace the battery ahead of time. This prevents sudden failures in the middle of important work.
Mistakes To Avoid When Changing The Battery
Even experienced welders make mistakes that can damage their helmets or cause performance issues. Watch out for these common errors:
- Forcing the battery compartment—If it doesn’t open easily, check for hidden clips or screws. Don’t pry with metal tools.
- Touching the lens or sensors—Oils from your skin can interfere with the auto-darkening function. Wear gloves or handle parts by the edges.
- Using the wrong battery—Always use the correct type (CR2032 or CR2450). Other batteries may fit but provide the wrong voltage.
- Reversing battery polarity—Inserting the battery upside down won’t damage the helmet, but it won’t work until installed correctly.
- Losing small parts—Work over a tray or towel to catch screws and clips.
- Ignoring warning signs—If your helmet acts strange after a battery change, don’t keep welding. Double-check everything and consult the manual if needed.
Extra detail: Avoid buying batteries from unknown online sellers, as counterfeits are common. Cheap batteries may leak or die early, risking your helmet and your eyes.
How To Maximize Battery Life
You can get the most from your Miller helmet battery by following a few simple habits:
- Turn off the helmet when not in use (if your model has a power switch)
- Store the helmet away from bright sunlight—constant light can slowly drain the battery
- Keep the lens clean—dirt and fingerprints can cause sensors to work harder, draining power
- Replace both batteries at the same time (if your helmet uses two)—uneven power can cause glitches
- Store batteries in a cool, dry place before use—extreme temperatures can shorten shelf life
Pro tip: Some welders cover their solar panel with tape or stickers. This can shorten battery life because the panel helps recharge the battery during use. Avoid covering the panel, even with clear tape, as it can block light needed for charging.
Troubleshooting After Battery Change
Sometimes, your helmet may not work perfectly right after a battery change. Here’s how to fix the most common problems:
- Helmet won’t turn on
- Check battery orientation
- Make sure the battery is seated fully
- Try a different, brand-new battery
- Check for dirt or corrosion on contacts
- Lens won’t darken
- Test with a bright light or use the helmet’s test mode
- Clean the sensors on the front of the helmet
- Confirm both batteries (if two) are installed and matched
- Reset the helmet by removing and reinserting the battery
- Lens stays dark
- Remove and reinstall the battery to reset the electronics
- Make sure there’s no debris or residue on the sensors
- Adjust the sensitivity and delay controls
- Erratic lens behavior
- Try fresh batteries from a different package (old batteries can sometimes “die” on the shelf)
- Clean the lens and sensor area carefully
- Check for loose battery compartment doors or covers
If you still have issues, consult the Miller user manual or contact Miller’s support for further help. They can walk you through advanced troubleshooting or help with warranty service.
Comparing Miller Helmet Batteries
Many users wonder if they should buy brand-name batteries or less expensive generic ones. The truth is, both can work, but there are differences in performance and reliability.
Here’s a comparison to help you choose:
| Battery Brand | Average Lifespan | Cost per Battery | Reliability |
|---|---|---|---|
| Duracell (CR2450/CR2032) | 18-24 months | $3.00 | Very High |
| Energizer (CR2450/CR2032) | 18-24 months | $2.75 | Very High |
| Generic (Amazon Basics, etc.) | 6-12 months | $1.20 | Medium |
| Off-brand (no-name) | 3-6 months | $0.60 | Low |
Advice: For a critical safety item like your welding helmet, use a reliable brand. The small extra cost is worth the better performance and peace of mind. If you buy in bulk, check the expiration date—old stock can lose power even before you use it.
Credit: proweldinghelmets.com
Frequently Overlooked Tips For Battery Changes
Many guides miss these small but important details:
Check for firmware reset: Some Miller helmets reset internal settings when the battery is removed. You may need to set your preferred shade and sensitivity again. This is easy to forget, especially if you share your helmet with others.
Inspect for corrosion: If you see white or green residue on the battery contacts, clean it with a bit of isopropyl alcohol and a cotton swab. Corrosion can block power and make your helmet act “dead.”
Keep spare batteries: Always keep an extra set of batteries in your toolbox. It’s easy to forget the helmet uses batteries until they fail during a job.
Label the battery change date: Write the date you changed the battery on a small sticker inside the helmet. This helps you track battery life and avoid surprises.
When To Replace Versus Repair
If your Miller helmet still won’t work after a battery change, consider:
- Is the lens cracked or damaged?
- Are the sensors clean and undamaged?
- Did you use the correct battery type and install it properly?
- Have you tried resetting the helmet by removing the battery for 30 seconds?
If the answer to all is yes, but the helmet still fails, you may need professional service. Most Miller helmets have a warranty, and opening the electronics further may void it. Contact Miller support or your dealer for repair options.
Trying to fix the electronics yourself can make the problem worse and cost you more in the long run.
Safety Reminders
- Never weld with a faulty or non-darkening lens. Eye injury can happen in seconds.
- Always use the correct battery type—never try to “modify” your helmet for a different battery.
- Dispose of old batteries safely, according to local regulations. Coin cell batteries can be dangerous if swallowed.
- Store batteries out of reach of children and pets.
Additional Resources
If you want more technical details or troubleshooting help, visit the official Miller Electric website or refer to their downloadable user manuals. For in-depth battery chemistry and safety, check out this helpful resource: Wikipedia: Button Cell.

Credit: www.youtube.com
Final Thoughts
Changing the battery in your Miller welding helmet is a simple skill that keeps you safe and productive. With the right tools, a bit of care, and this guide by your side, you can handle the job confidently—no guesswork, no stress.
Your helmet will deliver the clear, instant protection you need for every weld.
Frequently Asked Questions
How Do I Know Which Battery My Miller Welding Helmet Uses?
Check your helmet’s user manual or look for markings inside the battery compartment. Most Miller helmets use either CR2032 or CR2450 coin cell batteries. If you’re unsure, search for your model number online or contact Miller support.
Can I Use Rechargeable Batteries In My Miller Helmet?
No. Miller helmets are designed for standard lithium coin cell batteries (CR2032 or CR2450). Rechargeable batteries have different voltage and discharge curves, which can cause malfunction or unreliable performance.
How Long Does A Miller Helmet Battery Last?
A new, quality coin cell battery usually lasts one to two years with regular welding use. Actual life depends on how often you weld, helmet features, and battery brand.
What If My Helmet Still Doesn’t Work After Changing The Battery?
Double-check the battery orientation and make sure the contacts are clean. Try a fresh battery from a different package. If problems continue, clean the sensors and consult your user manual. If you still have issues, contact Miller for support or warranty service.
Is It Safe To Change The Battery Myself?
Yes, as long as you follow the steps in this guide. Use the correct battery, avoid touching the sensors, and work in a clean area. If you feel unsure, ask a more experienced welder or take your helmet to a dealer.