Correct gas pressure is critical to flame stability, puddle control, and weld quality in gas welding. An Oxy Acetylene Welding Pressure Settings Chart provides the baseline oxygen and acetylene regulator ranges needed to produce a neutral flame across different tip sizes and material thicknesses.
Incorrect pressure settings can cause unstable flames, excessive oxidation, backfiring, poor penetration, or contaminated weld metal.
In real welding conditions, pressure imbalance directly affects heat concentration and puddle response. Too little acetylene results in a harsh, oxidizing flame that weakens the joint, while excessive pressure increases safety risks and makes flame control unpredictable.
Consistent pressure is also essential for repeatability, especially when moving between thin sheet metal and heavier sections.
I’ll explain how to interpret pressure settings charts correctly, why tip size and material thickness matter, and how proper regulator adjustment improves weld consistency, safety, and joint integrity before striking the flame.
The Basics Of Oxy Acetylene Welding
Oxy acetylene welding, also called gas welding, uses two gases—oxygen and acetylene—to produce a high-temperature flame. This flame melts the base metal and a filler rod, joining the pieces together. The process is popular because it’s portable, versatile, and relatively inexpensive.
Both gases are stored in pressurized cylinders. They travel through hoses to a torch, where you adjust the flow with valves. The pressures for each gas must be set correctly using regulators. Setting the right pressure is critical because it affects flame stability, heat output, and safety.
Why Pressure Settings Matter
Incorrect pressure settings can cause several problems:
- Backfire (a loud pop with flame going out) or flashback (flame travels into the hose) can occur if the pressures are wrong.
- The flame shape may become too long, too short, or unstable, making it hard to control the weld.
- Excessive pressure causes noisy flames, wasted gas, and possible damage to the torch.
- Low pressure leads to weak flames, poor penetration, and contaminated welds.
Correct pressure settings create a neutral flame—a balanced mix of oxygen and acetylene that’s perfect for welding.
Understanding Pressure Regulators And Gauges
Pressure regulators attach to the top of gas cylinders. They reduce high cylinder pressure to the lower working pressure needed for welding. Each regulator has two gauges:
- Cylinder Pressure Gauge: Shows the total pressure inside the gas cylinder.
- Working Pressure Gauge: Indicates the pressure being sent to the torch.
You set the working pressure by turning the adjusting knob on the regulator. Always check the manufacturer’s recommendations for your equipment, but pressure charts provide a good starting point for most jobs.
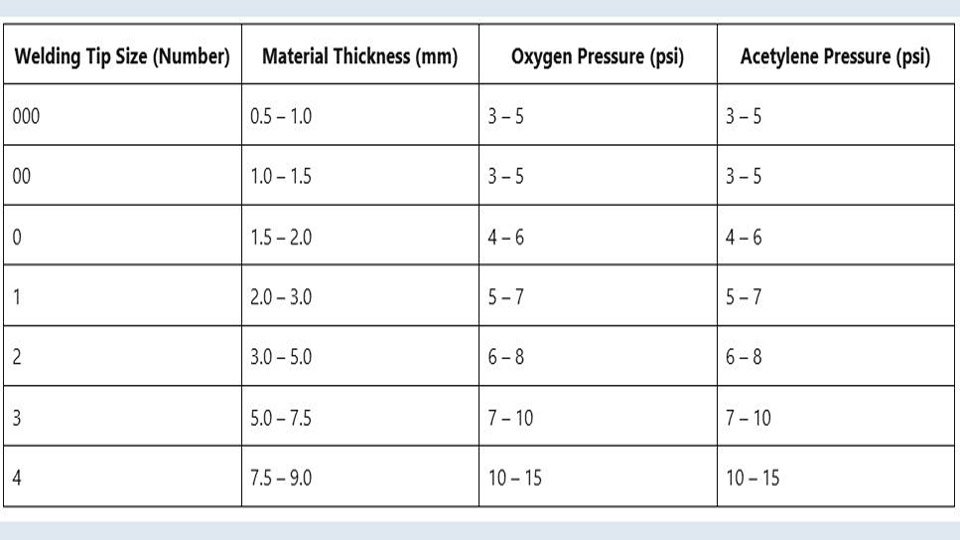
Oxy Acetylene Welding Pressure Settings Chart
The following chart shows recommended pressure settings for common welding tips and materials. These values are typical for standard welding torches, but always check your specific torch instructions.
| Welding Tip Size (Number) | Material Thickness (mm) | Oxygen Pressure (psi) | Acetylene Pressure (psi) |
|---|---|---|---|
| 000 | 0.5 – 1.0 | 3 – 5 | 3 – 5 |
| 00 | 1.0 – 1.5 | 3 – 5 | 3 – 5 |
| 0 | 1.5 – 2.0 | 4 – 6 | 4 – 6 |
| 1 | 2.0 – 3.0 | 5 – 7 | 5 – 7 |
| 2 | 3.0 – 5.0 | 6 – 8 | 6 – 8 |
| 3 | 5.0 – 7.5 | 7 – 10 | 7 – 10 |
| 4 | 7.5 – 9.0 | 10 – 15 | 10 – 15 |
Tip: For thinner metal (under 2 mm), start at the lower end of the pressure range. For thicker metal, use the higher values.
Matching Tip Size To Pressure Settings
The welding tip size affects how much gas flows through the torch. Larger tips need more pressure to deliver enough heat for thick metals, while small tips work best with lower pressures.
How To Choose The Right Tip
- Check the metal thickness. Match it to the chart above.
- Select the correct tip size. Tip numbers are usually stamped on the tip itself.
- Set the pressure. Adjust both oxygen and acetylene to the recommended psi for that tip.
Non-obvious insight: Using a tip that’s too large for thin metal can cause burn-through, while a tip that’s too small for thick metal will struggle to melt the base material.

Credit: www.scribd.com
Common Welding Applications And Their Pressure Settings
Different jobs require different settings. Here are some examples:
Welding Thin Sheet Metal
- Material: 1 mm mild steel (e.g., car body panels)
- Tip size: 000 or 00
- Oxygen/Acetylene Pressure: 3–5 psi each
This low pressure keeps the flame stable and reduces the risk of warping or burning holes.
Welding Medium Plate
- Material: 3–5 mm mild steel (e.g., brackets, frames)
- Tip size: 1 or 2
- Oxygen/Acetylene Pressure: 6–8 psi each
This range gives enough heat for good penetration without excessive spatter.
Welding Heavy Plate
- Material: 8–10 mm mild steel
- Tip size: 3 or 4
- Oxygen/Acetylene Pressure: 10–15 psi each
Higher pressures are needed for thick metal, but be careful—too much can blow out the weld.
Silver Brazing
- Material: Copper tubing (e.g., refrigeration)
- Tip size: 0 or 1
- Oxygen/Acetylene Pressure: 4–6 psi each
Brazing uses lower pressures than welding because you want to heat the joint—not melt the base metal.
Oxy Acetylene Cutting Pressure Settings
When cutting instead of welding, the pressures are different. Cutting tips use extra oxygen to blow molten metal away.
| Cutting Tip Size | Material Thickness (mm) | Oxygen Pressure (psi) | Acetylene Pressure (psi) |
|---|---|---|---|
| 000 | 3 – 6 | 15 – 20 | 3 – 5 |
| 00 | 6 – 12 | 20 – 25 | 4 – 6 |
| 0 | 12 – 25 | 25 – 30 | 5 – 8 |
| 1 | 25 – 40 | 30 – 40 | 7 – 10 |
Important: Always use the manufacturer’s guide for your cutting torch. Cutting uses much higher oxygen pressure than welding.
Credit: regulatortorchrepair.com
Key Factors That Affect Pressure Settings
While charts give you a starting point, real-world welding often requires small adjustments. Here’s what to watch for:
1. Type Of Metal
- Mild steel: Most common, use standard pressures.
- Stainless steel: Needs careful temperature control; sometimes lower pressures.
- Aluminum: Not usually welded with oxy acetylene (TIG/MIG is better), but if you do, use lower pressures and a soft flame.
- Copper and brass: Lower pressures help avoid overheating and oxidation.
2. Tip Condition
A dirty or partially blocked tip needs higher pressure to maintain the same flame. Always clean tips before adjusting pressures.
3. Hose Length And Diameter
Long or narrow hoses create more resistance. For hoses longer than 10 meters, you may need to increase pressure by 1–2 psi.
4. Altitude
At high elevations, air pressure is lower, so you may need to increase gas pressures slightly to compensate for reduced oxygen.
Non-obvious insight: Weather conditions (temperature and humidity) can change how the flame behaves. On very cold days, you may need slightly higher pressures for stable operation.
How To Set Oxy Acetylene Welding Pressures Step-by-step
Getting the pressures right is not just about reading the chart. Follow these steps for safe, accurate setup:
- Check all equipment. Make sure cylinders, regulators, hoses, and torch are in good condition.
- Open cylinder valves slowly. Open acetylene no more than 1.5 turns (for quick shutoff if needed).
- Set regulator pressures. With torch valves closed, adjust each regulator to the desired psi.
- Purge the lines. Briefly open each torch valve to clear air from the hoses, then close.
- Fine-tune at the torch. Light the acetylene first, add oxygen, and adjust both valves on the torch for a neutral flame.
- Check the flame. The inner cone should be sharp and steady, not flickering or noisy.
Expert tip: Always stand to one side of the regulator when opening cylinder valves, in case of a faulty gauge or burst disk.
Troubleshooting Common Problems
Even with correct settings, issues can occur. Here’s how to spot and fix them:
Flame Pops And Backfires
- Cause: Pressures set too high or tip too close to work.
- Solution: Lower pressures, use correct tip size, and keep tip slightly off the surface.
Flickering Or Unstable Flame
- Cause: Pressures set too low, dirty tip, or leaks.
- Solution: Increase pressures slightly, clean the tip, and check for leaks.
Sooty Or Smoky Flame
- Cause: Too much acetylene, not enough oxygen.
- Solution: Increase oxygen pressure or open the torch oxygen valve more.
Noisy, Hissing Flame
- Cause: Pressures too high.
- Solution: Reduce both pressures and re-check the flame.
Safety Tips When Setting Oxy Acetylene Pressures
Oxy acetylene welding can be dangerous if not handled correctly. Always follow these safety practices:
- Never exceed 15 psi acetylene: Above this, acetylene becomes unstable and can explode.
- Check for leaks: Use soapy water on connections. Bubbles mean a leak—fix before lighting.
- Wear protective gear: Use flame-resistant gloves, goggles with shade 5 or 6 lenses, and a welding jacket.
- Work in a well-ventilated area: Combustion gases can be toxic.
- Store cylinders upright: Secure them to prevent falling or rolling.
🛠 Essential Tools for Safe & Efficient Oxy-Acetylene Welding
Proper pressure settings are only part of the equation. Keeping your equipment clean, checking for gas leaks, and using the right safety gear can help improve performance and create a safer welding environment.
WILLBOND Torch Tip Cleaner Kit
Keep torch tips free from debris and buildup to maintain a stable flame and consistent welding performance.
Check Price on Amazon →PT199 Natural Gas Leak Detector
Quickly detect potential gas leaks in hoses, fittings, and connections before starting work for added peace of mind.
Check Price on Amazon →16-Inch Heat Resistant Welding Gloves
Protect your hands and forearms from heat, sparks, and hot metal while welding, cutting, or brazing.
Check Price on Amazon →Regular maintenance and proper safety equipment can help you achieve more consistent flame control, improve welding efficiency, and reduce common issues when working with oxy-acetylene systems.
How To Read And Use A Pressure Chart
A pressure settings chart is only useful if you know how to apply it. Here’s a short example:
Suppose you want to weld 2 mm sheet steel.
- Find 2 mm in the “Material Thickness” column.
- The chart suggests tip size 0, with 4–6 psi for both gases.
- Set your regulators to 5 psi as a starting point.
- Light the torch and adjust for a neutral flame.
- If the flame is unstable, make small adjustments (±1 psi) as needed.
Pro tip: Write down your preferred settings for common jobs. This saves time next time you weld similar materials.
Differences Between Welding And Cutting Pressure Settings
Many beginners think welding and cutting use the same pressures. In fact, cutting uses much higher oxygen flow because the jet blows molten metal out of the cut.
| Process | Typical Oxygen Pressure (psi) | Typical Acetylene Pressure (psi) |
|---|---|---|
| Welding | 3 – 15 | 3 – 15 |
| Cutting | 15 – 40 | 3 – 10 |
Never use cutting pressures for welding—it can damage your work and torch.
Credit: weldguru.com
Real-world Examples And Case Studies
Example 1: Automotive Bodywork
A mechanic needs to weld a patch on a car fender (1 mm steel).
- Tip size: 00
- Oxygen/Acetylene Pressure: 4 psi each
- Result: The neutral flame melts the edges smoothly, with minimal distortion.
Example 2: Fabricating A Steel Table
Welding together 5 mm thick plates.
- Tip size: 2
- Oxygen/Acetylene Pressure: 8 psi each
- Result: Good penetration and strong welds, without blowing holes.
Example 3: Cutting 10 Mm Plate For Scrap
Using a cutting torch.
- Cutting tip: 0
- Oxygen Pressure: 25 psi
- Acetylene Pressure: 5 psi
- Result: Clean cuts with little slag.
Lesson: Always adjust to the job and check your work as you go.
Common Mistakes And How To Avoid Them
- Setting both pressures too high: Leads to noisy, hard-to-control flames and wasted gas.
- Using the wrong tip: Too small = weak welds. Too large = melt-through or excess spatter.
- Ignoring tip cleanliness: Clogged tips cause poor flame and overheating.
- Not checking for leaks: Leaks can cause flashbacks or explosions.
- Forgetting to purge lines: Air in the hoses leads to popping and unstable flames.
Best practice: Develop a routine for setup, including all checks and adjustments.
Advice For Beginners
- Start with recommended settings from the chart, but be ready to adjust.
- Practice on scrap metal before welding real parts.
- Observe the flame: A sharp, steady inner cone means good pressure balance.
- Ask experienced welders for feedback. Small changes can make a big difference.
Non-obvious insight: Don’t try to weld too fast. Let the flame do the work at its own pace; rushing leads to weak welds.
Where To Find Reliable Pressure Charts
Many reputable sources publish pressure settings, including torch manufacturers and welding schools. For more in-depth technical data, see the Wikipedia Oxy-fuel Welding and Cutting page.
Always cross-check charts if you change brands or torch types.
Frequently Asked Questions
What Happens If I Set The Acetylene Pressure Above 15 Psi?
Setting acetylene pressure above 15 psi is extremely dangerous. Acetylene becomes unstable at higher pressures and can explode, even without a spark. Always keep acetylene below 15 psi, and ideally between 3–10 psi for most welding jobs.
Can I Use The Same Pressure Settings For All Metals?
No, different metals need different flame characteristics. Mild steel works well with standard settings, but metals like aluminum or stainless steel may require lower pressures and softer flames. Always check recommendations for the specific metal you’re working with.
How Do I Know If My Flame Is Set Correctly?
A neutral flame is the goal. It has a sharp, blue inner cone and does not produce soot, noise, or flickering. If the flame is yellow (too much acetylene) or loud (too much oxygen), adjust the pressures and torch valves until the flame stabilizes.
Is It Safe To Adjust Pressures While Welding?
It’s best to set pressures before lighting the torch. If you need to adjust while welding, use the torch valves for fine-tuning, not the regulators. For major changes, turn off the torch, reset the regulators, then relight.
Why Does My Flame Go Out Or Pop When I Start Welding?
This is usually caused by incorrect pressure settings, a dirty or wrong-sized tip, or holding the tip too close to the work. Check your settings, clean the tip, and maintain a small gap between tip and metal for best results.
Setting the right oxy acetylene welding pressure is a skill that takes practice, but it’s essential for safe and effective welding. Using the correct chart values, adjusting for your specific job, and checking the flame each time will give you better welds and fewer problems.
Always work safely, double-check your equipment, and never guess when it comes to gas pressures. With these tips and knowledge, you’ll be ready to tackle any welding project with confidence.

Hi, I’m Zachary Ford. I’m passionate about welding and dedicated to helping both beginners and experienced welders make informed decisions. I research, test, and write about welding helmets, welding machines, safety equipment, and essential workshop tools. My goal is to provide honest reviews, practical buying guides, and easy-to-follow tutorials that help you weld more safely, work more efficiently, and choose the right gear with confidence.