Spot welding parameters calculations determine whether a joint achieves proper fusion or fails under load. In resistance welding, small deviations in current, electrode force, or weld time directly affect nugget size, penetration, and heat balance. Incorrect values can cause expulsion, weak weld nuggets, excessive indentation, or inconsistent quality that leads to failed inspections and costly rework.
Understanding how to calculate and balance these variables is essential for maintaining arc stability, material integrity, and production efficiency across different sheet thicknesses and alloys. This topic matters in real fabrication because parameter errors rarely show immediately but often appear later as fatigue cracks or separation in service.
By mastering the calculation logic behind settings, not just memorizing charts, you gain control over weld strength, repeatability, and process reliability, which is the foundation for optimizing any resistance welding operation.
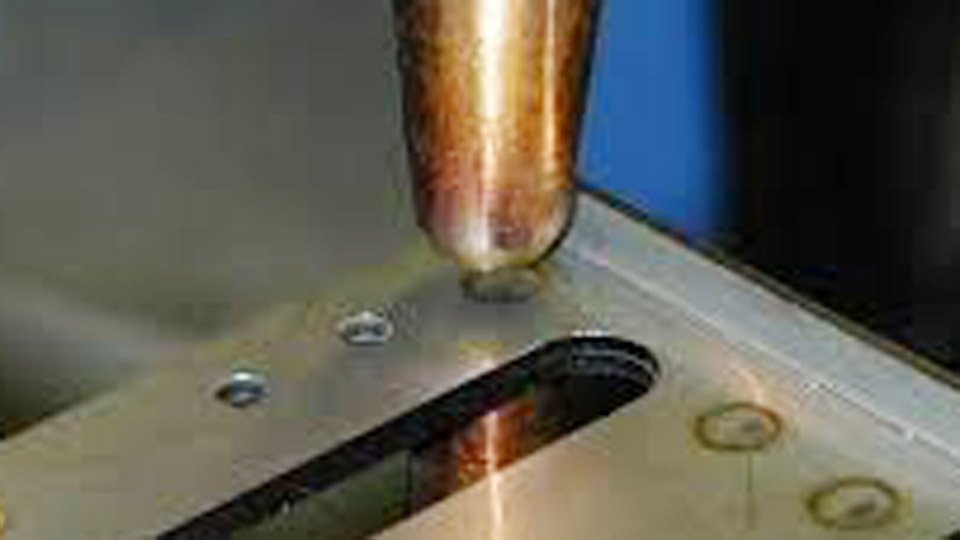
Image shengenfab
Fundamentals of Resistance Spot Welding
Spot welding is a resistance process, plain and simple. Two copper electrodes clamp your workpieces together, squeeze out the air gaps, and dump a massive burst of current through the stack. The resistance at the interface, where the two sheets touch, generates heat according to the classic formula: Q = I²Rt.
- Q is the heat energy (in joules).
- I is the welding current (amps).
- R is the total resistance (mostly at the faying surface).
- t is the weld time (in seconds or cycles).
That heat melts a nugget right at the joint, and the electrode force forges it solid as it cools. The beauty is in the speed—most welds take less than half a second—but the devil is in the details. Get the balance wrong, and you either underheat (cold weld) or overheat (expulsion and electrode mushrooming).
In my experience, 80% of spot welding headaches come from ignoring one of the three core parameters: current, force, and time. The rest—squeeze time, hold time, electrode material—fine-tune the process. But first, you have to calculate the basics based on material thickness and type.
Critical Spot Welding Parameters Explained
Let’s break down what actually controls the weld. I’ll explain what each is, how it works in practice, and the shop-floor adjustments I’ve made over the years.
Electrode Force: The Squeeze That Makes It All Possible
Electrode force is the pressure your tips apply to the work. It does three things: breaks through surface oxides, reduces contact resistance for consistent current flow, and forges the molten nugget as it solidifies.
Too little force, and you get high resistance, arcing, and expulsion. Too much, and you indent the surface or squash the nugget flat. I always start with the rule of thumb for mild steel: force (lbs) ≈ 6000 × total thickness (inches). For two pieces of 0.050″ sheet, that’s about 600 lbs.
In metric, it’s roughly 90 N per mm² of electrode face area. But here’s the real tip from the shop: on galvanized material, bump force up 20-30% to crush the zinc coating without it alloying into your tips.
I’ve got a 75 kVA press welder with an air cylinder that I set using a force gauge. Beginners always underestimate how much force thin metal needs—I’ve seen guys weld 18-gauge with 200 lbs and wonder why the nuggets are tiny.
Welding Current: The Heat Engine
Current is the star of the show. It directly drives the I² in that heat formula, so small changes make big differences.
For mild steel, the old-school calculation is current (A) ≈ 100,000 × total thickness (inches). So for 0.050″ + 0.050″, you’re looking at around 10,000 amps secondary current.
Modern machines let you set percent heat or actual amps, but I always think in terms of the machine’s output. On my Miller unit, I start at 60-70% and dial up until I see a good nugget without spitting.
Pro tip: Aluminum needs way more current—often double what steel takes—because it’s such a good conductor. Stainless needs less because of its higher resistance.
Weld Time: Cycles That Matter
Time is measured in cycles on 60 Hz power—1 cycle = 1/60th of a second. For thin stuff (under 0.060″), 4-8 cycles is plenty. Thicker material needs more, but never go crazy or you’ll overheat the electrodes.
The calculation I use: weld time (cycles) ≈ 100 × total thickness (inches). For 0.062″ material, that’s about 12 cycles, but I usually pull it back to 8-10 and compensate with a bit more current.
On pulsation schedules for thick or coated steel, I break it into short bursts with cool time in between. Keeps the heat in the nugget instead of cooking the electrodes.
Hold Time, Squeeze Time, and Electrode Design
- Squeeze time: 10-30 cycles to build full force before current hits. Skimp on this and you’ll get inconsistent welds.
- Hold time: 5-15 cycles to let the nugget freeze under pressure. Too short on high-carbon steel and it cracks.
- Electrode tips: Class 2 copper for steel, Class 1 for aluminum. Face diameter should be about 4-5 times the sheet thickness in mm. I dress mine every 50-100 welds on production runs.
How to Calculate Spot Welding Parameters Step by Step
Here’s the exact process I use when a new job hits the bench. It works for 90% of what DIYers and small shops weld.
Step 1: Identify your material and thickness.
Measure the thinnest sheet (use that for calculations if dissimilar). Note if it’s bare, galvanized, stainless, or aluminum.
Step 2: Calculate the target nugget size.
Minimum nugget diameter = 4 × √t (t in mm) or about 5-6 times the thickness for strong welds. For 1 mm (0.040″) steel, aim for a 5-6 mm nugget.
Step 3: Pick your starting force.
Use the 6000 × total thickness (inches) rule, or reference a chart (more on that below).
Step 4: Calculate rough current and time.
Current (A) = 100,000 × total thickness (inches)
Time (cycles) = 100 × total thickness (inches)
Then adjust: Reduce time and increase current for cleaner welds, or vice versa for thicker stuff.
Step 5: Set squeeze and hold.
Squeeze: 20-40 cycles.
Hold: Equal to weld time or a bit more.
Step 6: Test and tweak.
Make three test welds. Do a peel test. If the nugget pulls out clean and is the right size, you’re good. If not, adjust current by 5-10% or force by 10%.
I keep a notebook with my successful settings for common jobs. Saves so much time on repeat work.
Spot Welding Parameter Charts for Common Materials
Charts are your best friend. Here’s what I use in the shop, pulled from real-world data and adjusted over years of testing. All for single-phase AC 60 Hz machines, two equal thicknesses.
Mild Steel (Low Carbon)
| Thickness (inches) | Gauge | Tip Face Diameter | Force (lbs) | Current (amps) | Weld Time (cycles) |
|---|---|---|---|---|---|
| 0.010 | 30 | 1/8″ | 200 | 4,000 | 2 |
| 0.021 | 25 | 3/16″ | 300 | 6,500 | 4 |
| 0.031 | 22 | 3/16″ | 400 | 8,000 | 5 |
| 0.040 | 20 | 1/4″ | 500 | 8,800 | 6 |
| 0.050 | 18 | 1/4″ | 650 | 9,600 | 8 |
| 0.062 | 16 | 1/4″ | 800 | 10,600 | 10 |
| 0.078 | 14 | 5/16″ | 1,100 | 11,800 | 13 |
| 0.094 | 13 | 5/16″ | 1,300 | 13,000 | 15 |
| 0.125 | 11 | 3/8″ | 1,800 | 15,600 | 20 |
These are starting points. For coated steel, add 10-20% current.
Galvanized Steel
Galvanized needs more force and time because the zinc fights back.
| Thickness (inches) | Gauge | Tip Face Diameter | Force (lbs) | Current (amps) | Weld Time (cycles) |
|---|---|---|---|---|---|
| 0.022 | 26 | 3/16″ | 310 | 8,800 | 6 |
| 0.031 | 22 | 3/16″ | 450 | 9,500 | 7 |
| 0.051 | 18 | 7/32″ | 800 | 14,000 | 12 |
| 0.064 | 16 | 1/4″ | 1,050 | 15,500 | 15 |
| 0.093 | 13 | 11/32″ | 1,700 | 23,000 | 22 |
Dress electrodes more often—zinc builds up fast.
Stainless Steel
Higher resistance means lower current, higher force.
| Thickness (inches) | Gauge | Tip Face Diameter | Force (lbs) | Current (amps) | Weld Time (cycles) |
|---|---|---|---|---|---|
| 0.010 | 32 | 1/8″ | 230 | 2,000 | 1 |
| 0.031 | 22 | 3/16″ | 650 | 4,800 | 3 |
| 0.050 | 18 | 1/4″ | 1,200 | 7,500 | 6 |
| 0.062 | 16 | 1/4″ | 1,500 | 9,000 | 7 |
| 0.125 | 11 | 3/8″ | 3,200 | 15,000 | 17 |
Aluminum
This is the tricky one. High current, low force, short time. Use MFDC if you can—AC struggles here.
| Thickness (inches) | Gauge | Tip Face Diameter | Force (lbs) | Current (amps) | Weld Time (cycles) |
|---|---|---|---|---|---|
| 0.016 | 26 | 5/8″ | 200 | 14,000 | 1 |
| 0.032 | 20 | 5/8″ | 400 | 18,000 | 2-3 |
| 0.050 | 16 | 5/8″ | 500 | 22,000 | 4 |
| 0.063 | 14 | 5/8″ | 550 | 24,000 | 5 |
| 0.102 | 10 | 7/8″ | 800 | 32,000 | 8 |
Always use a forging force pulse at the end to close porosity.
Adjusting Parameters for Different Materials and Thicknesses
Material changes everything. Mild steel is forgiving. Aluminum is picky—too much time and it cracks. High-strength AHSS (common in modern cars) needs longer times and higher forces but lower currents.
For dissimilar thicknesses, base everything on the thinner sheet and use a domed electrode on the thicker side for better heat balance.
When welding coated materials, start with the uncoated chart and increase current 10-15%. For rusty or dirty stock? Clean it first—parameters won’t save you from bad prep.
Common Mistakes and How to Fix Bad Spot Welds
I’ve made every mistake in the book, and so will you if you’re honest.
- Burn-through: Too much current or time. Drop current 10% or shorten time by 2 cycles.
- Weak welds (no nugget): Not enough heat or force. Increase current first, then force.
- Expulsion (spatter everywhere): Force too low or current too high. Add force.
- Sticking electrodes: Hold time too short or dirty tips. Increase hold and dress electrodes.
- Indentation: Excessive force. Back it off 10-15%.
Always do a destructive test on scrap. Peel it apart—if the nugget stays in one sheet and pulls a button from the other, you’re in business.
Shop Tips from Two Decades on the Floor
- Keep a force gauge handy. Digital ones are cheap now and worth every penny.
- For portable gun welders (like the ones for auto body), shorter arms mean higher current—adjust accordingly.
- On thin auto body panels, I use a “kiss” schedule: low force to start, ramp up during the weld.
- Battery tab welding? Capacitor discharge machines are king—parameters are in milliseconds, not cycles.
- Clean your tips religiously. I use a tip dresser every shift.
One story: We were repairing a classic Mustang fender. Guy before me burned holes everywhere. I dropped the current 15%, added 10 cycles of squeeze, and the patches held like factory. Customer thought I was a wizard.
Testing Your Spot Welds Like a Pro
Don’t trust your eyes.
- Peel test: Pry the sheets apart. Good weld leaves a full nugget button.
- Chisel test: Drive a chisel between welds. If it doesn’t separate, solid.
- Shear test: For critical stuff, pull in a vise or tensile tester. Aim for at least 4× the sheet thickness in nugget diameter.
I do these on every new setup.
Safety Considerations in Spot Welding
This stuff is no joke. High currents mean serious arc flash potential. Wear proper gloves, face shield (shade 5-8), and leather apron. Those electrodes get hot—I’ve got scars to prove it.
Keep the work area dry. And for production, make sure your machine is grounded and the secondary cables aren’t frayed.
Wrapping It Up: Why These Calculations Make You Better
Once you start calculating spot welding parameters instead of guessing, your welds become predictable. You waste less material, spend less time fixing mistakes, and turn out work that actually holds up. The next time you’re staring at a stack of sheet metal, don’t just hit the pedal and hope.
Run the numbers, reference the chart, and make that first weld count. You’ll feel the difference immediately. When in doubt, err on the side of slightly higher force and shorter weld time. It keeps your electrodes happy and your welds strong.
FAQ
What are the best spot welding parameters for 18-gauge mild steel?
For two pieces of 18-gauge (0.050″), start with 650 lbs force, 9,600 amps, and 8 cycles. That’s my go-to for auto body patches. Do a peel test and adjust current up 5% if the nugget is small.
How do I calculate spot welding parameters for aluminum?
Aluminum needs roughly double the current of steel and much shorter times. For 0.040″ (18-gauge), try 20,000 amps and 3-4 cycles with 450 lbs force. Use Class 1 electrodes and consider a forging pulse.
Why do my spot welds keep burning through thin sheet?
Usually too much current or weld time. Drop current by 10-15% and shorten time by 2 cycles. Also check your electrode alignment—misalignment concentrates heat.
What’s the minimum nugget size for a good spot weld?
Aim for at least 4 times the square root of the sheet thickness in mm (or about 5-6 times the thickness for steel). For 1 mm sheet, that’s a 5-6 mm nugget.
Can I spot weld galvanized steel with the same settings as bare steel?
No—bump force and time up 20-30%, and expect to dress electrodes more often. The zinc coating changes everything. Start with the galvanized chart values.

Hi, I’m Zachary Ford. I’m passionate about welding and dedicated to helping both beginners and experienced welders make informed decisions. I research, test, and write about welding helmets, welding machines, safety equipment, and essential workshop tools. My goal is to provide honest reviews, practical buying guides, and easy-to-follow tutorials that help you weld more safely, work more efficiently, and choose the right gear with confidence.