
For mild steel with a 1/8 inch (3.2 mm) 7018 rod, start at about 120 to 130 amps on DC electrode positive. A welder amperage guide matters because the right number changes with rod size, metal thickness and position — and this one covers the settings, the signs of a bad setting, and when to change them.
What amperage actually does
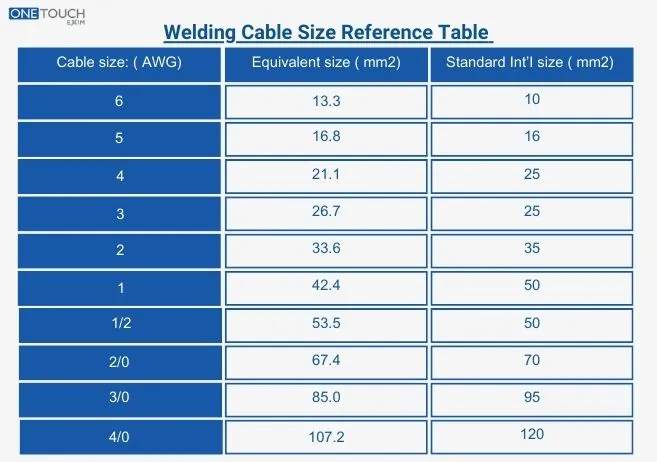
Amperage is the current flowing through the rod, and it sets how much heat lands in the metal.
The mistake people bring here is thinking one number fits every job. It doesn’t.
Setting your amps step by step
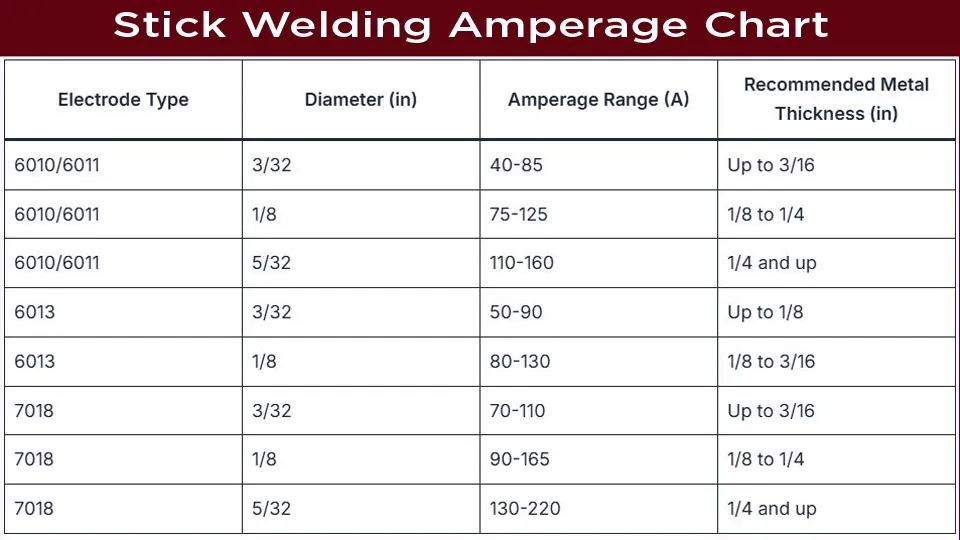
- Find your rod’s recommended range. A 3/32 inch 7018 runs around 70 to 100 amps; a 1/8 inch 7018 runs around 110 to 140 amps. Check the rod packet or the maker’s data sheet.
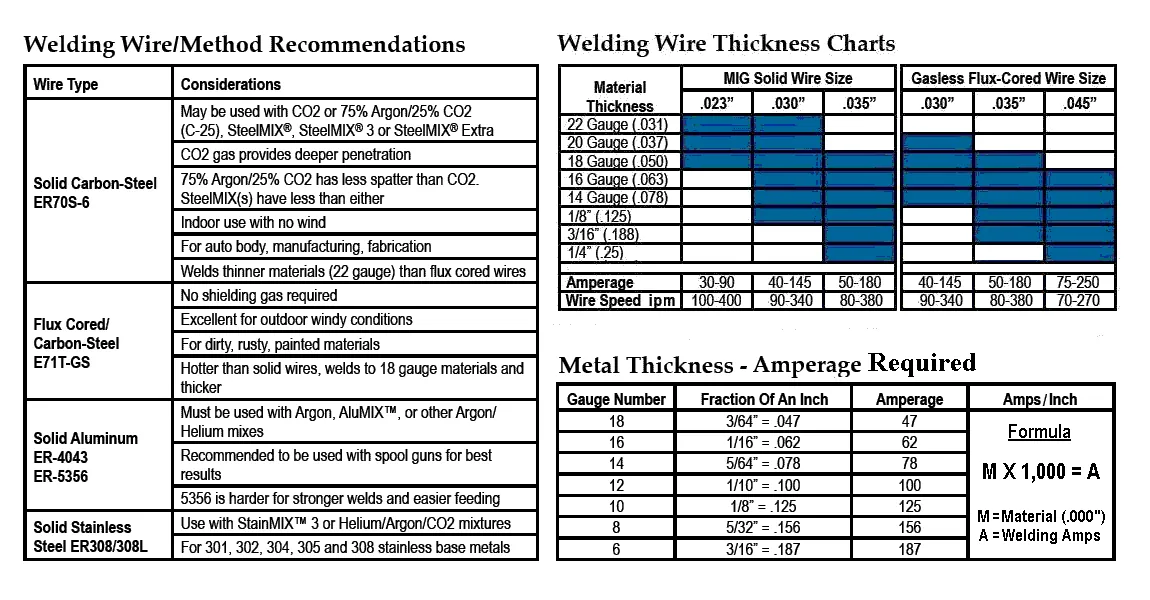
- Match amps to metal thickness. Thin sheet under 1/8 inch needs the low end. Plate 1/4 inch and up takes the high end.
- Set the machine to DC electrode positive (DCEP) for 7018. For 6010 and 6011, DCEP also works well.
- Run a test bead on scrap of the same thickness, about 3 inches long, at your starting number.
- Watch the puddle. It should be flat, with the edges wetting into the plate and no spatter popping.
- Adjust by 5 to 10 amps at a time. Never jump 30 amps in one move.
- Write the number down once it works, along with the rod and thickness.
The one judgement call is reading the puddle, not the dial.
If a step needs a licence or a certified procedure — structural, pressure or code work — stop and hand it to a certified welder. That’s not a do-it-yourself job.
Amperage by rod and thickness
The table below covers the common rods. These numbers assume DCEP on mild steel in the flat position. For vertical or overhead work, drop about 10 to 15 percent.
| Situation | What to use | How long | What to watch for |
|---|---|---|---|
| 1/8 in plate, 3/32 in 7018 | 80–90 amps, DCEP | 3 in test bead | Rod sticking to the plate |
| 1/4 in plate, 1/8 in 7018 | 120–130 amps, DCEP | 3 in test bead | Cold lap at the edges |
| 1/2 in plate, 5/32 in 7018 | 150–180 amps, DCEP | 3 in test bead | Undercut along the toe |
| Thin sheet, 3/32 in 6013 | 60–75 amps, DCEN | 2 in test bead | Burn-through holes |
| Root pass, 1/8 in 6010 | 90–110 amps, DCEP | 3 in test bead | Slag trapped in the root |
| Vertical up, 1/8 in 7018 | 100–110 amps, DCEP | 3 in test bead | Puddle running down |
| Overhead, 3/32 in 7018 | 75–85 amps, DCEP | 2 in test bead | Dripping metal |
What good welders check that beginners skip
Experienced welders clean the metal first. Ten seconds with a grinder saves a bead you’d have to cut out.
Partway through a bead, they check the puddle width against the last one. If it’s suddenly wider, the plate is getting hotter and the amps may need to come down a little on the next pass.
Prep before you touch the dial
- Grind to bare metal, 1 inch back from the joint on both sides.
- Set the gap to about 1/8 inch for a butt joint on 1/4 inch plate.
- Check the ground clamp is on clean metal, not paint.
Reading the bead while you weld
- Listen. A steady crackle means the amps are close. A loud pop or a hiss means the arc length or the setting is off.
- Watch the edges. If they sit on top of the plate, add 5 to 10 amps.
- Check the slag. Slag that chips off in one piece usually means good heat.
Common problems and quick fixes
| What you notice | What it usually means | What to do first |
|---|---|---|
| Rod sticks to the plate | Amps too low | Add 10 amps and retry |
| Rod burns back and stubs out | Amps too high | Drop 10 amps |
| Bead sits on top, no fusion | Too cold for the thickness | Add 10–15 amps or slow down |
| Holes burn through thin sheet | Too hot for the gauge | Drop 10 amps or use a smaller rod |
| Heavy spatter, rough bead | Arc length too long | Tighten the arc, then check amps |
| Undercut along the edge | Too hot, or travel too fast | Drop 5–10 amps, slow the travel |
Arc time and duty cycle limits
Welder duty cycle is a real limit, and the machine’s data plate is where you read it. A 200 amp machine rated at 60 percent duty cycle means 6 minutes of welding out of every 10, then let it cool.
The American Welding Society (AWS) publishes rod current ranges in its A5 filler metal specifications, and OSHA enforces arc welding safety requirements in US workplaces.
Keeping the settings working
Once you find a number that welds clean, write it on the machine or in a notebook: rod, size, thickness, position, amps. If the bead sounds different, re-read the puddle before touching the dial.
When this approach isn’t right
If you’re welding aluminum, this guide doesn’t apply — aluminum stick rods exist, but the current, polarity and technique are different, and TIG or MIG is usually the better choice.
If you’re on a code job with a written procedure (WPS), the amps are set by that document, not by feel. And if you’re on a small 120 volt machine, the top amps may not reach what 1/4 inch plate needs — step up to a 240 volt unit or preheat the metal.
Frequently asked questions
What amperage should I use for 1/8 inch 7018 rod?
About 110 to 140 amps on DCEP for flat work on 1/4 inch plate. For vertical or overhead, drop to roughly 100 to 115 amps and use a shorter arc.
Why does my rod keep sticking to the plate?
The amps are too low for the rod size, or the arc length is too short. Add 10 amps and hold a slightly longer arc.
How long can I weld at 200 amps?
It depends on your machine’s duty cycle. A 60 percent rating at 200 amps means 6 minutes of welding, then 4 minutes cooling. Check your machine’s data plate for its exact rating.
Is it safe to weld at max amps on a small machine?
No, not for long. Running at the top of the range heats the machine fast. Stick to the duty cycle on the data plate and let it cool when the overload trips.
What happens if the amps are too high?
You get burn-through on thin metal, undercut along the edges, and heavy spatter. The rod also burns back faster and the puddle gets hard to control.
Can I use the same amps for vertical and flat welding?
No. Vertical and overhead work needs about 10 to 15 percent fewer amps than flat, because gravity pulls the puddle down and you need it to freeze faster.
How do I know if my amps are right without a chart?
Run a 3 inch test bead on scrap of the same thickness. If the edges wet in, the sound is a steady crackle and the slag chips clean, the setting is close.
Conclusion
Get the rod, the thickness and the position right, and the amps almost pick themselves. Start in the middle of the rod’s range, run a test bead, and move 5 to 10 amps at a time until the puddle behaves. Write down what worked — that note beats any chart, because it’s your machine and your metal.

Hi, I’m Zachary Ford. I’m passionate about welding and dedicated to helping both beginners and experienced welders make informed decisions. I research, test, and write about welding helmets, welding machines, safety equipment, and essential workshop tools. My goal is to provide honest reviews, practical buying guides, and easy-to-follow tutorials that help you weld more safely, work more efficiently, and choose the right gear with confidence.