Are you ready to take your DIY skills to the next level? Making your own mini spot welder is easier than you think, and it can save you time and money on small metal projects.
Imagine having a powerful tool at your fingertips that lets you join metal pieces quickly and cleanly, without needing expensive equipment. In this guide, you’ll discover simple steps to build a compact, efficient spot welder using materials you likely already have.
Whether you’re fixing battery packs, crafting metal art, or working on electronics, this mini spot welder will become your new go-to tool. Keep reading and unlock the secrets to creating your very own spot welder today!
Credit: sequremall.com
Materials Needed
Gathering the right materials is the first step to build a mini spot welder. Choosing quality parts ensures your welder works well and lasts long. Prepare all items before starting the project to avoid delays.
Focus on tools, power sources, and safety equipment. Each category plays a vital role in the welding process. Below are the key materials needed for this DIY project.
Essential Tools
Start with basic tools like a soldering iron and wire cutters. You will also need pliers for bending and holding wires. A drill helps to make precise holes in metal parts. A screwdriver set is useful for assembling components. Include a multimeter to check electrical connections.
Battery Options
Choose a strong power source to generate enough heat for welding. Common options include lithium-ion batteries or lead-acid batteries. Lithium-ion packs are light and rechargeable. Lead-acid batteries provide high current but are heavier. Pick a battery that matches your welder’s size and use.
Safety Gear
Protect yourself by wearing safety glasses to shield your eyes from sparks. Use heat-resistant gloves to avoid burns. A welding apron or heavy clothing guards against hot metal splashes. Work in a well-ventilated area to reduce fumes. Always keep a fire extinguisher nearby for emergencies.
Choosing The Right Battery
Choosing the right battery is a key step in making a mini spot welder. The battery powers the welder and affects its performance. A good battery ensures strong, quick welds and keeps the device safe to use. Understanding battery types, capacity, voltage, and safety helps you select the best option for your project.
Types Of Batteries
Different batteries fit different welding needs. Lead-acid batteries are common and affordable. They deliver high current but weigh more. Lithium-ion batteries are lighter and charge faster. They last longer but cost more. NiMH batteries offer moderate power and are safe but less common for welders. Choose based on size, weight, and power needs.
Battery Capacity And Voltage
Battery capacity shows how much energy it can store, measured in amp-hours (Ah). Higher capacity means longer welding time. Voltage affects the power output. Spot welders need high current at low voltage for better control. Common voltage ranges are 12V to 24V. Match capacity and voltage to your welding tasks for best results.
Safety Considerations
Safety is critical when working with batteries. Always use batteries with proper insulation and no damage. Avoid overcharging or deep discharging to prevent fires. Use a battery holder or case to protect connections. Keep batteries away from heat and water. Follow manufacturer instructions and wear safety gear during welding.
Preparing The Components
Preparing the components is a vital step in building a mini spot welder. Precise preparation ensures the device works safely and efficiently. This process involves cutting and stripping wires, preparing electrodes, and assembling the frame. Each step demands attention to detail to avoid future problems.
Cutting And Stripping Wires
Start by selecting thick copper wires for the main connections. Use wire cutters to cut them into the required lengths. Strip the insulation carefully to expose clean copper without damaging the wires. Proper stripping helps create strong electrical connections. Avoid leaving any insulation on the contact points.
Preparing Electrodes
Electrodes conduct electricity and apply pressure during welding. Use copper rods or thick copper wire as electrodes. Cut them to equal lengths for balanced pressure. Clean the electrode tips with sandpaper to remove any oxidation. Smooth and shiny tips improve welding quality and reduce resistance.
Assembling The Frame
The frame holds all parts in place and must be sturdy. Use metal brackets or thick wood for the frame base. Attach insulated handles to keep your hands safe from heat and electricity. Secure the electrodes firmly to the frame using screws or clamps. Check that the electrodes align correctly for even welding pressure.

Credit: www.youtube.com
Wiring The Spot Welder
Wiring the spot welder is a key step to build a reliable mini spot welder. Proper wiring ensures safe and effective operation. This section covers how to connect the battery, electrodes, and add essential components like a switch. Secure connections help maintain good current flow and prevent hazards.
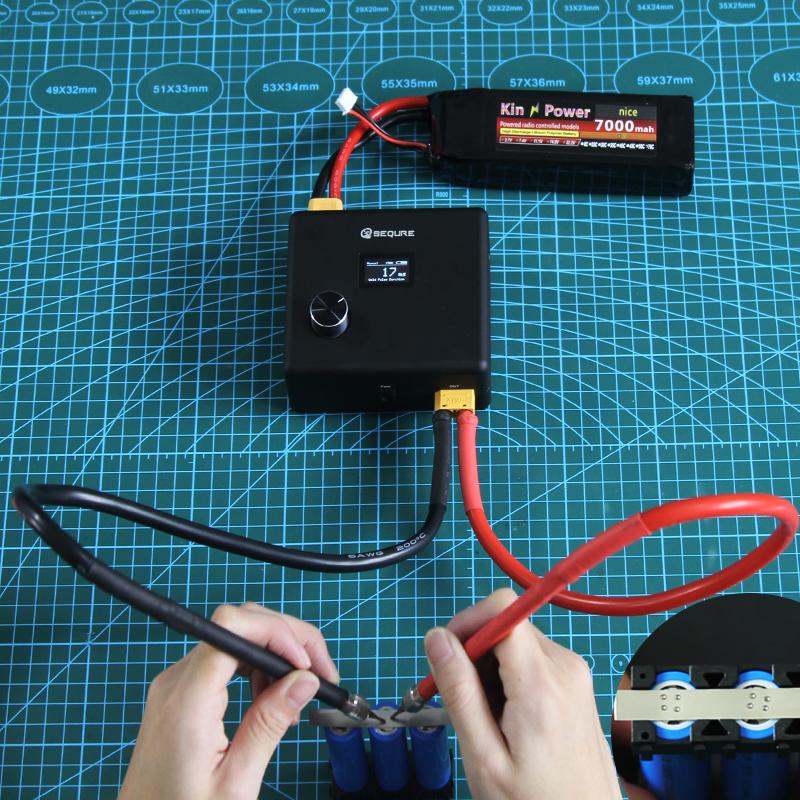
Connecting Battery And Electrodes
Start by choosing a suitable battery, such as a 12V car battery or a pack of lithium-ion cells. Use thick cables to handle high current flow. Connect the positive terminal of the battery to one electrode wire. Attach the negative terminal to the other electrode wire. The electrodes are usually made of copper or brass for good conductivity. Ensure the wires are tightly connected to minimize resistance.
Adding A Switch
Incorporate a heavy-duty switch between the battery and one electrode wire. This switch controls the power flow to the spot welder. Choose a switch rated for high current to avoid damage. Mount the switch in a convenient place for easy operation. This addition helps to safely start and stop the welding process.
Securing Connections
Use solder or strong clamps to secure all wire connections. Loose wires cause sparks and reduce welding power. Wrap exposed connections with electrical tape or heat shrink tubing. This prevents short circuits and improves safety. Double-check each joint to confirm it is firm and clean. Well-secured wiring increases the spot welder’s durability and performance.
Testing The Welder
Testing the mini spot welder is a crucial step to ensure it works safely and effectively. This phase confirms the welder’s power, strength, and overall function. Carefully testing helps avoid damage to materials and ensures strong welds. Follow simple steps to check each part of your homemade spot welder before full use.
Initial Power Test
Start by connecting the welder to a power source. Observe any signs of power flow, such as indicator lights or sounds. Use a multimeter to check voltage at the electrodes. Ensure the power supply matches the welder’s requirements. Keep your hands clear of the electrodes during testing. This step confirms the welder receives power correctly.
Adjusting Weld Strength
Test welds on scrap metal pieces to adjust strength. Start with low power settings to avoid burning through. Increase power gradually to find the right weld depth. Watch the weld spots for proper fusion without excess heat. Adjust timing and current controls to get consistent welds. Good weld strength means strong joins without damage.
Troubleshooting Common Issues
If welds are weak or inconsistent, check electrode contact points. Clean or replace worn electrodes for better results. Check all wiring connections for tightness and proper insulation. Overheating could mean power settings are too high. If the welder does not power on, test the fuse or switch. Fixing these common issues improves welder reliability.
Using The Mini Spot Welder
Using the mini spot welder opens many possibilities for small metal projects. This tool is perfect for joining thin metal sheets quickly and cleanly. Understanding its proper use ensures strong, reliable welds every time.
Basic Spot Welding Techniques
Hold the metal pieces tightly between the welder’s electrodes. Press the trigger or switch to start the welding process. Keep the welder steady to avoid weak joints. Short pulses of current make better welds than long ones. Practice on scrap metal to get a feel for timing and pressure.
Welding Nickel Strips
Nickel strips are common in battery pack assembly. Clean the strips and the metal surface before welding. Place the strip flat and apply firm pressure with the electrodes. Use short, controlled weld pulses to avoid burning the strip. Check weld quality by gently tugging on the strip after cooling.
Maintaining The Welder
Keep the electrodes clean and free of oxidation. Use fine sandpaper or a file to remove buildup regularly. Check the wiring and connections for wear or damage. Replace worn electrodes to maintain good contact and weld quality. Store the welder in a dry place to prevent rust and corrosion.
Safety Tips
Safety is the top priority when building and using a mini spot welder. This tool uses strong electric currents that can be risky without proper care. Follow these safety tips to protect yourself and your workspace.
Handling Batteries Safely
Use only batteries designed for high current output. Avoid damaged or swollen batteries. Always check battery voltage before use. Store batteries in a cool, dry place. Never short-circuit battery terminals. Use insulated gloves when handling batteries. Dispose of old batteries properly to prevent accidents.
Preventing Burns And Electric Shock
Wear heat-resistant gloves to avoid burns. Keep your hands away from welding tips during use. Use safety glasses to protect your eyes. Make sure all wires are insulated and secure. Turn off the welder before making adjustments. Avoid touching metal parts when the welder is on. Keep a fire extinguisher nearby in case of sparks.
Proper Workspace Setup
Work in a well-ventilated area to avoid fumes. Keep the workspace clean and free of flammable materials. Use a sturdy table or workbench for stability. Ensure good lighting to see clearly. Keep tools organized to avoid accidents. Have easy access to emergency exits. Keep children and pets away from the work area.

Credit: brt.cl
Upgrading Your Spot Welder
Upgrading your mini spot welder can boost its performance and make your welding tasks easier. Simple changes can enhance precision, power, and durability. Focus on key areas like timing, electrode design, and power supply for the best results.
Adding A Timer
A timer helps control the welding duration precisely. It prevents overheating and ensures consistent welds. Use a small digital timer or a simple relay timer circuit. Set the timer for short bursts to avoid metal damage. This upgrade improves repeatability and weld quality.
Improving Electrode Design
The electrode tip shape affects weld strength and accuracy. Use copper or copper alloy for good conductivity. Sharpen the electrodes to a fine point for small weld spots. Replace worn electrodes regularly to maintain performance. Better electrodes reduce weld defects and improve contact.
Increasing Power Capacity
More power means stronger welds and faster work. Upgrade the battery or power supply to a higher current rating. Use thicker cables to handle the extra current safely. Check that your components can handle increased power. This upgrade allows welding thicker metals and larger projects.
Frequently Asked Questions
What Materials Are Needed For A Mini Spot Welder?
You need a battery, copper electrodes, thick cables, a switch, and a sturdy frame. These materials ensure efficient current flow and safe operation.
How Do I Safely Operate A Mini Spot Welder?
Always wear protective gloves and eye protection. Use the welder in a well-ventilated area and avoid touching live wires during use.
Can A Mini Spot Welder Weld Different Metals?
Yes, it works best on thin sheets of metals like nickel, steel, and stainless steel. Different metals may require adjusting the current.
How Long Does A Mini Spot Welder Take To Weld?
The welding process typically takes 1 to 3 seconds. Timing depends on metal thickness and welder power settings.
Conclusion
Building a mini spot welder at home is simple and rewarding. Use basic materials and follow clear steps carefully. This tool helps join metals quickly and efficiently. Always prioritize safety during the process. With patience, you can create a reliable welder for small projects.
Practice makes perfect—try it on scrap pieces first. Enjoy crafting and improving your DIY skills along the way.