Running a bead with MIG and seeing smoke curl off the weld while the arc crackles can feel satisfying—until the weld turns out messy and you’re left wondering what went wrong.
I hit that exact wall when I first tried MIG welding with flux core wire and shielding gas . The puddle behaved differently, the sound changed, and my usual settings suddenly didn’t work like they used to.
That’s when I realized this setup isn’t just a small variation—it’s a different game. The combination can give you deeper penetration, better outdoor performance, and stronger welds, but only if you dial it in right. Otherwise, you’ll fight spatter, porosity, and wasted wire.
If you’ve been curious about this hybrid approach or struggling to get clean results, stick with me. I’ll show you what actually works in real shop conditions—and how to set it up the right way from the start.
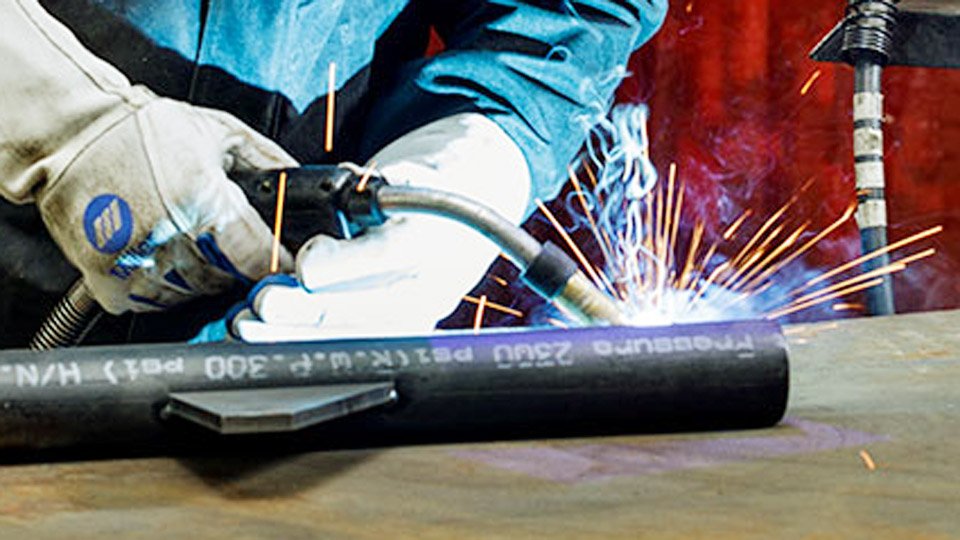
Photo millerwelds
What Is MIG Welding with Flux Core Wire and Shielding Gas All About?
MIG welding, or Gas Metal Arc Welding as the books call it, typically uses a solid wire electrode fed through a gun, protected by an external shielding gas like argon-CO2 mix.
Now, throw in flux core wire—that’s a tubular wire filled with flux compounds—and you’re in flux-cored arc welding territory. But when you pair it with shielding gas, it’s often called gas-shielded flux core or dual shield.
How does it work? The wire feeds continuously, melting into the joint while the arc generates heat. The flux inside the wire melts too, creating slag that protects the weld pool from contaminants.
The added shielding gas—usually 75% argon and 25% CO2—enhances that protection, pushing out atmospheric nasties like oxygen and nitrogen that cause porosity. This combo gives you a hotter arc than solid wire, leading to better penetration on thick stock.
I use this when I’m welding outdoors or on materials that aren’t pristine. Why? It handles wind better than pure MIG since the flux adds extra shielding, and it’s forgiving on rusty or painted surfaces.
In my shop, it’s saved me on jobs like reinforcing truck frames where prep time is limited. If you’re a student practicing on scrap, this setup teaches you about arc stability early on.
Always check your wire’s classification. Look for something like E71T-1M— the “T” means tubular (flux core), and “M” indicates it’s for mixed gas. Skip self-shielded wires if you’re running gas; they’re designed for no-gas setups and won’t perform right.
When Should You Use Flux Core with Gas Instead of Solid Wire?
Deciding between flux core with gas and standard solid wire MIG comes down to the job’s demands. Solid wire shines on clean, thin materials like sheet metal in auto body work—it’s cleaner, with less spatter and a smoother bead. But flux core with gas? That’s your go-to for heavier fabrication.
It works by combining the flux’s deoxidizers with the gas shield, allowing higher deposition rates. You can lay down more metal faster, which means fewer passes on thick joints. I remember a fabrication project for industrial racks; using flux core with gas cut my welding time by 30% compared to solid wire, with less heat input to boot, reducing warping.
Use it when you’re dealing with 1/4-inch or thicker steel, out-of-position welding like vertical ups, or when wind might blow away pure gas shielding. It’s ideal for structural work, pipeline repairs, or shipbuilding—common in US shops following AWS standards. Why? Deeper penetration means stronger welds with less chance of cracks under load.
If your project involves galvanized steel, flux core with gas handles the zinc better, minimizing burn-off issues. But test it first; I’ve burned through thin sections by not dialing back the heat. For hobbyists, it’s great for outdoor repairs without dragging a generator for perfect conditions.
How to Set Up Your Welder for This Process
Setting up isn’t rocket science, but get it wrong and you’ll fight spatter all day. Most US-made MIG machines like Lincoln or Miller can handle this— they often have flux core modes.
First, polarity: Switch to DCEP (Direct Current Electrode Positive). That’s electrode positive, ground negative. Self-shielded flux core uses DCEN, but with gas, it’s DCEP for better arc stability.
Install the wire: Open the spool compartment, load your flux core spool (0.035-inch is versatile for most jobs). Thread it through the drive rolls—use knurled rolls for flux core to grip the softer wire without crushing it. Adjust tension just enough to feed smoothly; too tight and you’ll get birdnesting.
Hook up the gas: Connect your regulator to a 75/25 argon-CO2 cylinder. Set flow to 20-25 CFH—enough for coverage without wasting gas. Check for leaks with soapy water on connections.
Power on and test: Run a short bead on scrap. Listen for a steady sizzle, not popping. If it’s erratic, tweak the drive roll tension.
From my experience, forgetting to swap to knurled rolls once led to a jammed feeder mid-job. Now, I always double-check. For students, practice setup a few times dry—no arc—to build muscle memory.
Picking the Right Flux Core Wire for the Job
Wire choice can make or break your weld. Flux core wires come in diameters like 0.030, 0.035, and 0.045 inches. Thinner for lighter work, thicker for heavy penetration.
What it is: A hollow wire packed with flux—minerals that clean the weld and form slag.
How it works: As it melts, the flux shields and deoxidizes, working with your gas for a clean pool.
When to use: Opt for E71T-1C/M for all-position welding on mild steel. “C” for CO2, “M” for mixed gas—versatile for shop use.
Why: It matches common US machines and materials like A36 steel.
Tips: Match wire to base metal strength. For rusty stock, wires with higher silicon content handle it better. I’ve used Hobart or Lincoln wires; they feed reliably. Store spools dry to avoid moisture pickup, which causes porosity.
Early on, I grabbed the wrong diameter—0.045 on thin plate—and blew holes everywhere. Lesson: Start with 0.035 for balance.
Dialing In the Perfect Settings: Amperage, Voltage, and More
Settings are where experience shines. No one-size-fits-all, but here’s a starting point based on shop trials.
For 0.035-inch wire on 1/4-inch mild steel: Voltage 24-26V, wire feed speed 300-400 IPM (inches per minute), amperage around 150-200A. Use 75/25 gas at 25 CFH.
How it works: Higher voltage flattens the bead, lower gives more penetration. Amperage ties to wire speed—faster feed means more amps.
When: Crank up for thick joints, dial down for thin to avoid burn-through.
Why: Proper settings ensure good fusion without undercut or porosity.
Practical table for quick reference:
| Material Thickness | Wire Diameter | Voltage | Wire Feed Speed (IPM) | Amperage | Gas Flow (CFH) |
|---|---|---|---|---|---|
| 1/8 inch | 0.030 inch | 22-24 | 250-350 | 120-160 | 20-25 |
| 1/4 inch | 0.035 inch | 24-26 | 300-400 | 150-200 | 20-25 |
| 3/8 inch | 0.045 inch | 26-28 | 350-450 | 180-220 | 25-30 |
| 1/2 inch+ | 0.045 inch | 27-29 | 400-500 | 200-250 | 25-30 |
Adjust based on your machine—test on scrap. I’ve fine-tuned by ear: A crisp bacon fry sound means you’re golden. Too much crackle? Lower voltage.
Prepping Your Joints to Avoid Headaches Later
Joint prep is non-negotiable. Skip it, and you’ll chase defects.
What: Cleaning and shaping the edges for optimal fusion.
How: Grind or file to remove rust, paint, oil. Bevel thick joints (over 1/4 inch) at 30 degrees for better penetration.
When: Always, but critical on contaminated metal.
Why: Flux core with gas tolerates some dirt, but clean surfaces mean stronger welds, less porosity.
Tips: Use a wire brush or angle grinder. For butt joints, leave a 1/16-inch gap for expansion. On laps, overlap 1 inch minimum.
In my shop, poor prep once caused a weld to fail on a gate hinge—embarrassing. Now, I spend extra time here. For hobbyists, invest in a good grinder; it pays off.
Step-by-Step: Laying Down a Solid Bead
Ready to weld? Here’s how I do it.
- Clamp pieces securely—movement kills consistency.
- Position comfortably; for flat, sit if possible.
- Hold gun at 10-15 degree drag angle, 3/4-inch stickout.
- Trigger on, start arc—move steadily, 1/2 inch per second.
- Weave slightly for wider beads on thick stuff.
- End by backstepping to fill craters.
- Chip slag while hot, wire brush clean.
How it works: Drag pulls the pool, using slag for support.
When: Flat or horizontal first; vertical ups need practice.
Why: Controlled motion ensures even fusion.
Tip: Watch the puddle—keep it round, not elongated. I’ve taught trainees this way, and they nail it after a few runs.
Dodging Common Mistakes That Trip Up Even Seasoned Welders
Mistakes happen, but knowing them saves grief.
Wrong polarity: DCEN instead of DCEP causes wild spatter. Fix: Check machine leads.
Excessive stickout: Over 1 inch loses gas coverage, porosity ensues. Keep it 3/4 inch.
High voltage: Worm tracks on bead surface. Drop half a volt at a time.
Poor gas flow: Too low (under 20 CFH) invites contaminants; too high wastes gas.
Not chipping slag: Traps inclusions in multi-pass.
Birdnesting: Loose tension or kinked liner. Clean feeder regularly.
I once had porosity from a leaky hose—wasted a day. Now, inspect setup daily. Pros make these too; stay vigilant.
Weighing the Pros and Cons in Your Shop
Every process has trade-offs. Here’s a balanced view.
Pros:
- Higher deposition: Lay more metal fast, great for production.
- Better on dirty/thick materials: Handles rust, deeper penetration.
- Out-of-position ease: Slag supports vertical/overhead.
- Wind resistance: Flux adds protection.
Cons:
- More spatter/slag: Extra cleanup time.
- Costlier wire: About 30% more than solid.
- Fumes: Ventilate well.
- Not ideal for thin: Can burn through easier.
Compared to solid wire MIG: Flux core excels on heavy jobs, solid on clean, precise work.
Table for clarity:
| Aspect | Flux Core with Gas | Solid Wire MIG |
|---|---|---|
| Penetration | Deeper | Shallower |
| Cleanup | More slag | Minimal |
| Cost per Pound | Higher | Lower |
| Best For | Thick, dirty | Thin, clean |
| Deposition Rate | Higher | Lower |
In my experience, the pros outweigh for structural work.
Staying Safe While Getting the Job Done
Safety isn’t optional—it’s your ticket home.
What: Protecting from arcs, fumes, heat.
How: Wear auto-darkening helmet (shade 10-13), leather gloves, flame-resistant jacket, safety glasses under helmet.
When: Every time.
Why: UV rays burn skin/eyes; fumes irritate lungs.
Tips: Ventilate—use exhaust fans. For gas, avoid wind disrupting shield. Ground properly to prevent shocks. Keep fire extinguisher handy.
I’ve seen burns from skipped gloves—don’t be that guy. For industry workers, follow OSHA guidelines.
Wrapping Up
Mastering MIG welding with flux core wire and shielding gas has transformed how I approach tough jobs, making me more efficient and reliable. Whether you’re fixing a fence or building machinery, this knowledge cuts down on failures and boosts your results. Always run a test bead on scrap matching your project—it’s the quickest way to dial in perfection and avoid costly do-overs.
FAQs
Can I Run Flux Core with Gas on Any MIG Welder?
Most can, but check if it handles flux core drive rolls and has DCEP polarity. Entry-level ones might need upgrades, but pros like Miller Multimatics switch seamlessly.
What’s the Ideal Gas Mix for This Setup?
75% argon/25% CO2 for balanced arc and penetration on mild steel. Straight CO2 is hotter, cheaper, but spattery—great for thick plates.
How Do I Fix Porosity in My Welds?
Clean metal thoroughly, check gas flow (20-25 CFH), shorten stickout to 3/4 inch, and ensure no leaks. If persists, lower voltage slightly.
Is This Process Better for Outdoor Welding?
Yes, the flux adds extra protection against wind, but still use windshields. It’s more forgiving than solid wire MIG.
What Wire Diameter Should Beginners Start With?
0.035 inch—versatile for 1/8 to 3/8 inch thick materials, feeds reliably, and forgives minor setting errors.