The torch hissed, the arc snapped on, and sparks sprayed across my gloves while I tried to slice through a chunk of steel that should’ve been an easy cut. Right then I caught myself thinking, “Do Plasma Cutters Use Gas or Compressed Air?” Because something clearly wasn’t right—the edge was rough, the tip was wearing fast, and I was burning through supplies like money didn’t matter.
That’s when I stopped guessing and started testing. Over time, I learned that the air source you choose can make or break your results, affecting cut smoothness, consumable life, and even how safe your setup is. It’s one of those small details that separates clean, pro-level cuts from frustrating rework.
If you’ve ever wondered why your plasma cutter isn’t performing like it should, stick with me. I’ll walk you through what actually works in real shop conditions—and how to get it right the first time.
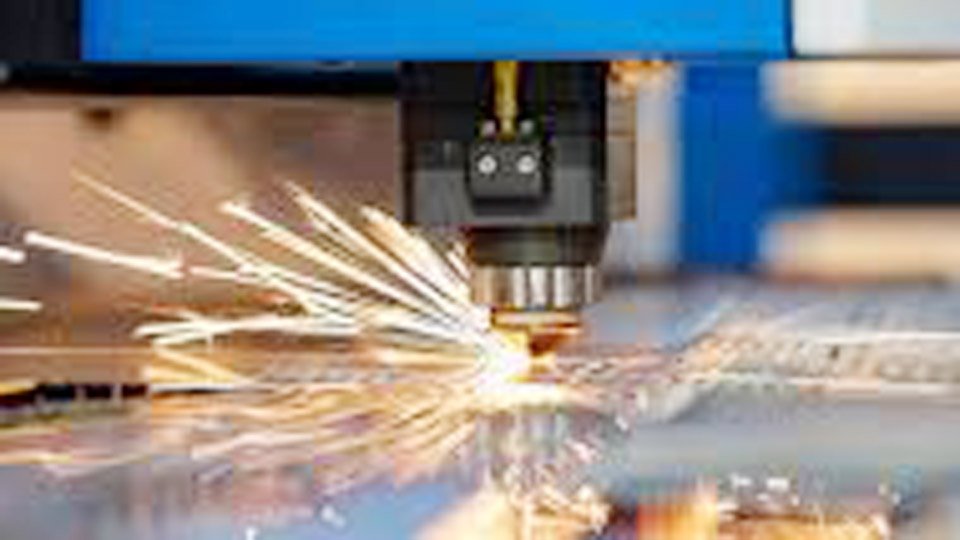
Image cyriousmetalworks
What Exactly Is a Plasma Cutter and How Does It Work?
You’re holding a torch that turns ordinary air into a superheated jet hot enough to slice through metal like butter. That’s plasma cutting in a nutshell. It’s a process where an electric arc ionizes gas—turning it into plasma, the fourth state of matter—and blows it out at high speed to melt and remove material.
Unlike welding, where you’re joining metals, here you’re severing them cleanly for fabrication, repairs, or artistic work.
How it works starts with the basics. You’ve got a power supply that generates the arc between an electrode inside the torch and the workpiece. Compressed gas flows through the nozzle, gets ionized by the arc, and exits as a plasma stream reaching temperatures up to 30,000°F.
That heat melts the metal, and the gas velocity blasts away the molten material, leaving a precise cut. In my experience, it’s way faster than grinding or sawing, especially on conductive metals like steel, aluminum, or stainless.
You’d use it when you need quick, accurate cuts without much heat distortion—think prepping joints for welding or shaping parts for a custom gate. Why? It minimizes rework. I’ve seen pros waste hours fixing warped plates from too much heat input with other methods.
Always ground your workpiece properly; a weak clamp can cause erratic arcs and poor cuts. From years on the floor, I know starting with a clean setup prevents 90% of headaches.
Do All Plasma Cutters Require Gas?
Short answer: yes, every plasma cutter needs some form of gas to function. Even those labeled “air plasma cutters” are using compressed air as the gas. It’s not like a laser cutter that runs on electricity alone; the gas is what carries the arc and clears the kerf.
In the shop, I’ve worked with everything from handheld units for DIY fixes to CNC tables for production runs. All rely on gas to create that ionized plasma jet. Without it, you’d have no way to sustain the arc or blow away the slag.
But here’s where it gets interesting— not all gases are created equal. Compressed air is the default for most entry-level and mid-range machines because it’s cheap and versatile. For heavier-duty work, you might switch to bottled gases like nitrogen or oxygen for better results on specific metals.
When do you need it? Always, but especially for thicker materials where air alone might leave too much dross. Why? Gas stabilizes the arc and improves cut quality, reducing distortion and improving safety by controlling fumes.
A lesson I learned the hard way: skipping a gas check once led to a failed arc start, delaying a whole job. Shop tip: Test your flow rate before cutting—aim for consistent pressure to avoid intermittent cuts.
Compressed Air: The Go-To Choice for Most Shops
If you’re just starting out or running a general fab shop, compressed air is your best friend. It’s what I use 80% of the time for cutting mild steel up to an inch thick. Why? It’s readily available, costs next to nothing compared to bottled gases, and delivers solid cut quality on a range of materials.
Here’s how it fits in: Hook up an air compressor to your plasma unit, set the pressure (usually 60-80 PSI), and you’re good. The air gets compressed, flows through the torch, and becomes plasma.
For DIY welders fixing farm equipment or hobbyists building brackets, it’s perfect—no need for fancy setups. In pro environments, it’s great for quick jobs where speed trumps ultra-smooth edges.
When to use it: On mild steel, stainless, or aluminum under 1/2 inch. It shines in versatile scenarios, like prepping for SMAW welding where a bit of oxidation isn’t a big deal. Pros include low cost and ease, but watch for moisture—wet air ruins consumables fast.
My tip: Install a good filter-dryer inline; I’ve extended electrode life by double doing that. Real story: On a bulkhead repair, air let me cut fast without swapping tanks, saving hours.
When Should You Use Specialty Gases Instead of Air?
Sometimes air just doesn’t cut it—literally. For thicker stainless or aluminum, or when you need mirror-like edges, switch to gases like nitrogen, oxygen, or argon-hydrogen mixes. I’ve pulled these out for precision jobs, like automotive parts where dross would mean extra grinding.
Oxygen excels on mild steel, boosting speed and cleanliness by reacting with the metal for an exothermic cut. Use it when piercing thick plates—say, over 1 inch—for faster production without much slag.
Nitrogen is my pick for stainless; it prevents oxidation, leaving weld-ready edges. Argon-hydrogen? That’s for heavy aluminum, delivering hot, stable arcs on materials up to 4 inches.
Better penetration, less distortion, and longer consumable life in specialized work. In a student shop, I’d start with air, but for industry repairs, gases reduce rework costs.
Tip: Match gas to material—oxygen on steel, nitrogen on alloys. Once swapped to nitrogen mid-job on stainless rails; cuts went from rough to smooth, impressing the client.
Pros and Cons of Using Compressed Air vs. Other Gases
Compressed air is versatile and cheap, but it can cause nitriding on edges, making welding trickier. Pros: Good for all metals, no bottle hassles, economical for hobbyists. Cons: Needs dry, clean supply; fair quality on thick stainless.
Oxygen? Pros: Fastest on steel, minimal dross. Cons: Expensive, shortens parts life, not for alloys. Nitrogen: Pros: Excellent on stainless/aluminum, long consumables. Cons: Costly, some dross on steel. Argon-hydrogen: Pros: Handles thick stuff, polished finishes. Cons: Pricey, requires safe handling.
In my shop, air wins for daily use, gases for specs. Table below compares:
| Gas Type | Best For | Pros | Cons | Typical Cost |
|---|---|---|---|---|
| Compressed Air | Mild steel, stainless, aluminum (thin) | Versatile, low cost, easy access | Potential oxidation, needs filtration | Low |
| Oxygen | Mild steel (thick) | Fast cuts, clean edges | High cost, not for alloys | Medium-High |
| Nitrogen | Stainless, aluminum | Good quality, long life | Expensive, dross on steel | Medium |
| Argon-Hydrogen | Thick stainless/aluminum | Maximum thickness, smooth finish | Very expensive, specialized | High |
Choose based on your job—air for budget, gases for quality.
Setting Up Your Plasma Cutter: Step-by-Step Guide
Getting your plasma cutter ready isn’t rocket science, but skip a step and you’ll pay for it. Here’s how I do it every time.
- Check your power: Plug into a dedicated 220V outlet for most US machines—avoid extensions to prevent voltage drops.
- Connect air or gas: For air, hook up a compressor (at least 5 CFM at 90 PSI). Use filters to keep it dry. For gases, attach regulators and set pressure per manual.
- Install consumables: Electrode, nozzle, swirl ring—new ones for best starts. Torque properly to avoid leaks.
- Ground the workpiece: Clamp directly to clean metal; paint or rust causes issues.
- Set amps and pressure: For 1/4″ steel, 40-50 amps at 60 PSI. Adjust for thickness.
- Test arc: Fire a short cut on scrap to dial in.
Why this matters: Proper setup ensures safety and efficiency. Tip: Keep spares handy; a blown nozzle mid-job is frustrating. In fabrication, this prep saves rework.
Common Mistakes That Can Ruin Your Cuts (and How to Fix Them)
I’ve made ’em all, so you don’t have to. Top mistake: Using worn consumables—they blow out and ruin arcs. Fix: Inspect after every 20 cuts; replace at signs of pitting.
Wrong torch height: Too low splatters, too high weakens cut. Fix: Use drag tips or set 1/8″ standoff.
Incorrect speed: Too fast leaves uncut spots, too slow builds dross. Fix: Practice on scrap; aim for steady sparks underneath.
Low air pressure: Causes hard starts. Fix: Check gauges, clean filters.
Piercing too low: Melts torch. Fix: Start high, then lower.
From shop floors, these fixes turned my messy cuts clean. Pro tip: Log your settings for repeat jobs.
Safety Tips Every Welder Should Know When Plasma Cutting
Safety isn’t optional—I’ve seen sparks fly and eyes burn. Always wear a helmet with shade 8-12 lens; UV rays are brutal. Gloves, long sleeves, and leather aprons protect from molten metal.
Ventilate: Fumes from cutting can be toxic, especially on galvanized steel. Use exhaust fans or respirators.
Electric shock: Keep dry, ground properly. Fire watch: Clear flammables; have an extinguisher.
Noise: Ear protection for long sessions. Tip: Stand clear of the cut path; slag flies far. In my years, following these kept me injury-free.
Material Compatibility: What Gases Work Best for Steel, Aluminum, and More
Mild steel loves oxygen for speed, but air works fine for thinner stuff. Stainless? Nitrogen prevents oxide buildup, perfect for food-grade fab.
Aluminum: Air for thin, argon-hydrogen for thick—avoids rough edges. Copper or brass: Nitrogen mixes for clean cuts.
Why match? Wrong gas leads to porosity in later welds. For multi-metal jobs, dual-gas systems save time. Switched gases on an aluminum boat repair; no more rework.
Table for amps by thickness (air plasma, mild steel):
| Thickness | Amps | PSI | Speed (IPM) |
|---|---|---|---|
| 1/8″ | 30-40 | 60 | 50-60 |
| 1/4″ | 40-50 | 65 | 30-40 |
| 1/2″ | 60-80 | 70 | 15-20 |
| 3/4″ | 80-100 | 75 | 10-15 |
Adjust for gases.
Real Shop Tips from Years on the Floor
Over two decades, I’ve learned tricks like chilling your torch post-cut to extend life. For curved cuts, use templates—saves measuring time.
Joint prep: Bevel edges slightly for better welds. Material handling: Clamp securely to avoid vibration. Common fix: If dross builds, slow down or up amps.
Story: On a rush fence job, dry air filters prevented moisture issues, finishing early. These keep your shop humming.
Wrapping Up
Nailing your gas choice transforms frustrating cuts into smooth operations. You’ve got the tools now to pick air for everyday wins or gases for tough challenges, cutting down on waste and boosting your efficiency.
Whether you’re a student dialing in your first arc or a pro tackling heavy fab, this knowledge equips you to handle real-world demands without the guesswork. Always purge your lines before starting— it clears contaminants and gives you that reliable arc every time.
FAQs
Can I Use a Plasma Cutter Without Any Gas?
No, you’ll need gas or air to create the plasma. Skipping it means no arc, no cut. Start with compressed air for simplicity.
What’s the Best Gas for Cutting Thick Aluminum?
Argon-hydrogen mix for thicknesses over 1/2 inch. It provides the heat and stability air can’t match, leaving clean edges ready for welding.
How Do I Know If My Air Pressure Is Wrong?
If arcs are weak or cuts have excessive dross, check your PSI—too low causes starts issues, too high wears consumables fast. Aim for manual specs.
Why Are My Cuts Leaving Too Much Slag?
Often from wrong speed or height. Slow down for thicker metal, or clean your nozzle. Test on scrap to fine-tune.
Is Compressed Air Safe for All Materials?
It’s versatile but can oxidize stainless edges. For critical welds, switch to nitrogen to avoid porosity problems.