Are you looking for a powerful spot welder without spending a fortune? What if you could turn an old microwave transformer into a reliable tool for your welding projects?
Making a spot welder from a microwave transformer is not only budget-friendly but also a smart way to recycle parts you might already have. In this guide, you’ll discover simple, step-by-step instructions that anyone can follow—even if you’re new to welding or electronics.
Keep reading, and you’ll learn how to create your own spot welder that’s perfect for small metalwork, battery pack repairs, and more. Ready to transform a common household item into a handy workshop tool? Let’s get started!
Credit: endless-sphere.com
Materials And Tools Needed
Gathering the right materials and tools is the first step to build a spot welder from a microwave transformer. Using proper items ensures your project works well and stays safe. This section covers the key components, tools, and safety gear needed for the build.
Selecting A Microwave Transformer
Choose a microwave transformer that is still in good condition. Older models may have rust or damage, so inspect carefully. A transformer with a high current rating works best for spot welding tasks. Remove any unnecessary wiring or parts before starting the conversion.
Essential Tools For The Build
Basic tools include a screwdriver, wire cutters, and pliers. A soldering iron helps with secure electrical connections. You will need a drill to make holes for mounting parts. Thick copper wire is necessary for winding the transformer coils. A multimeter is useful to check electrical continuity and resistance.
Safety Gear And Precautions
Wear safety goggles to protect your eyes from sparks and debris. Heavy-duty gloves guard your hands from heat and sharp edges. Use a mask to avoid inhaling dust or fumes. Work in a well-ventilated area to reduce inhalation risks. Always unplug the microwave transformer before handling it to prevent electrical shock.
Preparing The Transformer
Preparing the transformer is the most important step in making a spot welder. The transformer from a microwave is powerful but needs changes. These changes help it deliver the high current needed for welding. Careful work on the transformer ensures safety and efficiency.
Removing The Secondary Coil
Start by removing the original secondary coil. This coil has many thin wires that carry high voltage but low current. Use a sharp tool to cut and unwind these wires carefully. Removing the coil exposes the core and lets you add new thick wire.
Inspecting And Cleaning The Core
Check the core for any damage or rust. A clean core improves the magnetic flow and welding performance. Use a brush or cloth to remove dirt and rust. Make sure the core is smooth and free from any debris before rewinding.
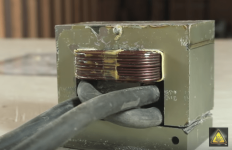
Rewinding With Thick Copper Wire
Choose thick copper wire, usually 8 to 10 gauge, for the new secondary coil. Wrap the wire tightly and evenly around the core. Only two or three turns are needed for high current output. Secure the wire ends well to avoid loose connections. This new coil will deliver the strong current needed for spot welding.
Assembling The Spot Welder
Assembling the spot welder is a critical step in transforming a microwave transformer into a reliable tool. This process involves securely mounting the transformer, attaching the welding electrodes, and correctly connecting the power supply. Each task requires attention to detail to ensure safety and efficiency.
Mounting The Transformer
Begin by selecting a sturdy base to hold the transformer firmly. Use bolts or strong clamps to secure the transformer. Make sure it does not move or vibrate during operation. Position it so the welding area is easy to access. Keep the transformer away from flammable materials. Proper mounting prevents accidents and improves the welder’s performance.
Installing Welding Electrodes
Choose copper or brass rods for electrodes. Cut them to a length that fits comfortably in your hands. Attach the electrodes to the transformer’s secondary terminals. Use strong screws or bolts to hold them in place tightly. Ensure the electrodes align properly to meet at the welding spot. Check for good electrical contact and no loose parts. Proper electrode installation is key to creating strong welds.
Connecting The Power Supply
Use thick, insulated wires for the power connections. Connect the primary winding of the transformer to a suitable power source. Install a switch or foot pedal to control the power flow. Add a fuse or circuit breaker for safety. Double-check all connections for tightness and correct polarity. Proper wiring prevents electrical hazards and ensures smooth operation.
Wiring And Electrical Setup
The wiring and electrical setup is a key part of building a spot welder from a microwave transformer. Correct wiring ensures the device works safely and efficiently. This section covers adding control features and safety measures to the electrical system. Follow these steps carefully for best results.
Adding A Foot Pedal Or Switch
Use a heavy-duty switch or foot pedal to control power flow. This allows hands-free operation and better control. Connect the switch to the transformer’s primary circuit. Make sure the switch can handle high current without damage. A foot pedal with a spring return works well. Test the switch before use to avoid sparks or shorts.
Implementing A Timer Circuit
A timer circuit controls how long the welder is active. It helps avoid overheating and saves power. Use a simple relay timer or an adjustable electronic timer. Connect the timer between the power source and the switch. Set the timing to a short pulse, usually under one second. This setup gives precise spot welds and protects the transformer.
Ensuring Proper Grounding
Grounding is vital for safety and proper operation. Connect the metal parts of the welder to a good earth ground. Use a thick copper wire or grounding rod. This prevents electric shock and reduces noise in the circuit. Check all connections for tightness and corrosion. Proper grounding also helps protect your tools and workshop equipment.
Testing And Calibration
Testing and calibration are key steps after building your spot welder from a microwave transformer. They ensure the tool works safely and performs well. Proper testing avoids damage to the device and materials.
Careful calibration helps set the right power and timing for strong, clean welds. Testing gives you confidence before using the spot welder on actual projects.
Initial Power-on Checks
Start by inspecting all connections and wiring. Make sure everything is tight and insulated. Plug in the device and switch it on briefly. Listen for unusual sounds or smells. Use a multimeter to check voltage output. Confirm the transformer does not overheat quickly. Turn off the power if you detect any issues.
Adjusting Weld Time And Current
Set the weld timer to a low value first. Gradually increase the time to control heat and penetration. Adjust the current by changing the transformer taps or wire thickness. Observe how each change affects the weld quality. Aim for short, strong welds without burning the metal.
Performing Sample Welds
Use scrap metal pieces similar to your final work. Press the electrodes firmly on the metal sheets. Activate the welder for the set time. Inspect the weld for strength and appearance. Repeat with different settings to find the best combination. Record your results for future reference.

Credit: www.youtube.com
Common Issues And Fixes
Building a spot welder from a microwave transformer is a cost-effective way to get powerful welding results. However, some common problems may arise during use. Understanding these issues helps keep your welder working well and safe. The following sections cover frequent troubles and how to fix them.
Overheating Transformer
The transformer can get very hot during welding. This happens if it runs too long without breaks. Overheating can damage the transformer’s insulation and shorten its life.
Fix this by welding in short bursts. Allow the transformer to cool between uses. Adding a cooling fan or heat sink can also help reduce heat buildup. Make sure the transformer is mounted where air flows freely.
Weak Welds And Solutions
Weak welds often result from too little current or poor contact between electrodes and metal. This makes the welds unreliable and weak.
Check that the electrodes are clean and properly aligned. Use thick copper wire for the transformer winding to increase current. Increase the number of winding turns carefully to improve power output. Make sure the metal surfaces are clean and free of rust or paint before welding.
Electrical Safety Concerns
Spot welders use high current, creating risks of electric shock and burns. Proper safety precautions are essential.
Always insulate exposed wires and connections. Use a fuse or circuit breaker to prevent overload. Wear insulated gloves and eye protection. Keep the welder on a non-flammable surface and away from water. Check all wiring regularly for damage or loose connections.
Tips For Effective Spot Welding
Effective spot welding depends on several key factors. Paying attention to these details improves weld quality and durability. Simple adjustments make a big difference in results.
Choosing The Right Materials
Select metals that weld well together. Thin sheets of steel or nickel-plated steel work best. Avoid thick or coated metals as they need more power. Use clean, rust-free metal for strong welds. Dirty or oily surfaces reduce weld strength.
Proper Electrode Maintenance
Keep electrodes smooth and clean. Worn or pitted tips cause poor contact and weak welds. Use a file or sandpaper to shape them regularly. Replace electrodes if they become too small or damaged. Good electrode condition ensures steady current flow and consistent welds.
Optimizing Weld Pressure
Apply firm, even pressure during welding. Too little pressure causes weak joints or no weld. Too much pressure can damage metal or electrodes. Adjust the force to hold metal sheets tightly together. Proper pressure helps current pass efficiently, creating strong weld spots.

Credit: www.youtube.com
Advanced Upgrades
Advanced upgrades can turn a basic spot welder into a more precise and reliable tool. These improvements add control, feedback, and durability. They also help you work with different materials and projects.
Adding An Oled Display
An OLED display shows real-time data during welding. It can display current, voltage, and welding time. This helps you monitor and adjust settings easily. OLED screens use less power and have clear visibility. You can mount the display on the control panel for quick viewing.
Incorporating Microcontroller Controls
A microcontroller lets you program welding parameters. It can control current flow and welding duration automatically. This makes the welds more consistent. You can add buttons or knobs to change settings quickly. Microcontrollers also allow for safety features like automatic shutoff.
Enhancing Cooling Systems
Strong cooling systems keep the transformer and components safe. Adding fans or water cooling can prevent overheating. Proper cooling extends the lifespan of your spot welder. It also allows longer welding sessions without damage. Place fans near hot parts or build a water jacket around the transformer.
Applications Of Diy Spot Welder
A DIY spot welder made from a microwave transformer serves many practical uses. It provides a low-cost, effective way to join metal parts. This welder is ideal for small tasks requiring precise, strong connections. It operates by delivering a quick burst of high current to the metal pieces. The result is a neat, durable weld spot. Below are some common applications that benefit from such a tool.
Battery Pack Assembly
DIY spot welders are perfect for battery pack assembly. They join thin metal strips to battery cells securely. This method avoids heat damage to batteries. It ensures a strong electrical connection. Many hobbyists use it for building lithium-ion packs. The spot welder makes the job faster and safer.
Metal Sheet Joining
Joining metal sheets is easier with a spot welder. It creates small weld spots that hold sheets firmly. This technique is common in metalworking and repairs. The welder prevents warping by limiting heat spread. It works well for steel, stainless steel, and other metals. Spot welding is clean and leaves minimal marks.
Small Repair Projects
Spot welders help with small repair jobs around the home or workshop. Fixing tools, metal frames, or appliances becomes simple. The welder quickly fuses broken or loose parts. It saves money by avoiding full replacements. Users appreciate the control and precision of spot welding. It is a practical choice for DIY repairs.
Frequently Asked Questions
What Materials Are Needed To Build A Spot Welder?
You need a microwave transformer, thick copper wire, welding tips, a power switch, and safety gear. These materials ensure a functional and safe spot welder.
How Do You Modify A Microwave Transformer For Welding?
Remove the secondary winding and rewind with thick copper wire. This lowers voltage and increases current for effective spot welding.
Is It Safe To Make A Spot Welder From A Microwave Transformer?
Yes, if you follow safety precautions like insulating wires and using protective gear. Proper handling of high current is crucial to avoid accidents.
What Metals Can Be Spot Welded With This Diy Welder?
Primarily thin sheets of steel and nickel-plated metals can be spot welded. Thicker or non-ferrous metals may require specialized equipment.
Conclusion
Building a spot welder from a microwave transformer saves money and reuses old parts. The process is simple with basic tools and careful steps. This project helps you learn about electricity and welding safely. Always follow safety rules to avoid accidents.
Experimenting with your own spot welder can improve your skills and confidence. Keep practicing and enjoy making strong metal joints at home.