Are you struggling with removing stubborn auto body spot welds without damaging your car’s metal? Whether you’re repairing a panel or replacing parts, getting rid of spot welds can feel like a tricky and frustrating task.
But it doesn’t have to be that way. With the right techniques and tools, you can remove these welds cleanly and efficiently, saving time and effort on your project. Keep reading, and you’ll discover simple, step-by-step methods that anyone can follow to make spot weld removal easier than you ever thought possible.
Your next auto body repair just got a whole lot smoother!
Tools Needed
Removing auto body spot welds needs the right tools. Each tool plays a role in making the job easier and safer. Prepare all tools before starting to avoid delays and errors. Using proper tools helps protect the metal and ensures clean removal of spot welds.
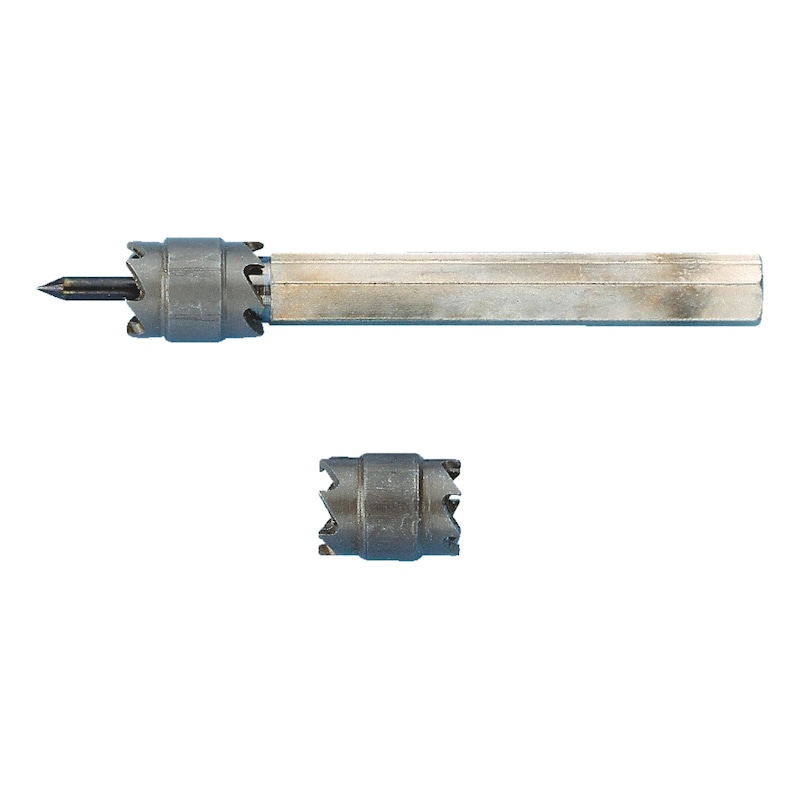
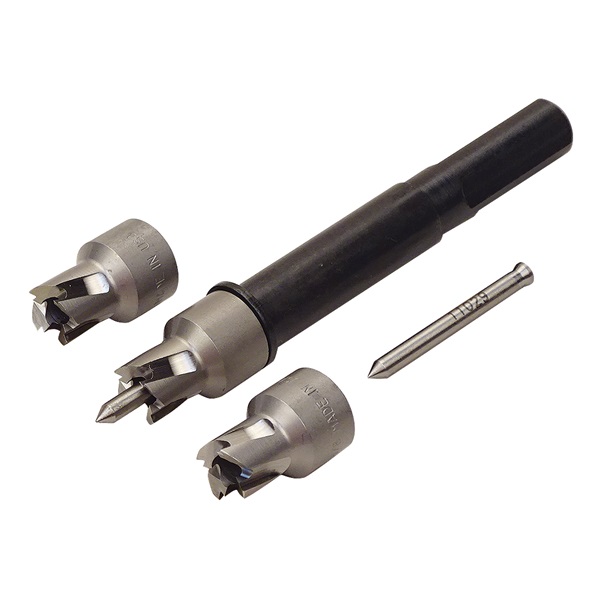
Spot Weld Drill Bits
Spot weld drill bits are designed to cut through welds precisely. These bits are usually made from cobalt or high-speed steel for strength. They drill out the weld without damaging the surrounding metal. Use the correct size bit for your specific spot welds. Replace worn drill bits to keep cutting smooth and fast.
Angle Grinder Discs
Angle grinder discs remove excess weld material and smooth rough edges. Choose grinding discs made for metal to handle tough steel surfaces. Thin discs work best for detailed grinding near welds. Use discs carefully to avoid cutting too deep or damaging the panel. Always check the disc condition before use.
Metal Punch And Hammer
A metal punch and hammer help separate panels after drilling out welds. The punch directs force precisely to break the weld’s grip. Use a hammer with controlled strikes to avoid bending the metal. This tool set is simple but effective for loosening panels without damage. Keep the punch tip sharp for best results.
Safety Equipment
Safety gear protects you from metal shards and sparks during welding removal. Wear safety glasses or a face shield to protect your eyes. Use gloves to guard your hands from sharp edges and heat. Ear protection reduces noise from drills and grinders. Work in a well-ventilated area to avoid inhaling dust and fumes.
Credit: www.youtube.com
Preparing The Work Area
Preparing the work area is the first step to removing auto body spot welds safely and effectively. A clean, well-lit, and organized space helps you work faster and avoid mistakes. Taking time to set up makes the removal process smoother and protects your tools and materials.
Clean The Surface
Start by wiping down the area around the spot welds. Use a degreaser or rubbing alcohol to remove dirt, grease, and rust. A clean surface helps you see the welds clearly. It also prevents debris from damaging your tools or the metal.
Remove loose paint or rust with a wire brush or sandpaper. This step reveals the exact location of each weld. It also ensures better contact if you use any grinding or cutting tools.
Marking Spot Welds
Use a permanent marker or chalk to outline each spot weld. Marking helps you keep track of welds you need to remove. It also reduces the chance of missing any spots.
Draw clear circles or dots directly on the metal. This visual guide saves time and improves accuracy. It is especially useful when working in tight spaces or on complex panels.
Setting Up Proper Lighting
Good lighting is essential for spotting welds and working safely. Position a bright, adjustable work light near the area. Use LED lights for clear, white illumination without heat.
Make sure the light source does not create shadows or glare. Move the light as you work to keep the welds visible. Proper lighting reduces eye strain and helps you spot imperfections early.
Drilling Out Spot Welds
Drilling out spot welds is a key step in removing auto body panels. This method helps separate welded sheets without harming the metal underneath. It requires patience, the right tools, and careful technique to avoid mistakes. Below are essential tips for drilling out spot welds safely and effectively.
Creating A Center Dimple
Start by making a small dimple in the center of the spot weld. Use a center punch or a sharp tool for this. The dimple keeps the drill bit from slipping during drilling. It ensures the hole stays in the right place. Take your time to create a clear, well-defined dimple.
Choosing The Right Drill Bit Size
Select a drill bit slightly smaller than the spot weld’s diameter. Usually, a 3/8-inch bit works for most spot welds. Using the right size prevents cutting too much metal. It also helps in cleanly breaking the weld. Make sure the drill bit is sharp and made of high-speed steel or cobalt for better durability.
Drilling Technique Tips
Hold the drill perpendicular to the panel surface. Apply steady, moderate pressure without pushing too hard. Let the drill bit do the cutting. Use a slow to medium speed to avoid overheating the metal. Stop drilling once you break through the weld. Clean the area before trying to separate the panels to avoid damage.
Credit: bucketofbloodsaloon.com
Using An Angle Grinder
Using an angle grinder is a practical way to remove auto body spot welds. This tool allows you to grind away the welded spots quickly. It requires careful handling to ensure the base metal stays intact. Understanding the right techniques and tools can make this job easier and safer.
Selecting The Correct Grinding Disc
Choose a grinding disc designed for metal work. A 4.5-inch or 5-inch disc works well for most spot welds. Use a disc made from aluminum oxide or zirconia alumina for durability. Avoid using discs meant for stone or concrete. These discs wear out quickly on metal and may damage the surface.
Grinding Spot Welds Safely
Wear protective gear such as gloves, goggles, and a dust mask. Keep a firm grip on the angle grinder at all times. Start grinding at low speed to control the tool better. Move the grinder steadily across the weld to avoid gouging. Let the disc do the work without applying too much pressure. Stop often to check your progress and keep the area clean.
Avoiding Damage To Base Metal
Keep the grinding disc flat against the weld to prevent cutting into the metal. Do not grind too deep; the goal is to remove the weld, not the sheet metal. Use light passes and check the metal thickness regularly. If the base metal gets too hot, pause to let it cool. Overheating can weaken the metal and cause warping.
Removing Welded Panels
Removing welded panels is a key step in auto body repair. It requires care to avoid damage to the metal pieces. Proper tools and techniques make the process smooth and safe. This section covers how to separate metal pieces, handle hardened steel areas, and clean up after removal.
Separating The Metal Pieces
Start by locating the spot welds joining the panels. Use a spot weld cutter or drill bit sized for the weld diameter. Slowly drill through the welds, taking care not to drill too deep. Light taps with a hammer or gentle prying can help separate the metal once welds are drilled out. Work evenly to avoid warping the panel edges.
Handling Hardened Steel Areas
Spot welds create hardened zones that resist cutting. Use cobalt or high-speed steel drill bits for these areas. A spot weld cutter bit is ideal to reduce wear on your tools. Keep drill speed moderate and apply steady pressure. Cooling the bit with water or oil can extend its life and prevent overheating.
Cleaning Up After Removal
After separating panels, remove any leftover weld material. Use an angle grinder with an abrasive grinding wheel suited for steel. Grind gently to smooth rough edges and prepare surfaces for new welds. Clean metal surfaces with a wire brush or sandpaper to remove rust and debris before reassembly.
Finishing Touches
After removing auto body spot welds, the finishing touches make all the difference. These steps ensure the metal surface looks smooth and ready for the next phase. Proper finishing helps avoid future problems and improves the final appearance.
Every detail matters to get a clean, professional result. Focus on smoothing, inspecting, and prepping carefully to maintain the car’s structure and aesthetics.
Smoothing Weld Spots
Use a grinding disc or sanding tool to smooth weld spots gently. Move the tool evenly across the surface to avoid gouges. The goal is to create a flat, clean area where the weld once was. Take care not to remove too much metal, as this weakens the panel. Finish with finer grit sandpaper for a polished look.
Inspecting For Metal Damage
Check the metal thoroughly after smoothing the weld spots. Look for cracks, holes, or thin areas that may need repair. Tap the metal lightly and listen for hollow sounds that show weak spots. Use a flashlight to spot any imperfections you might miss. Repair damaged areas before moving forward to maintain strength and safety.
Prepping For New Welds Or Paint
Clean the surface with a degreaser to remove dust and oils. Mask off surrounding areas to protect from sparks or paint overspray. Apply a rust inhibitor if the metal is bare. Make sure the surface is dry and free of debris before welding or painting. Proper prep ensures strong welds and a smooth paint finish that lasts.
Tips For Clean Results
Achieving clean results when removing auto body spot welds takes care and the right approach. The goal is to separate the welded metal without causing damage. Using proper tools and techniques helps keep the work neat and efficient.
Following key tips ensures smooth removal, preserves surrounding metal, and speeds up the process. This section covers three important practices to focus on for the best outcome.
Using High-speed Or Cobalt Bits
High-speed steel (HSS) or cobalt drill bits work best for spot weld removal. They cut through hardened metal quickly and cleanly. These bits stay sharper longer than standard bits.
Use a bit size slightly larger than the weld diameter. This prevents extra damage to the base metal. Choose cobalt bits if you expect heavy use or tougher steel.
Working Slowly And Carefully
Take your time during drilling. Press gently and avoid forcing the bit. Slow, steady pressure reduces the risk of slipping or creating holes.
Stop often to check progress. Remove metal shavings and cool the bit if needed. This careful approach keeps the surrounding metal intact.
Maintaining Tool Sharpness
Dull tools cause rough cuts and increase the chance of mistakes. Keep your drill bits sharp by regularly sharpening or replacing them. Clean bits cut cleaner and reduce heat buildup.
Inspect bits before each use. Sharp tools save time and protect your work from unnecessary damage.
Common Mistakes To Avoid
Removing auto body spot welds requires care and precision. Many beginners make mistakes that can damage the metal or waste time. Avoiding common errors leads to better results and safer work. Here are some mistakes to watch out for.
Drilling Too Deep
Drilling too deep can break through the metal panel. This damages the base metal and creates weak spots. Always stop drilling as soon as the weld is removed. Use a drill bit with the right length for the job. Check progress often to avoid going too far.
Applying Excessive Pressure
Pressing too hard while drilling can cause the bit to slip or break. It also heats up the metal, which may warp or weaken it. Let the drill do the work with steady, light pressure. Keep the drill speed moderate for cleaner cuts and longer bit life.
Skipping Safety Precautions
Ignoring safety steps leads to injuries and accidents. Always wear safety glasses to protect your eyes from metal shards. Use gloves to avoid cuts and burns. Work in a well-ventilated area to reduce dust and fumes. Follow all safety instructions for your tools.
Credit: www.tptools.com
Frequently Asked Questions
What Is The Easiest Way To Remove Spot Welds?
Use a spot weld cutter or high-speed steel drill bit to carefully drill through the weld. This method prevents metal damage.
What Is The Best Tool For Removing Welds?
The best tool for removing welds is a spot weld cutter or a high-speed steel drill bit. Angle grinders with abrasive discs also effectively remove excess weld material.
What Size Drill Bit To Drill Out Spot Welds?
Use a 3/8-inch (9. 5mm) drill bit to drill out spot welds cleanly and efficiently. Choose cobalt or high-speed steel bits for durability.
How To Remove Welding Spots?
Use a spot weld drill bit or cobalt high-speed steel bit to drill through the weld. Create a small divot first for accuracy. Alternatively, use an angle grinder with an abrasive disc to grind down weld spots cleanly. Always protect the underlying metal during removal.
Conclusion
Removing auto body spot welds takes patience and the right tools. Always work carefully to avoid damaging metal surfaces. Use proper drill bits or cutters designed for spot welds. Take your time and follow safety steps closely. With practice, this task becomes easier and more precise.
Keep your workspace clean and organized for best results. Spot weld removal is key to quality auto body repair and restoration. Stay focused, and you’ll handle it well every time.